ARKNIGHTS: ENDFIELD AREA DEFENSE GUIDE
Table of Contents
Area Defense is the tower-defense layer underneath Endfield's outpost economy, and once you understand how it actually shapes income, ignoring it stops being an option. Every time the Early Warning Terminal flags an incoming wave at one of your outposts, you have a choice: deploy operators and fight on the ground, or let the turrets carry it on Auto-Defense. The catch is that only Auto-Defense pays the long-term dividend — each clear permanently increases that outpost's Stock Bill Bonus Earning Chance, and the higher the Risk Level you clear, the bigger that compounding payout becomes.
This guide walks the entire system from the first quest unlock at Refugee Camp through the maximum Risk 4 builds at Sky King Flats. Every number, build composition, and quote you see is sourced from in-game testing and verified Reddit posts from the r/Endfield community, with author attribution preserved so you can pull up the original screenshots. The aim is to give you a single page that answers both the simple beginner questions ("how do I even unlock this?") and the late-game Wuling questions ("why does my boss-stomp keep wiping my cluster?").
You will find detailed sections on the eleven turret types, the eight verified community builds across Refugee Camp, Infra Station, and Sky King Flats, and the Xiranite power quirks that make Wuling defenses behave differently from Valley IV. Where it helps, the prose links inline to related outpost, factory, combat, and Stock Bill guides, since defense pulls from each of those systems.
What this guide does not cover: the early-game story beats around Valley Reboot, individual operator builds, and the Wuling main mission walkthrough — those have their own pages in the beginner guide and operator hub. Defense is the focus here, end-to-end.
Quick Answer
Area Defense unlocks at Refugee Camp once you reach Prosperity Level 2 and complete the OD Project: Refugee Camp I quest, the Fort Showdown tutorial, and the Defense Construction side quest. From there the Early Warning Terminal at each outpost flags incoming enemy invasion routes, and you place AIC combat facilities around the perimeter to intercept them before they reach the Command Core, which sits under a blue map icon and grants an Overclock buff to nearby turrets during active defense.
Every incursion offers two modes: Operator Intervention (you fight alongside turrets) and Auto-Defense (turrets only, unlocked after a manual Risk Level clear and permanently raises Stock Bill Bonus Earning Chance). There are eleven turret types — eight damage (Gun, Heavy Gun, Grenade, HE Grenade, Sentry, Surge, Beam, Marsh Gas) and three utility (LN, Sonic, Medical) — and every turret needs power from Electric Pylons connected through Relay Towers, so build the power chain before placing combat facilities. Wuling's Sky King Flats outpost unlocks at Authority Level 43, uses auto-connecting Xiranite power instead of manual wiring, and adds Marsh Gas Mk I as its signature slow utility alongside Wuling-tier damage turrets like the Hyper Beam Tower.
What Area Defense Actually Is
Area Defense is Endfield's tower-defense system, and it triggers on a per-outpost basis whenever the Early Warning Terminal detects incoming enemies. The Terminal sits at every outpost and rotates to face new threats — when it lights up, you have time to inspect the predicted enemy invasion routes before the wave actually arrives. The goal of every defense is to keep the Command Core intact: that is the blue-icon facility at the centre of the outpost, and if enemies destroy it the defense fails outright.
During an active defense, the Command Core does more than just sit there as an objective. It projects an Overclock buff to all nearby combat facilities, significantly raising their attack power for the duration of the wave. This is the single biggest reason layouts cluster their strongest damage turrets near the core: every turret inside the Overclock radius gets a free DPS multiplier that turrets at the perimeter do not. The trade-off is that pure clustering invites boss AOE stuns at higher Risk Levels, which the strategy section below covers in depth.
Once every incoming threat detected by the Early Warning Terminal has been neutralised, the outpost enters Peace Mode. In Peace Mode no further defenses trigger until the Terminal picks up a new threat, which gives you a window to rebuild, swap turrets, or focus on factory expansion without interruption. The pattern is wave-of-attacks then quiet then more attacks, not a constant siege, so you do not need to garrison turrets for every minute of play.
How To Unlock Area Defense
Area Defense unlocks through a fixed quest chain at the Refugee Camp, your first outpost in Valley Pass. The chain has five gates and you cannot skip any of them. First, you unlock Refugee Camp itself by completing the Valley Reboot main mission and the Building an Outpost exploration quest. Then you trade at the outpost until Prosperity hits Level 2 — that level gate is the slowest piece for most players, because Prosperity EXP scales with the value of items you trade in. Raw materials like Buckflower contribute almost nothing per trade; processed goods like Buck Capsule B contribute far more, so setting up a basic factory production line early dramatically shortens the wait.
Once Refugee Camp hits Prosperity 2, the OD Project: Refugee Camp I quest becomes available — completing it queues up the next two missions. Fort Showdown is the tutorial defense that teaches the basics of turret placement and the Early Warning Terminal interface; it also awards 300 Operational EXP on completion. Right after that, the Defense Construction side quest finalises the Early Warning Terminal setup at your outpost and gives you the ability to manually launch incursions at any Risk Level you have unlocked. From that point on, you can place turrets, run defenses, and start chasing Auto-Defense clears for the Stock Bill bonus.
Operator Intervention vs Auto-Defense
Every Imminent Incursion offers two modes you launch from the Early Warning Terminal, and they reward fundamentally different things. Operator Intervention lets you deploy onto the battlefield alongside your turrets, fighting enemies directly while your combat facilities provide support fire. This is the standard mode for an initial clear, because it lets you patch leaks with combat skills and lean on Medical Towers for in-fight healing — your turrets do not need to be perfect, because you are personally backstopping them.
Auto-Defense is the strict version: turrets handle everything, you cannot enter the battlefield, and there are no emergency patches if a lane collapses. The reward is the permanent Stock Bill Bonus Earning Chance bump, which compounds over time and is the entire reason to bother clearing higher Risk Levels at all. Auto-Defense only unlocks after you clear that Risk Level in Operator Intervention first, so the loop is: brute-force the manual clear with your operators carrying the slack, then re-run on Auto to lock in the permanent bonus.
Each outpost has multiple Risk Levels with increasing difficulty, and you select the Risk Level at the Terminal before launching. Higher Risk Levels feature stronger enemies and more complex wave compositions, and some Risk Levels change the enemy pathing compared to lower tiers — so even if your Risk 2 layout is perfect, the Risk 3 paths may not feed through the same kill zone. Each Auto-Defense clear at a higher Risk Level further improves the Stock Bill Bonus Earning Chance, so you have a direct economic incentive to push up the difficulty ladder rather than parking at the lowest clear.
Valley IV Risk Level Breakdown
The four Risk Levels at Valley IV outposts each test a different defense skill, and community testing on r/Endfield has produced consistent recommendations for what makes each one tick. The table below summarises what to expect at every tier — pay particular attention to the tower limit, because that is the hard ceiling on how complex your layout can be regardless of how clever the build is. Source: Risk 2 community discussion.
| Risk Level | Tower Limit | Key Enemies | Main Challenge |
|---|---|---|---|
| Risk 1 | 4 | Basic mobs, standard beasts | Tutorial-style, single path |
| Risk 2 | 4 | Fast-moving enemies | Speed management, enemies slip through |
| Risk 3 | 8–11 | Teleport mages, healing slugs | Multi-path pressure, wave timing |
| Risk 4 | Max | Bosses with AOE stun | Positioning critical, spacing required |
Risk 1 is your first real defense after the tutorial and it exists to teach pathing. Enemies follow a single primary path with basic enemy types only, so almost any placement of two to three towers will clear it. Use this run to learn coverage and how the Command Core's Overclock radius actually looks in practice — that knowledge pays off on every subsequent tier.
Risk 2 is the first real difficulty spike, and the wall everyone hits is speed. Fast enemies will slip past slow-firing towers like Sentries, and clumping turrets without spread makes them unable to deal with groups quickly enough. The verified successful build from u/DreamzKira pairs a Grenade Tower for AoE coverage, two Heavy Gun Towers for sustained DPS, and an LN Tower for slow control — that combination cleared Risk 2 Auto-Defense with 40 HP remaining. In u/DreamzKira's own words, "I'm trying risk 2 auto defense and the dudes are way too fast, I can't slow them enough or damage them fast enough, they always slip through" — the LN Tower is what finally fixed it. The general rule is to find the middle ground between clumping and spread; overlapping fields of fire matter more than raw coverage at this tier.
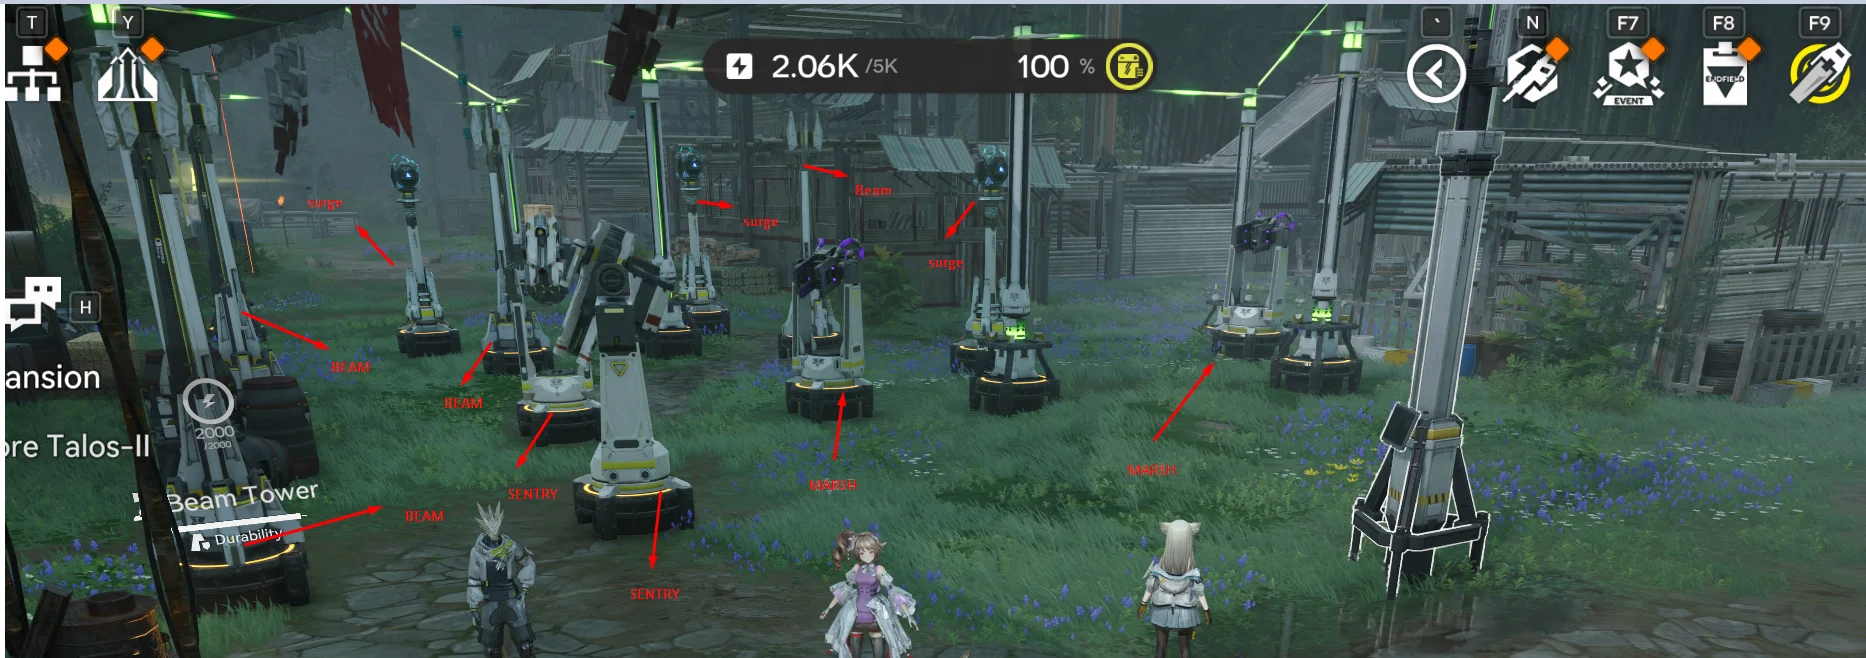
Risk 3 introduces multi-path pressure: enemies attack from multiple directions simultaneously, teleport mages bypass frontline defenses, and healing slugs reduce damage taken. The proven Infra-Station Risk 3 build from u/VillianceTheReal uses 8 Surge Towers and 3 Beam Towers and only leaks a single Teleport Mage on a clean run — "you need 8 surge towers and 3 beam towers... To be honest 1 Teleport Mage Guy got through but other than that it worked perfectly." The community caveat from u/SnowDropWhiteWolf is real: Sentry Towers at 11.6k ATK still need "like 10 shots or more to kill the big beast" and Surge Tower's 4k damage is "laughable even to the normal bugs" — the trick is that Surge Towers chain across grouped enemies, so the total throughput beats the per-shot number. Facility limits at this tier are 8–11 and you may need two or three attempts even with a good layout due to RNG factors. Source: u/VillianceTheReal.
Risk 4 is the endgame: maximum pressure with bosses that have AOE stomp attacks capable of stunning multiple turrets simultaneously. Tower spacing becomes critical — spread them out, and specifically keep ONE Surge Tower in the middle portion away from the main cluster so that boss stomps cannot disable everything in one hit. u/VillianceTheReal sums it up: "Was pretty simple, just be sure to have one surge tower in the middle portion a bit away from the others so the stomp of the big guy doesn't stun all your towers." u/ArtificalSUN's Risk 4 guide includes visual screenshots and confirms the same approach, and for lower Risk Levels you can use the same layout but remove Surge and Sentry towers evenly. Source: u/VillianceTheReal, u/ArtificalSUN.
Two general rules cut across every Risk Level. First, always check the Early Warning Terminal before each defense, because paths change between Risk Levels and a layout that worked at Risk 2 may funnel enemies past the kill zone at Risk 3. Second, raise your Regional Development Level (RDL) before pushing the next tier — RDL gates your facility limit, and if you cannot place enough turrets, no amount of clever positioning will save you. Surge Towers and Beam Towers are non-negotiable from Risk 3 upward: Surge for chain damage and slow utility, Beam for the single-target DPS that brings down tanky units before they reach the core.
Outpost-Specific Layouts
The r/Endfield community has tested and shared verified builds for the Valley IV outposts, and the patterns repeat consistently enough that you can copy them directly. Each layout below has been cleared on Auto-Defense by the named author and links back to the original Reddit post where you can see the visual diagram. These are not theory — they are screenshots of working builds with reproducible results.
For Refugee Camp Risk 3, u/VillianceTheReal's verified build defends on Auto-Defense with only one small enemy leaking on a successful run; expect to retry it two or three times due to RNG factors, because even a strong layout cannot guarantee a perfect clear every wave. Their summary: "Here is my build how i successfully defended the level 3 battle on Auto-Defense in the refugee camp." For Refugee Camp Risk 4, u/ArtificalSUN's guide uses only Valley IV turrets with no Wuling-tier required, mixes Surge and Sentry, and is built around screenshot-by-screenshot placement: "Just follow the screenshots for your turrets placement, throw in some batteries (or pylons, whatever) and it will reliably complete the auto-defence for you." For lower Risk Levels at Refugee Camp, use the same Risk 4 layout but remove Surge and Sentry towers evenly to stay under the lower tower cap. View Refugee Camp Risk 3 build · View Refugee Camp Risk 4 build.
For Infra Station Risk 3, the headline composition is 8 Surge Towers plus 3 Beam Towers — u/VillianceTheReal's Reddit post includes the visual diagram, and the result on a clean run is exactly one Teleport Mage leaked with everything else handled cleanly. For Infra Station Risk 4, the critical positioning rule is the isolated Surge Tower trick: keep one Surge Tower in the middle portion away from the others, so that the big boss enemy's stomp cannot stun your whole cluster at once. The author's verbatim guidance: "Was pretty simple, just be sure to have one surge tower in the middle portion a bit away from the others so the stomp of the big guy doesn't stun all your towers." View Infra Station Risk 3 build · View Infra Station Risk 4 build.
If you are restricted to Valley-faction towers and cannot use Wuling-tier turrets at Infra Station Risk 4, u/HommitNMA has a verified alternative layout that splits the defense into three zones. The left-down side runs three Surge Towers in an L-shape, the right-down side has a Beam Tower beside the core plus three Surges, and the up side mirrors with a Beam plus three more Surges in an L-shape. The full composition lands at three Beam Towers total with the remaining slots filled by Surge Towers — a Valley-only build that maintains Auto-Defense reliability without needing the higher-tier Wuling content.
For Wuling outposts, u/PunkHooligan's minimalist Sky King Flats build uses only Surge Towers and Sentry Towers — no utility towers needed — and reports 100% success on Auto-Defense at Risk Level 1. The exact turret counts are not specified in the Reddit post, but the principle is resource-efficient: chain damage from Surge plus single-target punch from Sentry handles the lower-tier Wuling wave compositions cleanly. Special thanks to the community members whose builds anchor this section: u/VillianceTheReal for three verified builds across Refugee Camp Lvl 3 and Infra Station Lvl 3 and 4, u/ArtificalSUN for the comprehensive Lvl 4 guide for both outposts, u/HommitNMA for the Valley-only restriction solution, and u/PunkHooligan for the Wuling minimalist approach.
Wuling Region Defense
Wuling's only outpost — Sky King Flats in Jingyu Valley — unlocks at Authority Level 43 after completing the Where Danger Sleeps main mission and exploration quest. It introduces three defense mechanics that genuinely differ from Valley IV: auto-connecting Xiranite power infrastructure, the Wuling-tier turret roster (Marsh Gas Mk I for slow zones, AF1 Armor Fragger / Sledgehammer Mortar / Hyper Beam Tower for damage), and a separate Wuling Stock Bill economy that funds Wuling-exclusive purchases. Treating Sky King Flats as "Valley IV but harder" will lead to layout mistakes; the differences below are worth internalising before your first attempt.
| Feature | Valley IV | Wuling (Sky King Flats) |
|---|---|---|
| Unlock Level | Game start | Authority Level 43 |
| Power System | Manual wiring (Electric Pylons + Relay Towers) | Auto-connect Xiranite infrastructure |
| Signature Slow Utility | LN Tower (liquid-nitrogen slow) | Marsh Gas Mk I (Wuling-tier slow zone) |
| Enemy Level | Scales to outpost level | Higher baseline difficulty (43+) |
| Stock Bills | Valley Stock Bills | Wuling Stock Bills (separate currency) |
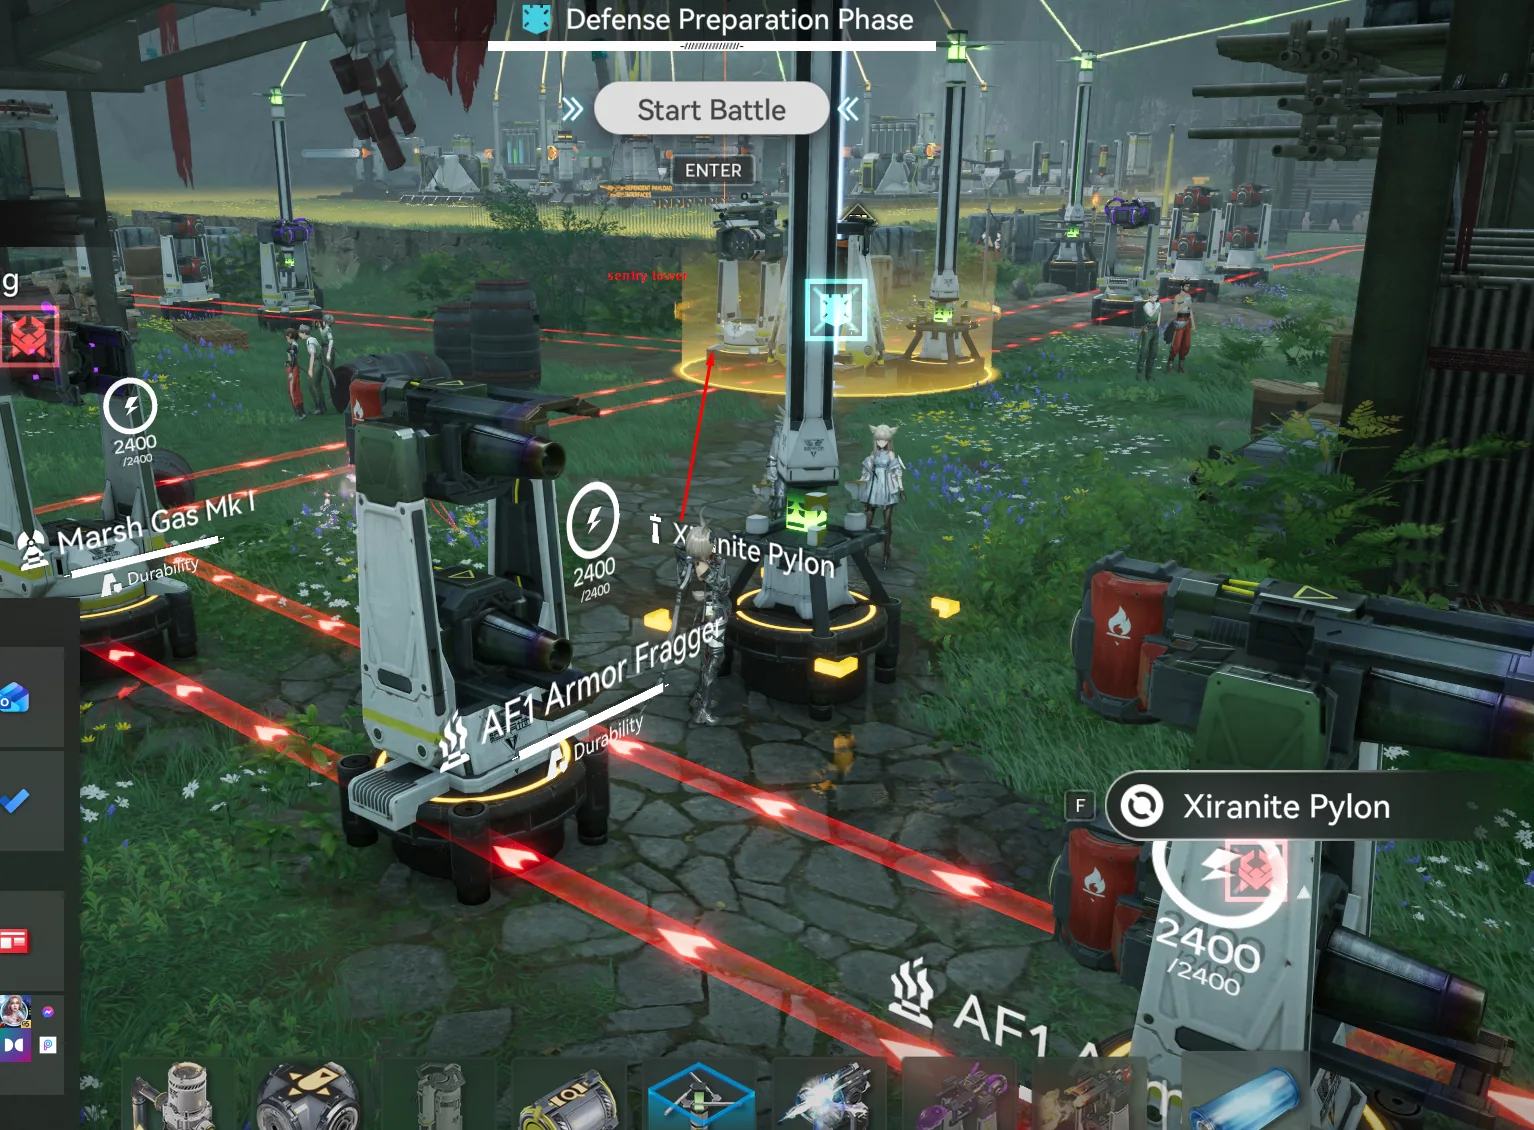
The Xiranite power model is the most disruptive change. The Xiranite Pylon auto-connects to the PAC within 30 m and to other Xiranite facilities within 80 m, powering all combat facilities in the 30 m local area without manual relay wiring. The Xiranite Relay extends the grid 80 m at a time and chains naturally with other Xiranite facilities. The standard Wuling power chain is Thermal Bank fed by LC Wuling Batteries → Xiranite Relay → Xiranite Pylon → combat facilities, and unlike Valley IV you do not have to manually wire each pylon to its neighbour. Auto-connect makes Wuling defenses faster to set up, but placement still matters — keep pylons within 30 m of turret clusters and use relays to bridge longer distances. The faster setup time is best spent on turret-placement strategy rather than left on the table.
Bootstrap your first Wuling defense by transferring 20–30 SC Valley Batteries from Valley IV before you arrive, which gives the Thermal Bank fuel to run on while you assemble the Xiranite chain locally. Marsh Gas Mk I is essential for crowd control at this outpost because fast enemies are common in Wuling defenses, and its slow zone multiplies the effective DPS of every Surge, Sentry, AF1 Armor Fragger, or Hyper Beam Tower covering the same area. Place Marsh Gas Mk I at chokepoints, just before your main damage cluster, or anywhere enemies bunch up.
Sky King Flats Risk Levels
Sky King Flats features four Risk Levels with the same enemy progression pattern as Valley IV — basic mobs at Risk 1, fast movers at Risk 2, multi-path at Risk 3, AOE-stun bosses at Risk 4 — but with higher baseline difficulty due to Authority Level 43+ enemy scaling. Tower limits follow the same 4 / 4 / 8–11 / Max progression. Community testing from r/Endfield players forms the basis for every recommendation below.
Risk Level 1 is your introduction to Wuling's unique mechanics and Xiranite power infrastructure. Enemies follow a single primary path with basic types only, so two or three turrets is usually enough — focus on learning the pathing and practising Xiranite auto-connect setup rather than maxing out a complex composition. Community-verified: u/PunkHooligan achieved 100% Auto-Defense success at Risk 1 using only Surge Towers and Sentry Towers with no utility towers needed. View original post.
Risk Level 2 is the first major spike for Wuling, and the screenshot below from the community shows a working setup that handles both fast trash and small boss units.
Sky King Flats Risk 2 — community-verified turret placement
The community success build for Risk 2 layers three Surge Towers for chain damage, four Beam Towers prioritising boss DPS, two Marsh Gas Mk I for slow utility, and two Sentry Towers for single-target coverage. Risk 2 here is more forgiving about minor leaks than Valley IV — prioritise killing bosses over a perfect clear, because boss units are the main DPS check at this tier. The Marsh Gas slow utility is essential to keep fast enemies in the kill zone, and four Beam Towers ensure bosses die before reaching the core. Successful clears at this tier often end with minor leaks accepted, which is the correct trade-off.
Risk Level 3 introduces armoured units and multi-path pressure, and the proven approach is a modular per-lane defense: 1× Marsh Gas Mk I + 2× AF1 Armor Fragger per lane, plus a central Sentry Tower. Each lane gets a dedicated Marsh Gas slow zone with armoured-unit DPS behind it, and the central Sentry covers stragglers from any lane.
Sky King Flats Risk 3 — modular per-lane defense layout
The placement strategy mirrors the build on each attack lane: Marsh Gas closest to the spawn point for maximum slow uptime, AF1 Armor Fraggers behind the Marsh Gas where enemies cluster while slowed, the central Sentry Tower with clear sightlines to all lanes, and Xiranite Pylons powering each lane cluster independently. The build demonstrates the power of modular, lane-based defense: by treating each path as an independent zone with its own control and DPS, you create multiple failing points rather than one single point of failure that an unlucky wave can collapse.
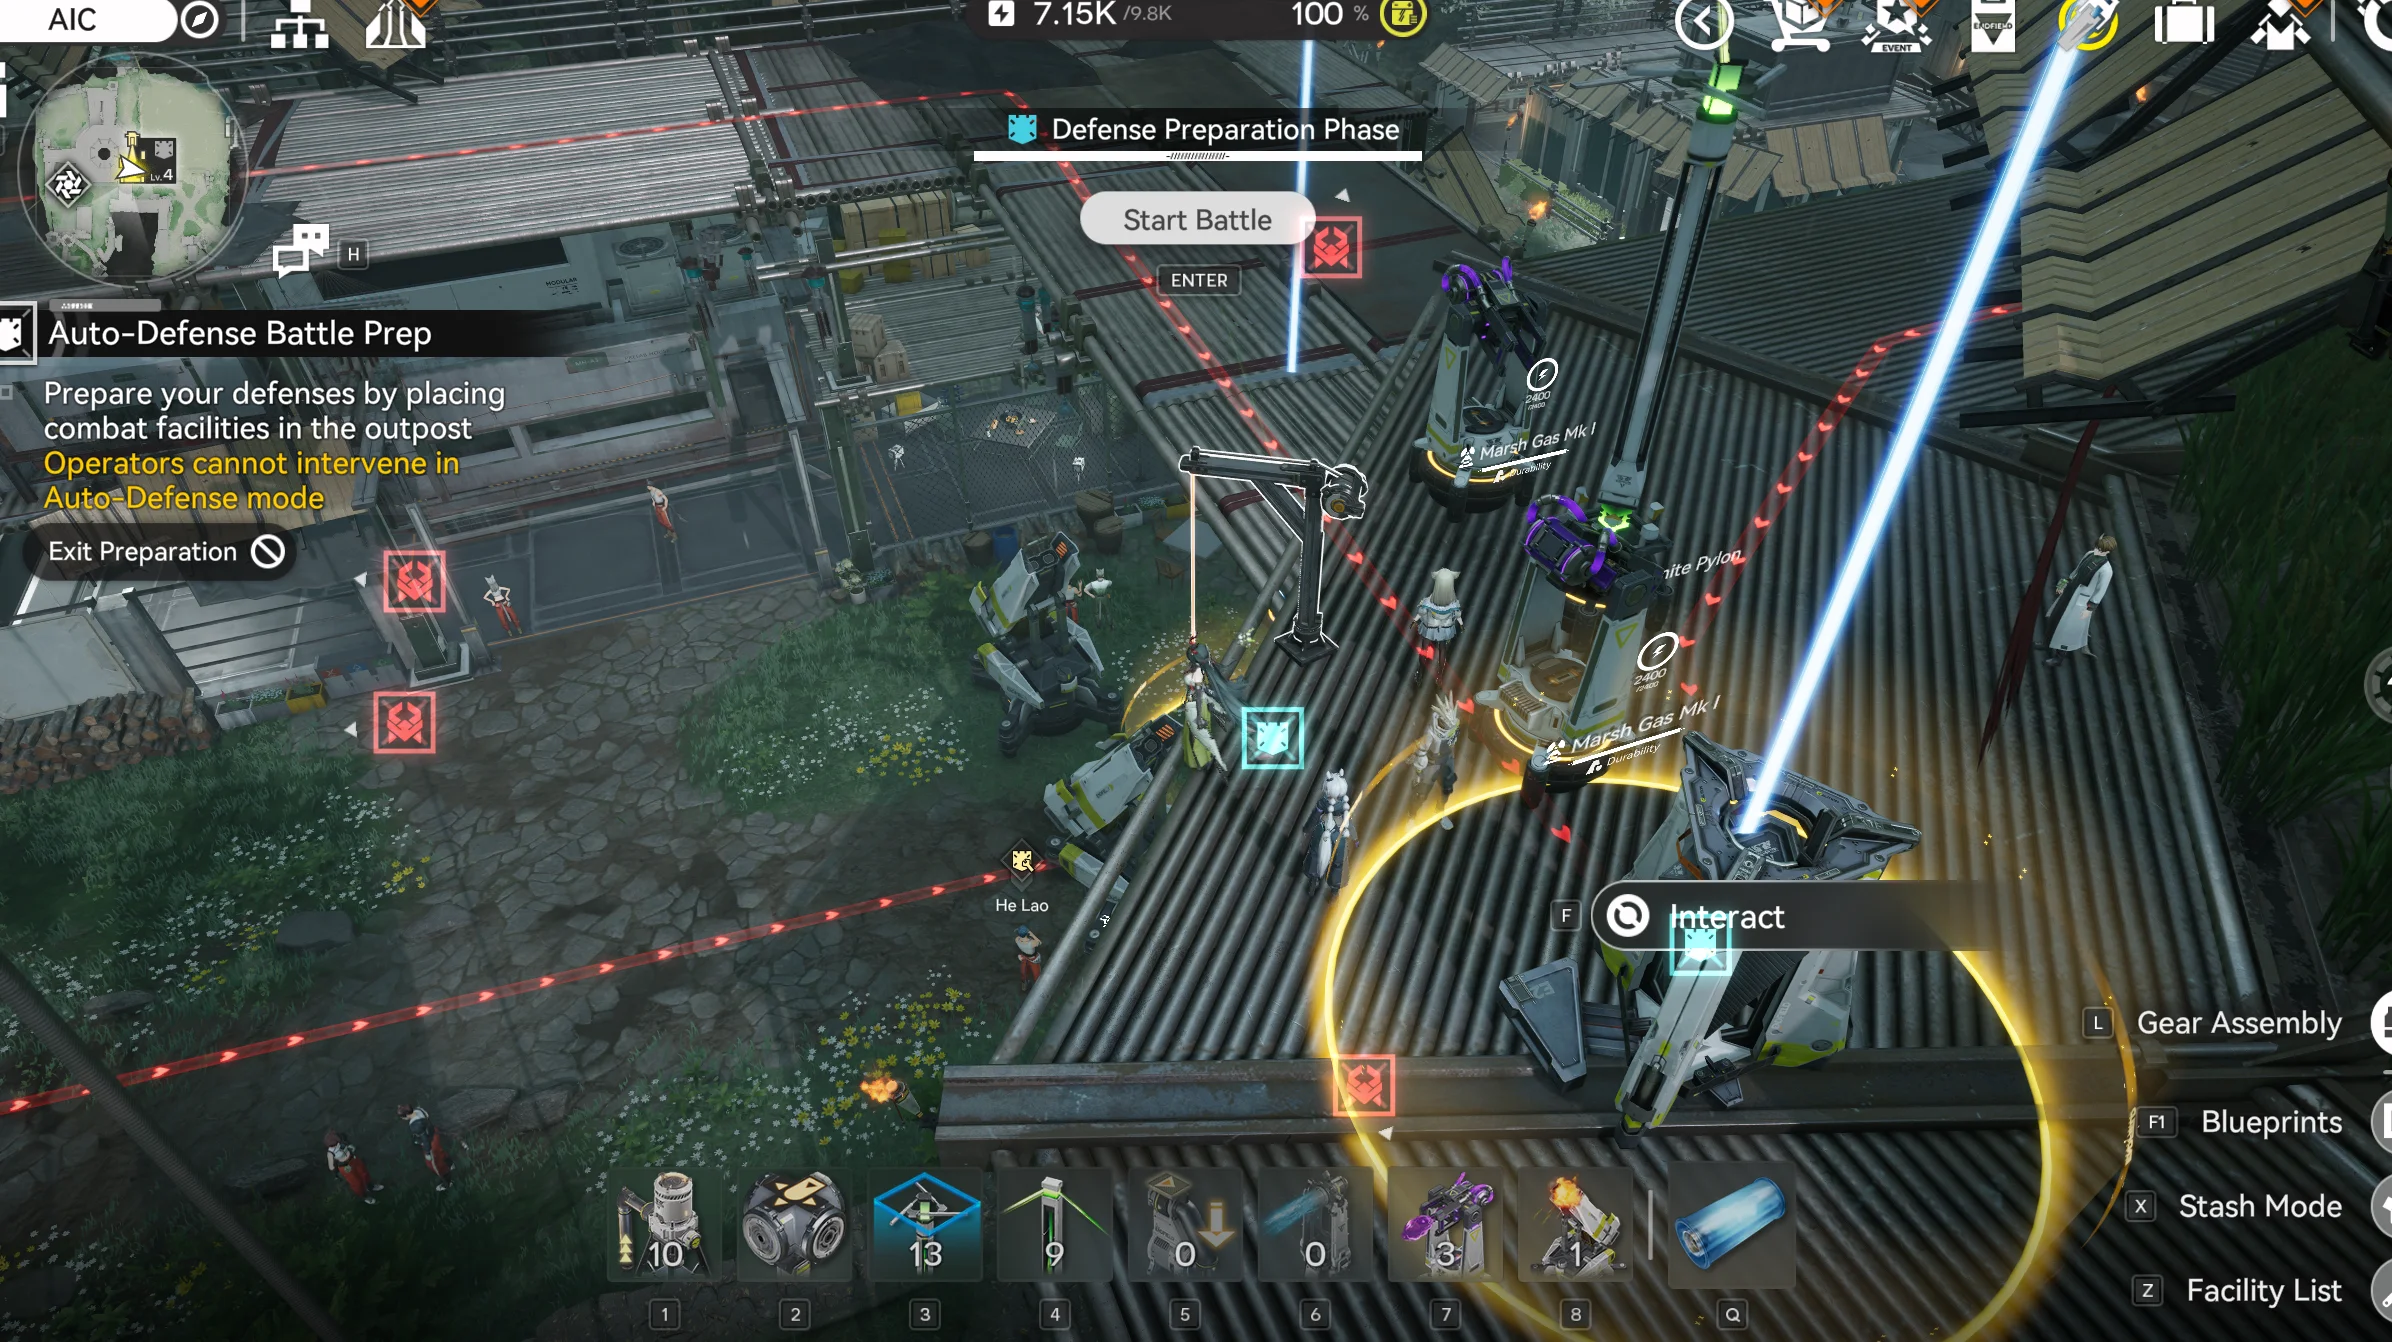
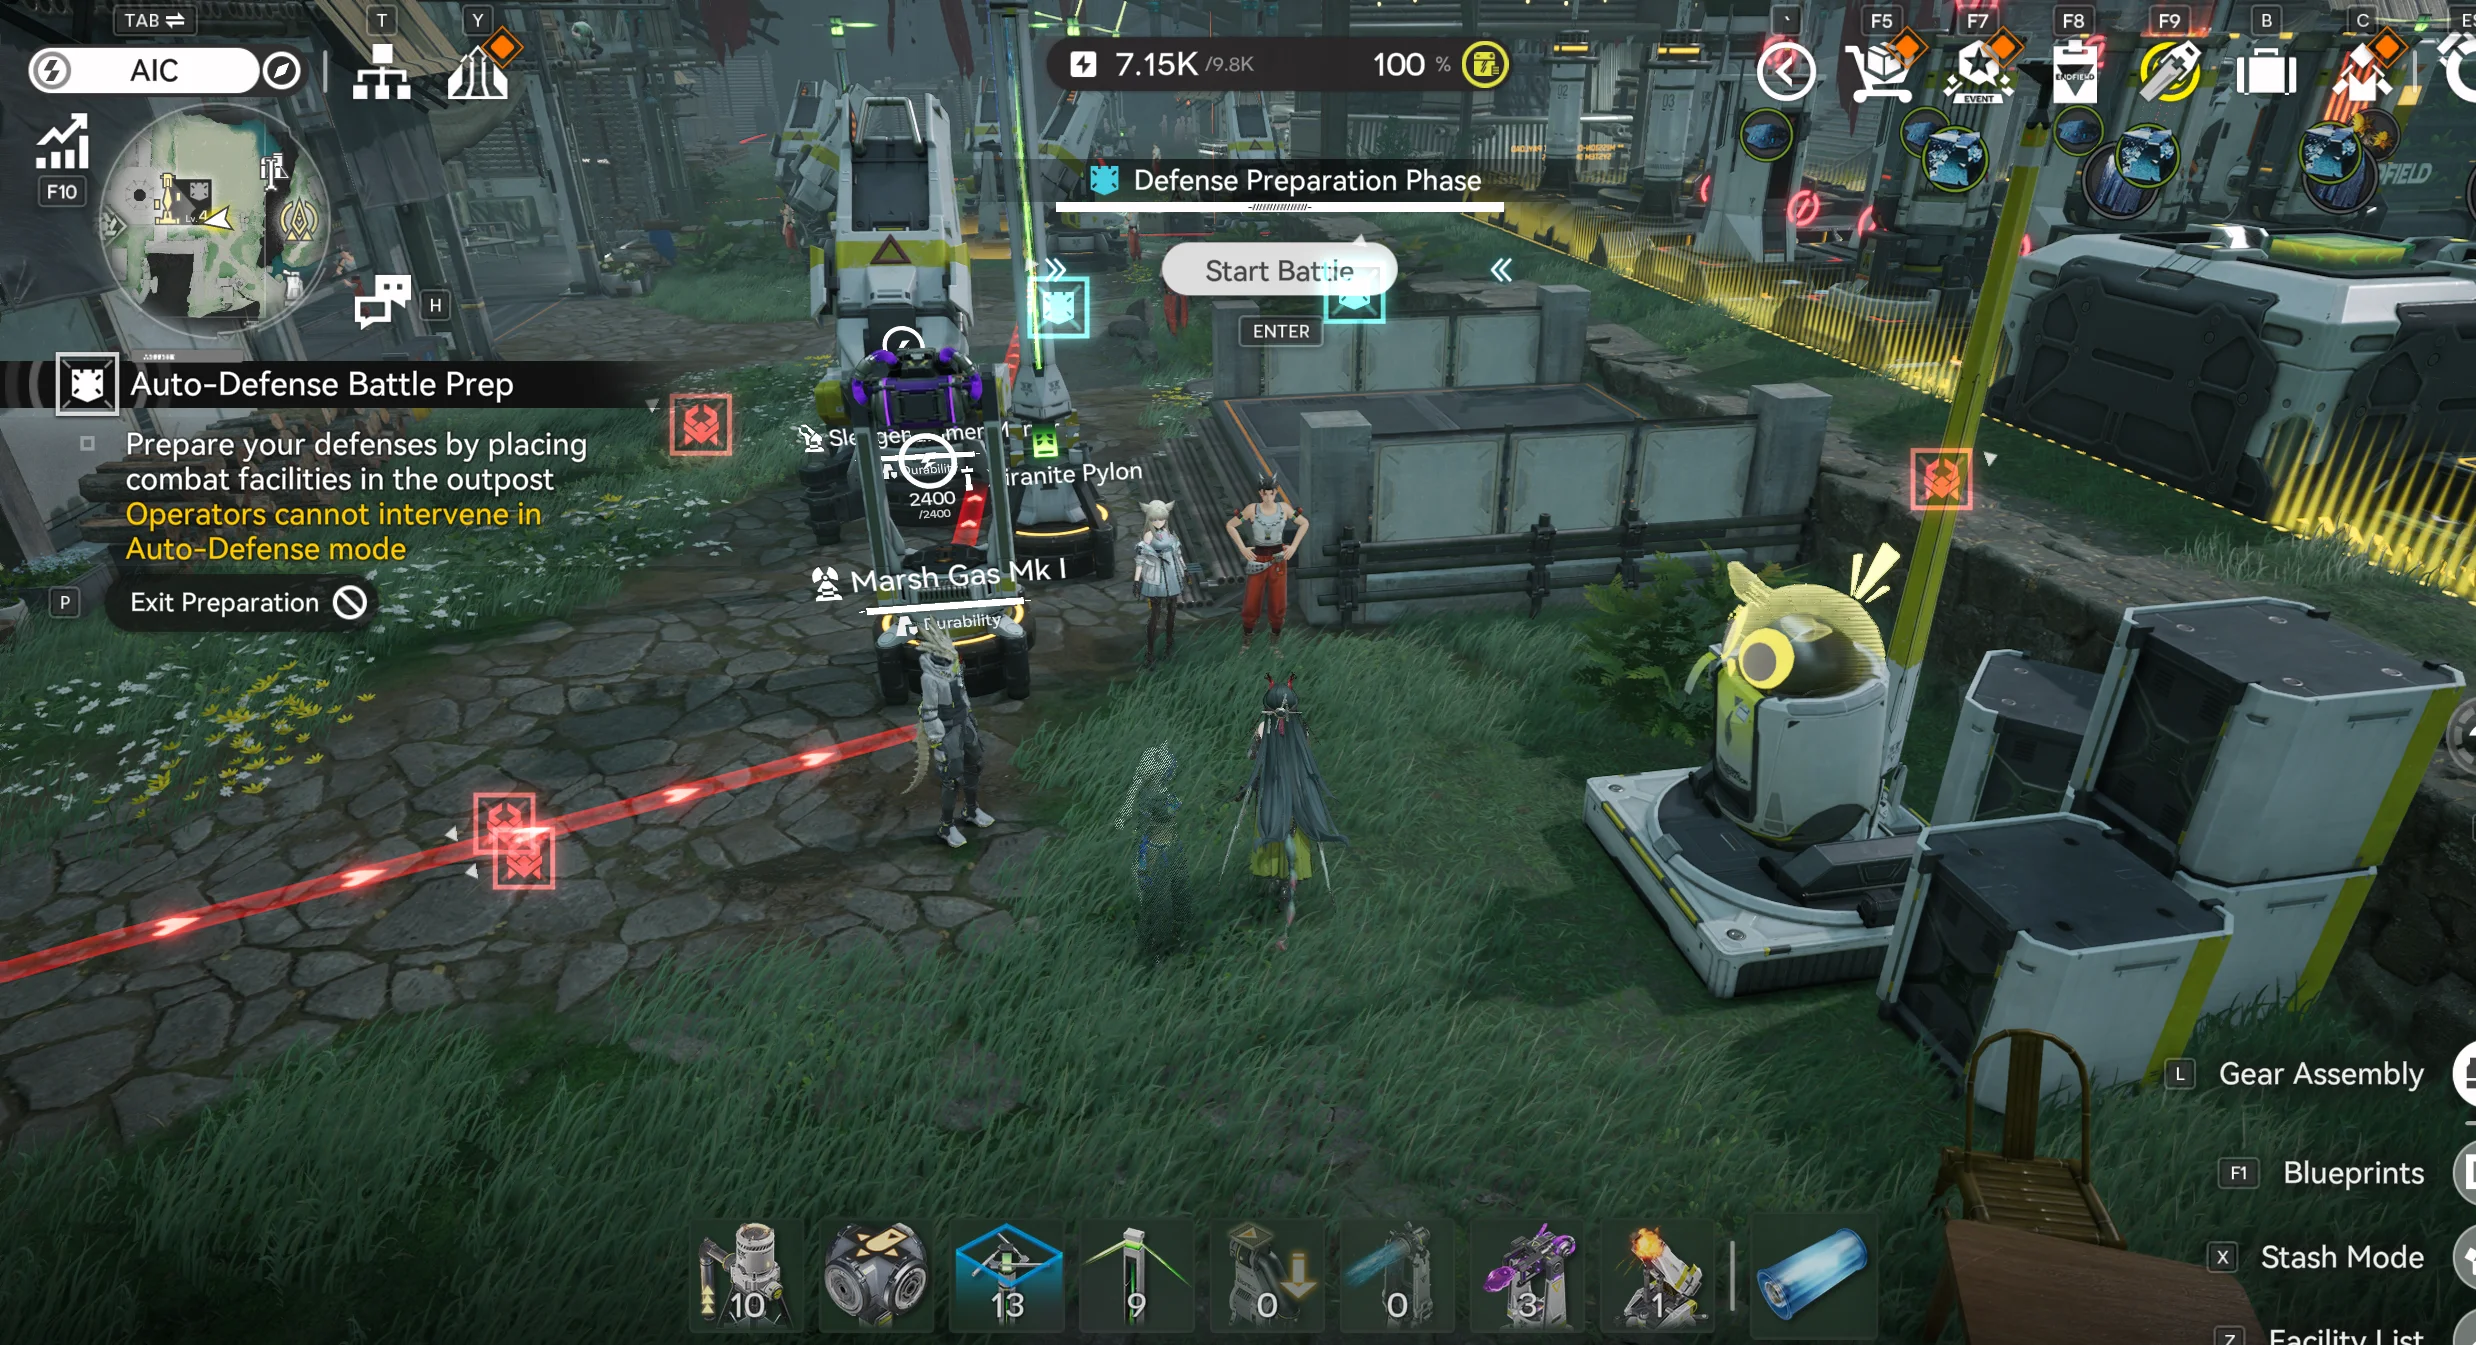
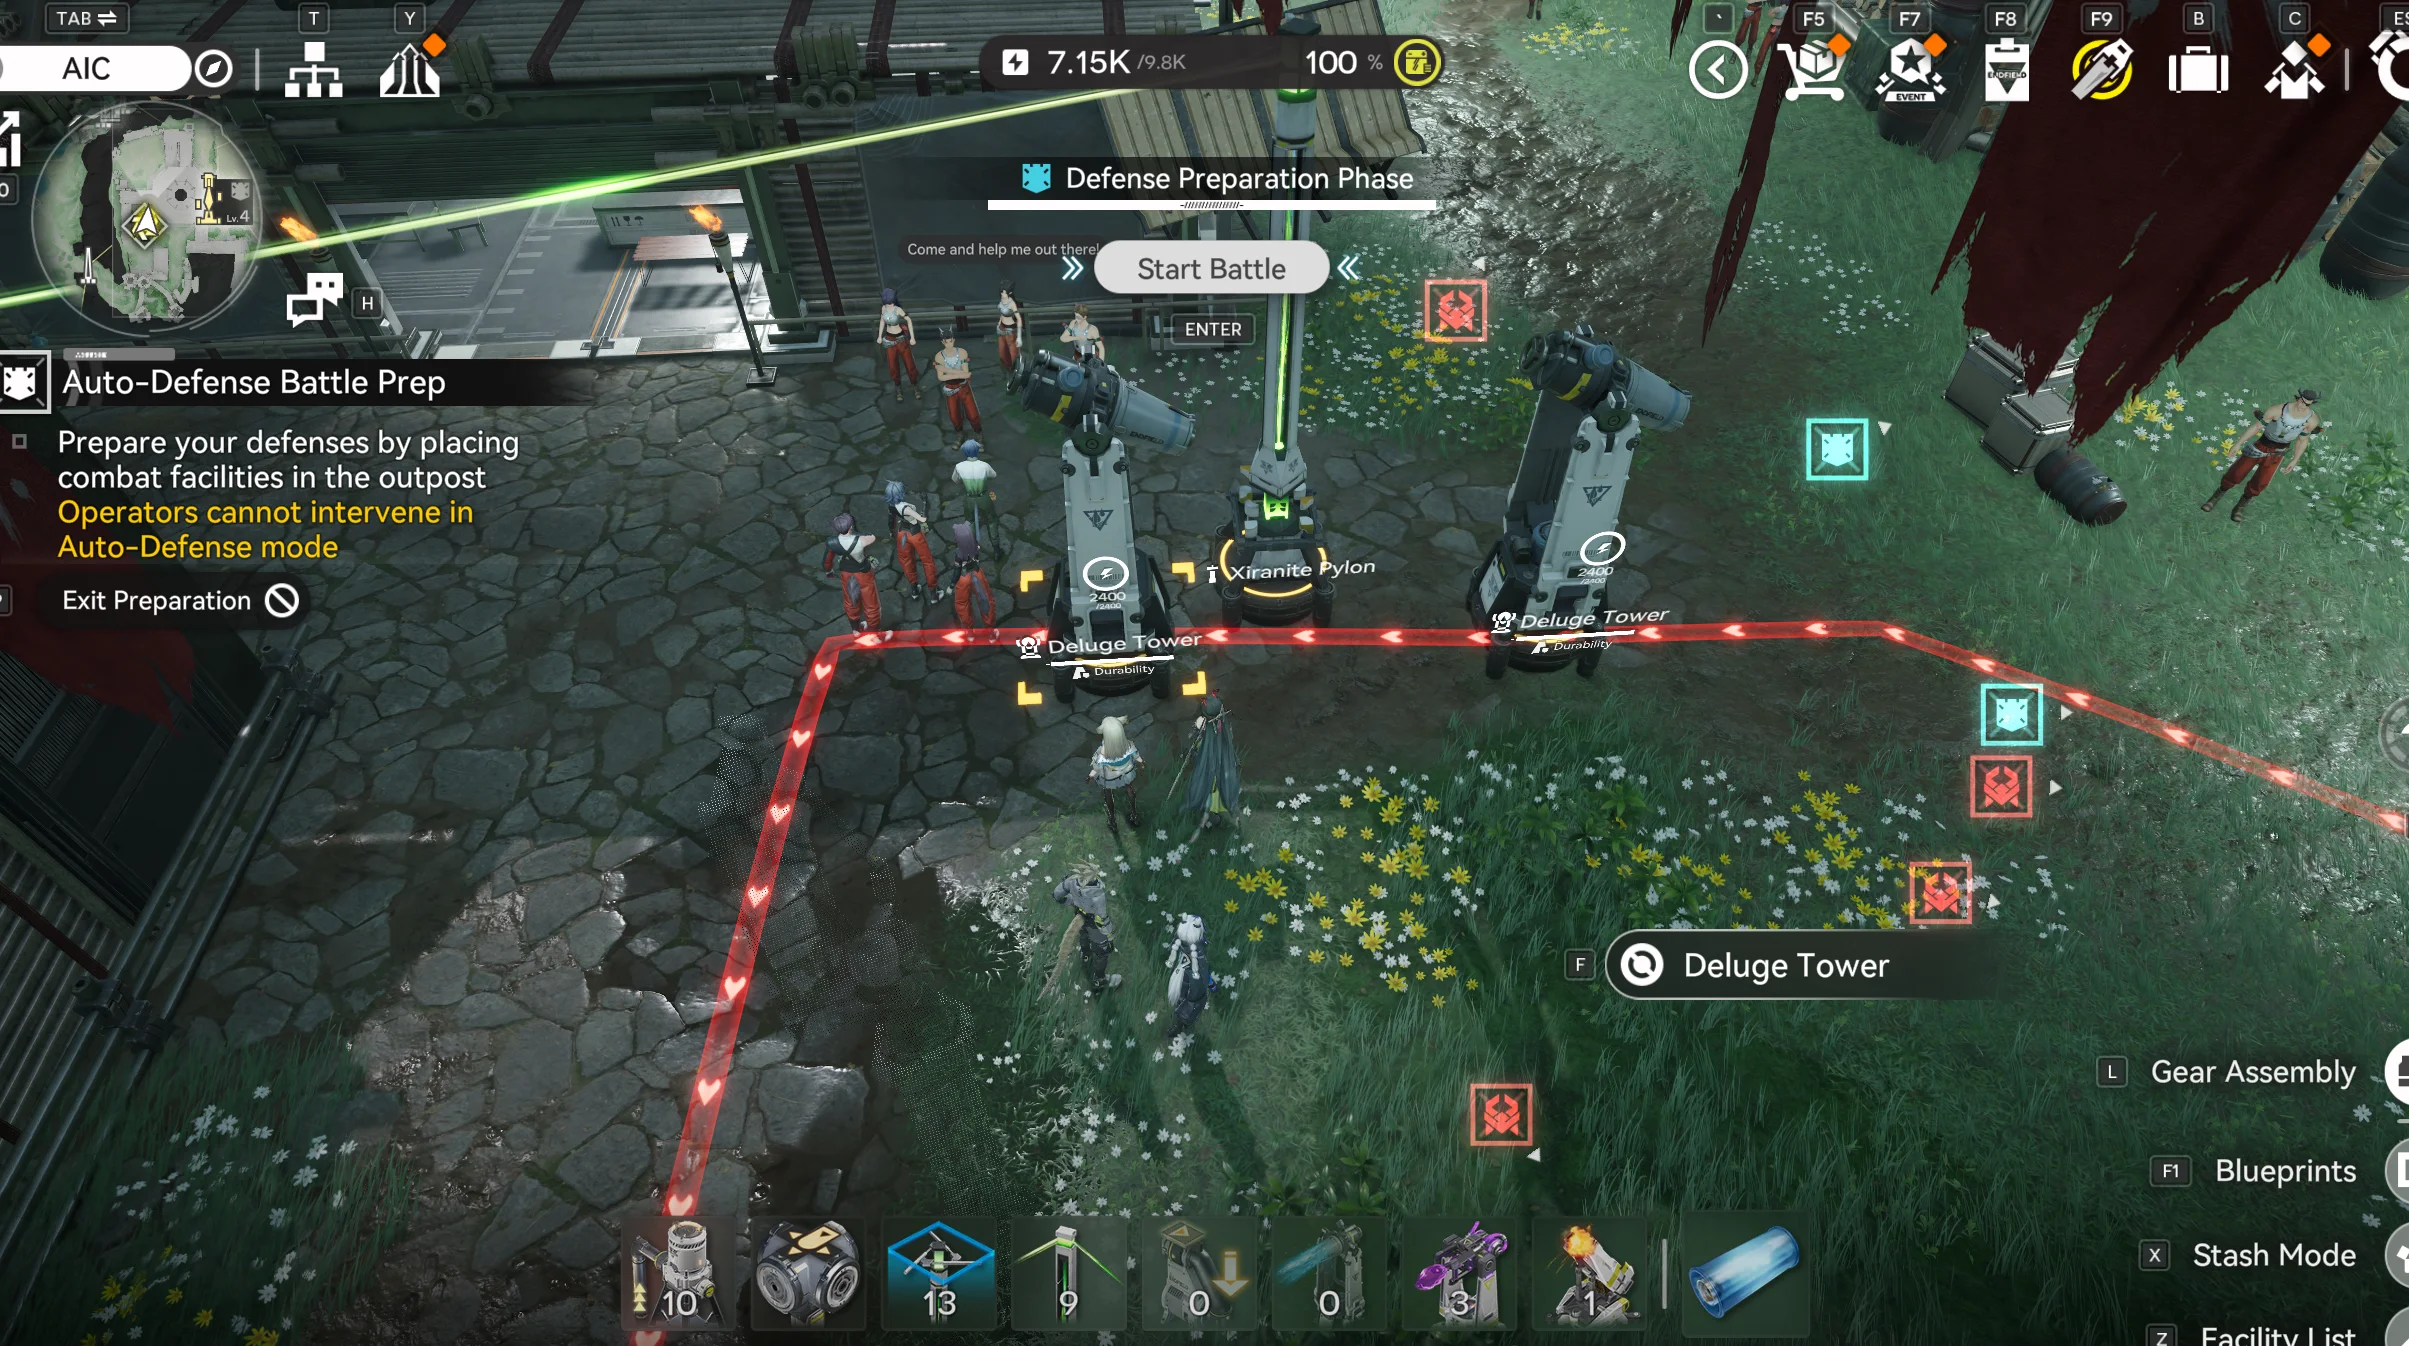
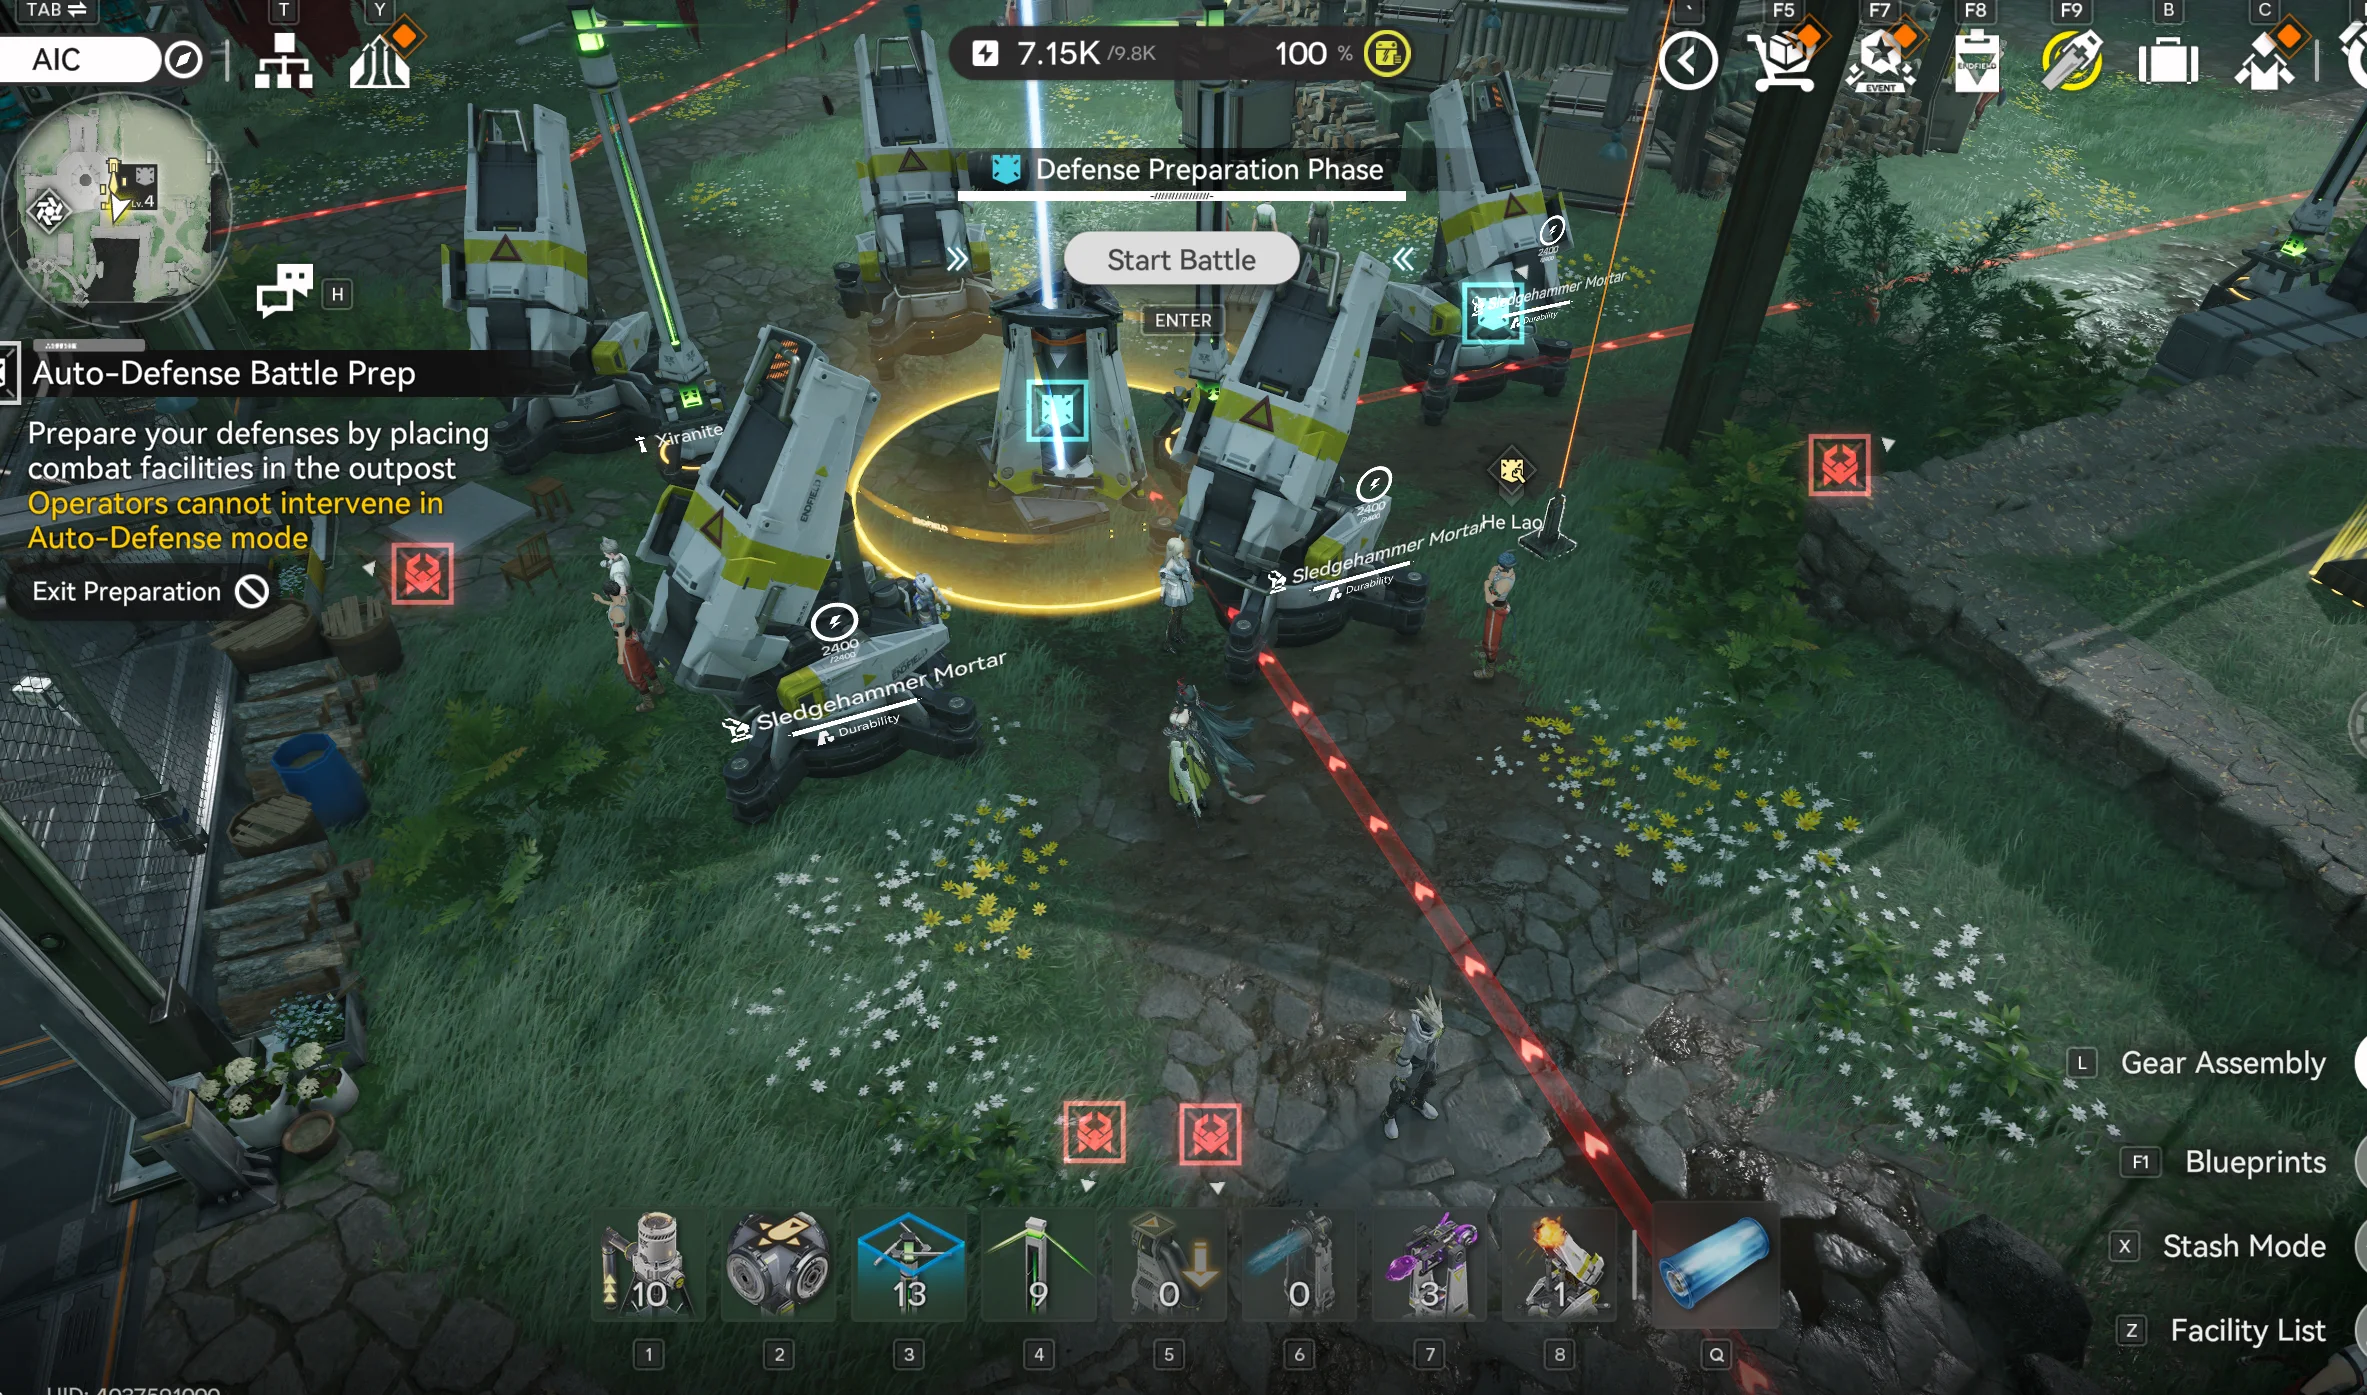
Risk Level 4 is Wuling's ultimate challenge. The verified composition that clears it is 4× Marsh Gas Mk I + 2× Deluge Tower + 7× Sledgehammer Mortar — 13 turrets total at the max tower cap. Place Marsh Gas Mk I at the four entry chokepoints, cluster the Sledgehammer Mortars near the Command Core for the Overclock buff, and use the two Deluge Towers to cover flank lanes. The screenshots below show the full loadout and placement.
Wuling-Specific Strategy
Sky King Flats Construction Site uses a Wuling-tier turret roster that does not exist at Valley IV, and the 1.3 patch (released 2026-06-05) raised the outpost level cap so the upper Risk Levels can now field the full set. The four tactical points below all compound across the four Risk Levels — internalise the roster first, then the spacing rules, and the Xiranite power perk last.
Marsh Gas Mk I is the Wuling crowd-control anchor: it occupies the same slow-utility role that Marsh Gas plays at Valley IV outposts, but it pairs with much higher-damage Wuling turrets so its effective contribution is larger. Place it at chokepoints, just before your main damage cluster, or anywhere enemies group up — the slow zone multiplies the effective DPS of every Sentry, AF1 Armor Fragger, Sledgehammer Mortar, or Hyper Beam Tower covering the same lane.
The Wuling damage roster handles every threat profile. Hyper Beam Tower (45,375 ATK, 8 s Electric, 5-star Wuling III) replaces the Valley IV Beam Tower as the Sky King Flats boss-killer once you reach Risk 3+ — same 8 s cadence but more than double the per-shot damage, so spacing matters even more (one boss stomp on two clustered Hyper Beams ends the run). Sledgehammer Mortar (33,000 ATK, 8 s AoE Physical) is the cluster-near-core deathball that punches hardest when the Command Core's Overclock buff multiplies its already huge shells. AF1 Armor Fragger (17,252 ATK, Heat DoT flame jet) gives every lane sustained burning damage and is the answer to armored Risk 3 mobs like Bonekrusher Infiltrators. Deluge Tower (5 s interval, knockback against small and medium enemies) is the spacing tool — drop it at a chokepoint and it shoves approaching enemies back into your kill zone so the slower 8 s turrets get an extra firing cycle.
Multi-path requires balanced investment. Sky King Flats Risk 3 sends three waves of mixed enemies (Cloud Stalker, Grove Archer, Bonekrusher Infiltrator, Road Plunderer per the Talos Wiki enemy list) from multiple directions, so never put all turrets on one path, always check the Early Warning Terminal in case paths shifted between Risk Levels, build a secondary defense line to catch leaks, and accept that some small enemies may leak as long as the core survives. Xiranite power means faster setup, even more so after 1.3: the Thermal Bank → Xiranite Relay → Xiranite Pylon chain auto-connects, and the 1.3 patch additionally lets Xiranite Pylons and Relays inside the Core AIC Area auto-connect to outer Xiranite facilities — so most of your wiring is done as soon as you place facilities, freeing time for turret-placement strategy. The 30 m Pylon radius still applies, so cluster turrets within range. Finally, respect the higher baseline difficulty: Wuling enemies scale to Authority Level 43+ minimum, so gear up in Valley IV first (Tier 2 gear minimum recommended), stockpile Yazhen healing items for Operator Intervention, and remember that Wuling Stock Bills are the only currency that funds Wuling-exclusive purchases.
Power Infrastructure
Every turret needs power, and without a connected power grid your combat facilities sit inactive while enemies stroll past them to the Command Core. Plan the power chain before you place a single turret — running out of power supply mid-defense is one of the most common ways a clear fails at any Risk Level. Each region has its own power facility set, and the ranges below define exactly how far each piece can reach.
| Facility | Range | Role |
|---|---|---|
| Thermal Bank | — | Converts heat into electrical power (fuel: LC Valley Battery) |
| Relay Tower | 80m | Transmits power to facilities within range |
| Electric Pylon | 30m | Wirelessly powers all facilities in local area |
| Xiranite Pylon | 30m + 80m | Wuling-region power, auto-connects to Xiranite facilities |
| Xiranite Relay | 80m | Wuling relay, auto-connects within range |
| Backup Power (1.3) | Region-wide | Emergency reserve — supplies unlimited electricity for 30 min when the grid fails, then 12 h recharge; toggle manual or auto activation |
The standard Valley IV power chain flows from a Thermal Bank generating power, into a Relay Tower that transmits the signal 80 metres, and finally to an Electric Pylon that wirelessly distributes power to every facility within a 30-metre radius. For distant turret clusters, chain multiple Relay Towers together to bridge the gap without dragging Pylons across the entire outpost. In Wuling, the Xiranite variants auto-connect to compatible facilities within range, and as of the 1.3 patch the Xiranite Pylons and Relays placed inside the Core AIC Area now auto-connect to outer Xiranite facilities as well — so most of the wiring is implicit. Auto-connect removes the manual wiring step but does not remove the need to plan placement: the 30 m Pylon radius still applies, so Xiranite Pylons must sit within range of the turret clusters they power.
The 1.3 patch also introduced Backup Power, a region-wide emergency reserve that auto-activates the moment a region loses power. The reserve supplies unlimited electricity for 30 minutes, after which it enters a 12-hour recharge cooldown measured from the moment the reserve stops supplying — see the Game8 Backup Power guide for the activation UI. Treat it as one-shot insurance, not a generator: the recommended setting is manual, so a passive outage caused by an AIC layout change does not burn the reserve before the next Imminent Incursion fires. Switch to auto only if you intend to leave the region idle for long stretches and would rather burn the 30 minutes immediately than discover the outage later.
Turret Synergies & Combos
Proven turret combinations from the r/Endfield community recur often enough that they have community names attached, and each one is built around a specific failure mode at a specific Risk Level. Memorising the named combos is faster than rederiving them from first principles, especially when you are racing the unlock of a new outpost.
The "Cluster of 4" is the standard chokepoint build: one Marsh Gas plus two HE Grenade Towers plus one Beam Tower. The Marsh Gas slows and damages enemies inside the mist zone, the HE Grenades provide overlapping AoE coverage, and the Beam Tower cleans up elites and survivors. u/TheGuurzak summarises the pattern: "Clusters of 4: 1 marsh gas, 2 he grenades, and 1 beam to clean up. If you have a very long straightaway, put a sentry in the middle of it to soften them up along the way." It is the most reliable beginner-friendly composition because it does not require precise positioning to work.
The Anti-Fast Enemy setup is the Risk 2 specialist build that u/DreamzKira used to clear Risk 2 Auto-Defense with 40 HP remaining: Grenade Tower plus Heavy Gun Tower plus LN Tower plus a second Heavy Gun. The Grenade Tower covers groups with AoE, the Heavy Guns provide sustained DPS on fast movers that would shrug off smaller calibres, and the LN Tower slows enemies just enough to buy the Heavy Guns the extra firing cycles they need. Layout matters: u/DreamzKira's screenshots show grenade tower left, heavy gun top-left, and LN tower right at the entrance, with the second heavy gun further back to catch leaks.
The Boss Killer / Anti-Pyromancer setup leans on Beam Towers at long range: one or two Beams positioned a good distance apart prevent both being disabled by the same AOE attack. With 22,338 ATK per shot, the Beam Tower melts elites, and its long line of sight lets it engage at maximum range. u/owl_quartz puts it bluntly: "If there's a bloody teleporting Pyromancer, specifically, set up 1-2 Beam Towers a good distance apart from each other and he won't survive long enough to see the light of the next day."
For Wuling outposts, the Per-Lane Modular combo is the proven Sky King Flats Risk 3 build documented by icy-veins: one Marsh Gas Mk I plus one AF1 Armor Fragger plus one Sentry Tower per lane, powered by a dedicated Xiranite Pylon, with a fourth Sentry Tower positioned centrally as the lane-convergence overwatch. The full thirteen-slot composition is 3× Xiranite Pylon, 5× Sentry Tower, 3× Marsh Gas Mk I, 3× AF1 Armor Fragger — the Marsh Gas slows enemies into the AF1's burning flame jet, the Sentries finish off elites, and the central Sentry catches whatever leaks. Modular design means each lane is its own failure domain, so an unlucky wave on one path does not collapse the whole defense.
The Wuling Apex Cluster is the high-end Sky King Flats Risk 4 composition built around three Wuling III turrets. Sledgehammer Mortars (33,000 ATK, 8 s AoE Physical) cluster near the Command Core for the Overclock multiplier, Hyper Beam Towers (45,375 ATK, 8 s Electric) sit on long-sight lanes where bosses spawn, and a Deluge Tower (knockback) at the chokepoint shoves approaching enemies back into the Sledgehammer AoE so the 8 s cadence gets full value. Same AOE-stun-mitigation rule applies as Valley IV Risk 4 — space at least one Hyper Beam Tower well apart from the cluster so a single boss stomp can never disable every long-cooldown turret at once.
For Risk 3 multi-path defense, the Multi-Path Standard is the eight-Surge-plus-three-Beam composition that defines u/VillianceTheReal's Infra Station Risk 3 build. Surge Towers chain damage to up to two enemies and apply a slow as a side effect, while the three Beam Towers handle high-threat single targets that the Surges cannot finish off. Risk 4 requires the AOE Stun Mitigation pattern: keep one Surge Tower isolated in the middle portion of the map, away from the cluster, so that when a boss stomp stuns your main turret group the isolated Surge keeps firing and saves the defense. For chokepoint control, the L-Shape Formation of three Surge Towers in an L is u/HommitNMA's Valley-only signature — left-down side three Surges in L, right-down side Beam plus three Surges, up side Beam plus three Surges L-shape.
For last-line defense near the Command Core, place one Beam Tower beside each core for high single-target damage and support it with three Surge Towers for crowd control, or use a single Sentry or Beam as a 360-degree backstop. u/foxylord's note on Sentry usage: "Leaving a single sentry or beam (depending on if you need 360 coverage) as a last line of defense has been their best use." That positioning leans on the Command Core's Overclock buff to multiply damage, which is why core-adjacent turrets punch above their listed stat line.
Three anti-synergies are worth flagging because they show up in failed runs over and over. Clumping without AOE mitigation leaves every turret vulnerable to a single boss stomp; always isolate a critical tower at higher Risk Levels. Too many Sentry Towers vs swarms falls apart on cooldown timing — at ~5 second intervals, big beasts that take 25+ seconds to kill leave your Sentries inactive when new waves spawn, as u/SnowDropWhiteWolf points out: "The sentry does like 11.6k sounds great and then you realize it needs like 10 shots or more to kill the big beast... meaning basically half your turrets aren't doing anything when new waves spawn." And spreading too thin is the inverse failure: spread without overlapping fields of fire means groups walk past every kill zone untouched. The middle path between cluster and spread is the goal.
Strategy & Turret Placement
Effective defense requires understanding both enemy pathing and the role each turret type plays inside that path. The four general placement rules below apply at every Risk Level and every outpost — the higher Risk Level builds in the sections above are specialisations of these fundamentals, not replacements for them.
First, AoE turrets at intersections and bends: Grenade Towers, HE Grenade Towers, and Marsh Gas get the most value where paths cross or bend. A single AoE turret covering an L-shaped turn hits enemies twice as they round the corner, doubling its effective damage without doubling its cost. Second, mix turret types: fast-firing Gun Towers and Heavy Gun Towers chew through weak trash mobs, while slower high-damage Sentry Towers and Beam Towers handle elites and armoured units. Relying on a single turret type leaves you exposed to either swarms or tanky enemies, depending on which extreme you picked.
Third, control turrets as force multipliers: the slow utilities are LN Towers (Valley IV) and Marsh Gas Mk I (used at both Valley IV and Wuling), and the stun utility is the Omnidirectional Sonic Tower. A single well-placed control turret at a chokepoint gives every damage turret in range one or two extra attack cycles per enemy, which is often worth more than another raw-damage facility. One Sonic Tower at a bend is frequently better value than another Gun Tower. Fourth, build near the Command Core: the Overclock buff grants nearby combat facilities a significant attack-power increase during active defense, so concentrate your strongest turrets within its radius to maximise damage output during the critical waves. At Sky King Flats this means clustering Sledgehammer Mortars near the core for the highest-payoff Overclock target in Wuling, since 33,000 base ATK multiplied by Overclock is the largest single per-shot output the region offers.
Two pro-tips run alongside the four rules. Design in depth: not every enemy has to die at the first chokepoint, so build a secondary line of turrets to catch leaks rather than over-investing in one direction. Over-investment in a single lane leaves you exposed when multiple paths activate at higher Risk Levels. Accept small leaks: for a clear, the only thing that matters is the Command Core surviving. Letting a few low-impact enemies through so you can fully counter the dangerous elites is often the correct call — chasing perfect kills at the expense of core protection is one of the most common failure patterns.
Common Mistakes To Avoid
Most failed Auto-Defense attempts boil down to a small set of recurring mistakes, and recognising them in advance is faster than diagnosing them after a wipe. The first is ignoring multi-path enemy routes — different Risk Levels can change enemy paths, so always check the Early Warning Terminal before each defense rather than assuming last attempt's layout still applies. Placing all turrets on one lane means getting overrun the moment a second route activates.
The second is having the turret limit set too low. Your outpost facility limit is tied to Regional Development Level, and if you cannot place enough turrets, no amount of clever positioning will save you. Raise your RDL before attempting higher Risk Levels; see the Outpost Guide for how to increase RDL methodically. The third is over-investing in one direction: multiple enemy paths require balanced coverage, so use the Early Warning Terminal to identify all paths before building rather than fortifying only the most obvious approach.
The fourth is no control turrets. Pure damage builds get overwhelmed by swarms because raw DPS is wasted on enemies that walk through it too fast. LN Towers and Marsh Gas Mk I multiply your damage output by holding enemies in kill zones longer, and every lane should include at least one control turret. The fifth is forgetting power infrastructure — turrets without power do nothing, so always build your power chain first (Thermal Bank → Relay Tower → Electric Pylon → turrets, or the Xiranite chain at Wuling). Running out of power mid-defense is one of the most common failures and it is entirely preventable. The 1.3 Backup Power reserve does not excuse a missing chain because the 12-hour cooldown leaves your next defense unprotected.
The sixth is not switching to Auto-Defense after clearing manually. After clearing a Risk Level in Operator Intervention, switch to Auto-Defense for the permanent Stock Bill Bonus Earning Chance increase — many players forget this step and miss the compounding passive income it generates. The seventh is the related sin of skipping Area Defense entirely: Auto-Defense completion permanently improves outpost economy, so even if tower defense is not your favourite mode, clearing it once yields long-term returns through higher Stock Bill bonuses. The eighth is not leveraging Command Core Overclock: during active defense the Command Core buffs nearby combat facilities with Overclock, so concentrate turrets within its radius to take advantage of the increased attack power during waves.
The ninth — and a 1.3-era mistake worth flagging on its own — is treating Backup Power as your primary supply. The reserve gives 30 minutes of unlimited electricity, then it is gone for 12 hours measured from the moment it stops supplying. Players who leave Backup Power on auto and let it patch a bad AIC layout often discover the reserve is already on cooldown when an Imminent Incursion fires later in the day, and the defense runs unpowered. The fix is to set Backup Power to manual, fix any layout issue with the normal power chain first, and reserve the 30-minute window for an active defense that the regular chain cannot cover.
Community Content Creators
A handful of independent content creators publish Endfield video guides that complement this written reference, particularly for Area Defense visual placement. Endfield Hub is not affiliated with or endorsed by any of these creators — the list below highlights helpful community resources for players who learn better from video walkthroughs than text guides. Both creators below were active on the platforms listed at the time of writing.
KyoStinV
@KyoStinVVeteran Arknights content creator covering Endfield gameplay, strategy guides, and event walkthroughs. Known for clear, accessible guide videos that work for both new and experienced players.
Visit ChannelGryphline
@wulionEndfield-focused channel with visual tower placement strategies, turret optimization guides, and Area Defense walkthroughs. Helpful for understanding outpost defense layouts and combat facility positioning.
Visit ChannelFor the full directory of independent Endfield content creators across YouTube, Twitch, and other platforms, the creators page indexes every channel with the categories they cover.
Sources & Reddit Builds
This guide is compiled from community contributions on r/Endfield. All Reddit posts linked here contain visual screenshots and additional discussion, and special thanks to the Endfield community members who shared their successful builds and strategies. Individual results may vary based on turret levels, operator intervention, and RNG factors — every build is verified by its author, not a guarantee for your account.
The Wuling-side builds anchoring this guide include u/PunkHooligan's Wuling Auto Tower Defense Risk 1 100% clear (minimalist Surge + Sentry build), u/VillianceTheReal's Sky King Flats Level 2 Auto Defense (visual placement guide with screenshot), the Jingyu Valley Sky King Flats Defense post (Gas + Surge + Beam strategy with screenshots), and u/QuarterUnlucky4399's Wuling Outpost Defense (manual intervention placement with weak point marker).
On the Valley IV side, the verified builds include u/VillianceTheReal's Refugee Camp Risk Level 3 build, Infra-Station Risk Level 3 build (the 8 Surge + 3 Beam composition), and Infra-Station Risk Level 4 build (the isolated-Surge AOE-stun mitigation strategy). For broader community discussion and additional builds beyond what is documented here, the r/Endfield subreddit is the active hub. All build strategies, screenshots, and quotes in this guide belong to their respective authors on Reddit, compiled here for educational purposes with original-post links preserved.
Reddit Source Posts
Wuling Auto Tower Defense 1 — 100%
Minimalist Surge + Sentry build for Risk Level 1 · u/PunkHooligan
Sky King Flats Level 2 Auto Defense
Visual placement guide with screenshot · u/VillianceTheReal
Jingyu Valley Sky King Flats Defense
Gas + Surge + Beam strategy with screenshots · u/[deleted]
Wuling Outpost Defense
Manual intervention placement with weak point marker · u/QuarterUnlucky4399
Refugee Camp Risk Level 3 Build
Verified Auto-Defense layout · u/VillianceTheReal
Infra-Station Risk Level 3 Build
8 Surge + 3 Beam composition · u/VillianceTheReal
Infra-Station Risk Level 4 Build
AOE stun mitigation strategy · u/VillianceTheReal
r/Endfield Community
Active subreddit hub for builds, discussion, and patch notes
Quick Reference Checklist
The interactive checklist below tracks your progress from first defense unlock through every Risk Level clear across Valley IV and Wuling. Tick items off as you complete them to keep a running record of which outposts have permanent Stock Bill bonuses banked and which Risk Levels still need to be cleared.
Unlocking Defense
Reach Prosperity Level 2 at Refugee Camp
Complete "OD Project: Refugee Camp I"
Complete "Defense Construction" side quest
Complete "Fort Showdown" tutorial mission
Build first set of turrets around outpost
First Defenses
Check Early Warning Terminal for enemy routes
Place AoE turrets at intersections and bends
Mix damage types (Gun Tower + Grenade Tower minimum)
Add at least one control turret (LN or Sonic Tower)
Clear first Risk Level in Operator Intervention
Unlock Auto-Defense for first outpost
Multi-Outpost Defense
Extend defense coverage to second and third outposts
Build power infrastructure before combat facilities
Clear multiple Risk Levels for higher Stock Bill bonuses
Upgrade to HE Grenade Tower, Heavy Gun Tower, Beam Tower
Set up Auto-Defense at all unlocked outposts
Wuling Region Defense
Unlock Sky King Flats outpost (Authority Level 43 + 'Where Danger Sleeps' quest)
Bootstrap Wuling power with transferred Valley IV batteries
Set up Xiranite power infrastructure (Thermal Bank → Xiranite Relay → Xiranite Pylon)
Clear Sky King Flats Risk Level 1 in Operator Intervention
Build Marsh Gas Mk I + Surge Tower combo for crowd control
Clear Sky King Flats Risk Level 2 (allows minor leaks)
Add Beam Towers for boss DPS
Clear Sky King Flats Risk Level 3 (multi-path defense)
Master spaced placement to avoid boss AOE stuns
Clear Sky King Flats Risk Level 4 (max difficulty)
Switch all Risk Levels to Auto-Defense for permanent Wuling Stock Bill bonuses
Endgame Defense
All Valley IV outposts running Auto-Defense permanently
Sky King Flats (Wuling) running Auto-Defense permanently
Highest Risk Level cleared at each outpost
Valley Stock Bill Bonus Earning Chance maximized
Wuling Stock Bill Bonus Earning Chance maximized
Peace Mode achieved across all outposts
If you have not yet reached Authority Level 43 or unlocked Sky King Flats, treat the Wuling sections of the checklist as a forward roadmap rather than a present blocker — the Valley IV side is enough to start compounding Stock Bill bonuses on its own.
Frequently Asked Questions
That covers the full Area Defense system from the Refugee Camp unlock through Sky King Flats Risk 4, with verified community builds for every outpost in between. Once your Auto-Defense bonuses are stacking, the next step is making the most of the Stock Bills they generate — see the Stock Bills guide for how the bonus actually translates into faction currency and the Outpost Guide for raising Regional Development Level so you can place enough turrets at the higher Risk Levels. If you are still gearing up before the Wuling attempt, the combat guide and Control Nexus guide cover Operator Intervention positioning and the operator assignments that backstop a failed Auto-Defense run.