DEATHLY SILENCES STAGE 3: PYROMANCER F2P TEAM
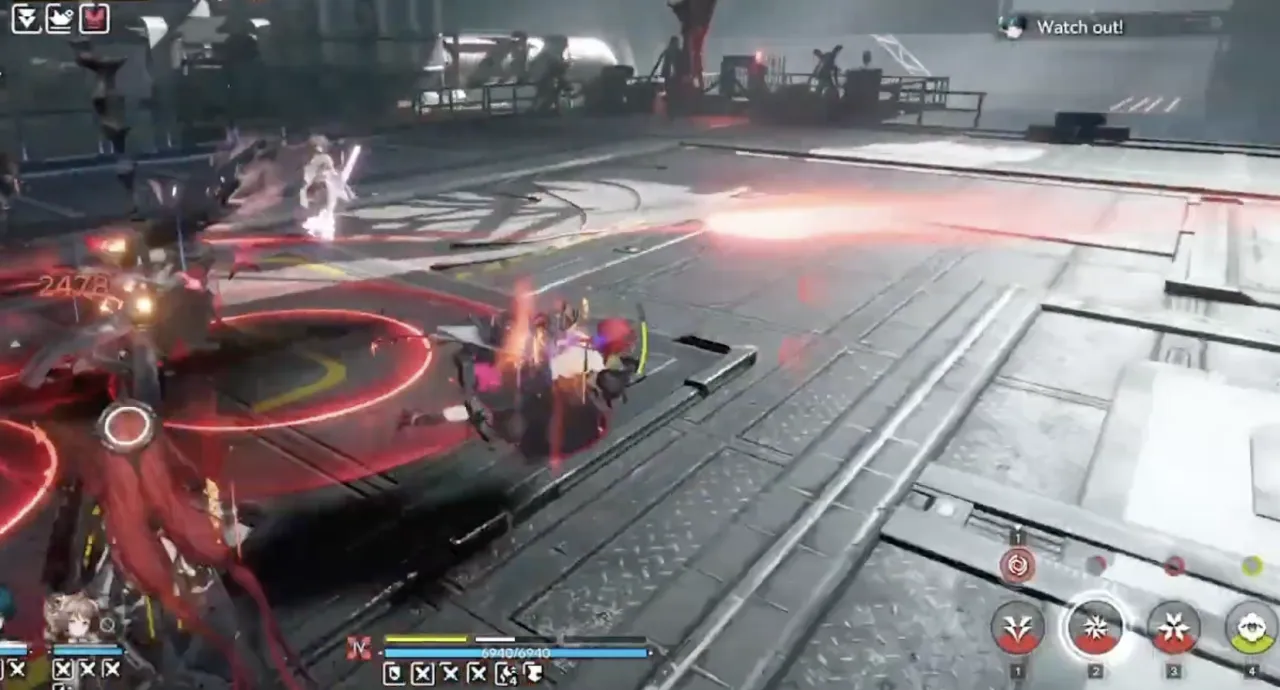
Table of Contents
The Pyromancer channels his ultimate: a glowing beam that sweeps toward the two clones he summoned. This is the moment the whole run hinges on. Screenshot from the run below.
Stage 3 of Contention of Deathly Silences is the one day-one players kept dying to, the caster stage with the lethal explosion burst. Its English name is still being confirmed in-game, but the fight itself is simple to describe and brutal to execute: a Pyromancer boss summons two clones of himself, then channels an ultimate that deletes anything squishy standing in the beam. If you’re free-to-play and can’t burst those clones down before the ult lands, this guide is for you. We built a heat team around one idea: don’t out-damage the boss, out-tank his ultimate.
TL;DR - Key Points
- Team: Camille, Ardelia, Laevatain, Ember — a full heat squad that survives instead of racing the clock
- Don’t tunnel the clones — as F2P you can’t kill them fast enough, so ignore them and prep for the ult
- Ember’s ultimate is your damage soak — pop it to eat the Pyromancer’s beam instead of dodging or dying
- Ember’s ult charges two ways — her own combo attacks, and the controlling operator getting hit
- Ember’s ult has a 19s cooldown (18s at max mastery) — do not eat a big hit while it’s down
- Laevatain is the tank and main DPS — stack HP so she can eat hits to charge Ember and survive
- Camille is the SP battery — his combo procs off heat infliction, funding Ardelia’s heal spam
- Save Laevatain’s ult for the vulnerable window right after the Pyromancer’s ult, not before
Watch the Full Run
The gear layouts for every operator are shown in detail at the end of the video, so if you want to copy the exact substats, watch it through.
The Core Problem: You Can’t Race the Clones
Here’s the trap most players fall into. The Pyromancer summons two clones of himself, and every instinct says kill them before they do something bad. But as a free-to-play player, your damage isn’t high enough to delete two summoned casters before the boss finishes channeling his ultimate. You commit to the clones, the beam lands anyway, and someone dies.
The whole strategy flips that instinct on its head. You are not trying to kill the clones. You treat the summon phase as free prep time. While the clones are up and the boss is winding into his ult, you use those seconds to stack Ardelia’s heals and charge Ember’s ultimate. When the beam finally sweeps the arena, you eat it, survive, and then punish.
This is the same “survive the failure condition instead of out-damaging it” logic behind the Ardelia solo cheese for Tidal Grief, just scaled up to a four-operator heat comp.
Why This Team Works Together
Every operator here has one job, and the four jobs feed each other. This is not a random pile of heat units, it’s a loop.
| Operator | Role | Why They’re Here |
|---|---|---|
| Ember | Damage soak | Her ultimate absorbs the Pyromancer’s beam so nobody dies to it |
| Laevatain | Tank + main DPS | Eats hits to charge Ember’s ult, then bursts the boss in the open window |
| Camille | SP battery | Combo procs on heat infliction, funding constant Ardelia heals |
| Ardelia | Healer | Sustains the squad through the summon phase and after the ult |
Notice the dependency chain. Laevatain gets hit, which charges Ember’s ult. Camille’s kit generates SP off the heat flying around, which lets you spam Ardelia. Ardelia keeps Laevatain alive long enough to keep getting hit. Break any one link and the run falls apart, which is exactly why substituting operators rarely works here.
Ember: Your Panic Button, On a Timer
Ember is the reason this clear exists. Her ultimate creates a damage-soak window that lets your controlled operator eat the Pyromancer’s beam without dropping. Learn how it charges and you’ll always have it ready when the beam comes.
Ember’s ult charges from two sources:
- Her own combo attacks while she’s the active operator
- The controlling operator getting hit while Ember is on the team
That second source is the important one. Because Ember’s ult builds when whoever you’re controlling takes damage, you want your tankiest operator in front eating hits. That’s Laevatain, which is why she doubles as the designated punching bag (more on that below).
The catch is the cooldown. Ember’s ultimate runs on a 19-second cooldown, dropping to 18 seconds at max mastery. Once you pop it to soak a beam, you cannot pop it again until that timer clears. This is the single most important number in the fight.
Treat Ember’s cooldown like a heartbeat. In the roughly 18 to 19 seconds after you use her ult, you have no damage soak. Do not put a fragile operator in front of a big hit during that window.
If you get greedy and eat something huge while Ember’s ult is down, there’s no safety net. Plan your aggression around the cooldown, not the other way around.
Laevatain: Tank First, DPS Second
Laevatain plays two roles at once, and the order matters. Her first job is to be the operator who gets hit, because that’s what charges Ember’s ult fastest. Her second job is main damage. Build her to survive, not to nuke.
That means one gearing priority above all: stack HP. Laevatain’s set isn’t picky here, you’re not chasing a specific bonus, you just want enough health that she can stand in front of the Pyromancer’s clones and their attacks without folding. The more she can safely eat, the faster Ember’s ult comes online, and the safer your next beam soak is.
Her damage still matters in one specific window. Laevatain’s final strike consumes heat infliction, which is where the heat-team synergy pays off. That consumed heat is the fuel for Camille’s SP engine, covered next.
Use Laevatain’s ult carefully. Do not fire it on cooldown, and do not use it on the clones. Save it for the vulnerable window right after the Pyromancer finishes his own ultimate. That’s when he’s exposed and you can actually whale on him. Blow her ult early and you won’t have it back in time to kill the boss during his opening, which just drags the fight out and gives him more chances to ult you.
Camille: The SP Battery That Never Stops
Camille is the glue. His entire contribution is SP generation, and it’s substantial. Between his ultimate, his combo, and his battle skill, he keeps the team’s SP topped up, which is what lets you spam Ardelia’s heals in the chaotic seconds right after you eat the Pyromancer’s ult.
The synergy with Laevatain is the key detail. Camille’s combo triggers on heat infliction, and each trigger gives you SP. Laevatain’s final strike is consuming heat all over the field, so Camille’s combo is constantly firing, constantly feeding the SP pool. This is Camille’s real home, the heat comp, and it’s the same reason he’s built around Frontiers for combo-cooldown SP generation.
Practical tip on his battle skill: when you’re at full health, use his battle skill to charge attacks; when you’re hurting, use it toward health. Read the situation. If the squad is topped off, dump it into offense to keep the SP engine and damage flowing. If you’re recovering from a beam, lean it defensive.
Ardelia: Keep It Simple, Keep Healing
Ardelia has the least complicated job on the team: heal when the situation calls for it. That’s it. She’s the reason Laevatain can keep eating hits to charge Ember, and she’s the reason you survive the cleanup after a beam.
The one build note that matters is her gear. Run the LYNX Aegis Injector so her heals land harder. The Lynx treatment bonus is the same effect that makes Ardelia a survival monster in other stages, and here it’s what keeps your tank standing through the summon phase. This is a deliberate trade: Ardelia often runs a damage-buff set in offensive heat comps, but on this fight you want raw healing throughput, so Lynx wins.
Because Camille is flooding you with SP, you can afford to cast Ardelia far more often than usual. Don’t hold heals to be economical. If someone’s dropping, top them.
The Heat Loop, In One Picture
Here’s how the four kits chain together during a clean run. Read it as a cycle, not a checklist.
| Step | What Happens | Payoff |
|---|---|---|
| 1 | Laevatain stands in and takes hits | Charges Ember’s ult |
| 2 | Laevatain’s final strike consumes heat | Fuels Camille’s combo trigger |
| 3 | Camille’s combo procs on heat | Generates team SP |
| 4 | SP funds Ardelia heal spam | Keeps Laevatain alive to keep getting hit |
| 5 | Ember’s ult comes online | Ready to soak the next Pyromancer beam |
Every operator’s output is another operator’s input. When the loop is spinning, you have heals, SP, and a charged Ember ult all arriving right about when the boss wants to ult you.
Execution: Beat the Beam
Here’s the moment-to-moment plan for the ult phase, which is the part of the fight that actually kills people.
- Clones spawn, boss starts channeling. Do not commit to the clones. Acknowledge them and move on.
- Prep during the channel. Keep Laevatain in front eating hits to build Ember’s ult, keep Camille’s combo rolling for SP, and stack a couple of Ardelia heals so you’re topped up.
- Confirm Ember’s ult is charged. If it’s up, you’re safe. If it’s not, that’s a sign you weren’t taking enough hits or your build needs more ult efficiency.
- Beam sweeps in: pop Ember’s ultimate. Soak the damage instead of trying to dodge out. This is what the whole comp exists to do.
- Punish the opening. The instant the Pyromancer finishes his ult he’s vulnerable. This is when you dump Laevatain’s ultimate and burst him.
- Respect the cooldown. Ember’s ult is now down for 18 to 19 seconds. Play safe, don’t feed a big hit, and rebuild charge for the next beam.
The rhythm of the fight is: prep, soak, punish, recover, repeat. If you internalize that Ember’s cooldown gates how often you can soak, everything else falls into place.
Gear Summary
The exact substats are shown at the end of the video, but here’s the build direction for each operator.
| Operator | Set / Key Piece | Priority | Why |
|---|---|---|---|
| Laevatain | Flexible, HP-focused | Max HP | Needs to eat hits to charge Ember and survive |
| Ember | Ult efficiency / Ember pieces | Ult charge rate | Her ult must be up in time for every beam |
| Camille | Frontiers + Redeemer | Combo CDR + ult charge | SP generation and a fast ultimate |
| Ardelia | LYNX Aegis Injector | Treatment / healing | More healing throughput to keep the tank up |
For a full breakdown of why Camille wants Frontiers over the alternatives, see our Camille gear sets guide. For Ember’s kit and how her ultimate scales, the Ember build guide covers the details.
Common Mistakes
- Tunneling the clones. The number-one killer. You can’t out-damage them as F2P, so stop trying and prep for the beam instead.
- Using Laevatain’s ult too early. Firing it on the clones or before the boss’s ult wastes your one real burst window. Hold it for the post-ult opening.
- Putting a squishy operator in front. If someone other than Laevatain is eating hits, you charge Ember slower and risk a death. Keep the tank forward.
- Eating a big hit during Ember’s cooldown. After you soak a beam, you have 18 to 19 seconds with no safety net. Play defensively until it’s back.
- Under-building Laevatain’s HP. A glass-cannon Laevatain dies to the summon phase and never charges Ember. HP is not optional here.
- Hoarding Ardelia’s heals. Camille is flooding you with SP for a reason. Spend it. A dead tank costs you far more than an over-cast heal.
When This Team Works (and When It Doesn’t)
This comp is built for the free-to-play reality: not enough raw damage to skip the mechanic, so you beat it by surviving. It works because every piece is load-bearing. Ember soaks, Laevatain tanks and charges her, Camille funds the heals, Ardelia keeps the tank alive.
It will struggle if you break the chain. Swap Laevatain for a fragile DPS and Ember’s ult charges too slowly. Drop Camille and your Ardelia casts dry up. Pull Ardelia off Lynx and your tank starts dying in the summon phase. If you’re a heavily-invested account that can genuinely delete the clones, you don’t need this at all, you can just kill everything. But if you’re staring at a beam you can’t outrun, this is your answer.
What Would Change This
A few things could shift the strategy as the meta settles:
- The confirmed English stage name and official enemy data. We’re treating this as day-one intel; verify the Pyromancer’s exact ult timing against the in-game Enemy Intel screen once it’s documented.
- Mastery levels on Ember. The 18-second cooldown at max mastery versus 19 at base sounds small, but across a long fight it’s one extra soak. Prioritize her mastery if you’re leaning on this comp.
- Future healers or shielders. A shield-based support could eventually replace the “eat it with Ember” approach, but for now the damage soak is the cleanest F2P answer.
For the full stage roster and how Stage 3 fits into the rest of the series, keep an eye on the Umbral Monument database. Further down the ladder, Stage 5’s Harrowing Æthillu swaps the survive-the-beam plan for a burst-the-revival one, since that phantom keeps coming back until you delete it fast enough.
Final Read
Stage 3 of Contention of Deathly Silences isn’t a DPS check, it’s a discipline check. The Pyromancer punishes players who panic at the clones and reward players who treat his ultimate as a scheduled event they’ve prepped for. Ember eats the beam, Laevatain feeds Ember by tanking, Camille keeps the SP flowing, and Ardelia keeps the whole thing standing. Learn Ember’s cooldown, hold Laevatain’s ult for the opening, and the day-one wall turns into a rhythm you can repeat until the boss is dead.
FAQ
What is the Pyromancer in Deathly Silences Stage 3? It’s the caster-type boss on the stage day-one players flagged as the wall. He summons two clones of himself and channels an ultimate beam with lethal explosion damage. The stage’s official English name is still being confirmed in-game.
Do I need to kill the summoned clones? No, and trying to is the most common way to fail as a free-to-play player. Your damage isn’t high enough to delete them before the boss ults, so ignore them and use the summon phase to prep your defenses instead.
How does Ember’s ultimate tank the beam? Ember’s ult creates a damage-soak window that lets your controlled operator absorb the Pyromancer’s beam without dying. Instead of dodging the ultimate, you eat it on purpose while Ember’s ult is active.
What charges Ember’s ult the fastest? Two things: Ember’s own combo attacks, and the operator you’re controlling getting hit. Keeping your tanky operator (Laevatain) in front to take hits is the fastest way to build it.
What is Ember’s ultimate cooldown? 19 seconds at base, dropping to 18 seconds at max mastery. After you soak a beam, you have no damage soak for that window, so avoid big hits until it’s back.
Why is Laevatain the tank instead of Ember? Because Ember’s ult charges when the controlled operator takes damage, and Laevatain, built with high HP, can safely eat hits to charge it. She also serves as your main DPS in the boss’s vulnerable window.
Is this team viable for free-to-play players? Yes, that’s the entire point. It’s designed for accounts that can’t burst the clones down, trading a damage race for a survival plan built around Ember’s soak.
When should I use Laevatain’s ultimate? Only in the vulnerable window right after the Pyromancer finishes his own ultimate. Using it early on the clones wastes your one real burst window and lets the fight drag on.
What gear does each operator need? Laevatain wants max HP with a flexible set, Ember wants ult efficiency, Camille runs Frontiers plus Redeemer for SP and ult charge, and Ardelia runs the LYNX Aegis Injector for extra healing. Exact substats are shown at the end of the video.
Can I swap Ardelia for another healer? It’s risky. The Lynx treatment bonus on Ardelia is what keeps your tank alive through the summon phase, and her heal spam depends on Camille’s SP. Swapping her breaks the loop the comp relies on.
Contention of Deathly Silences is permanently available, so there’s no rush on Stage 3 itself. Take the time to learn Ember’s cooldown, and this fight stops being scary.
Take a Break
Available on desktop