OPTIMIZED FARMING ROUTES: GATHERING & ENERGY ALLUVIUM MAPS
Table of Contents
Every daily loop in Arknights: Endfield eventually comes down to the same chore: sweeping the open world for gathering materials and Energy Alluvium spawns. The nodes are scattered across more than a dozen named regions over Valley IV and Wuling, and wandering between them without a plan burns real time, a sloppy circuit can take twice as long as a tight one and still miss spawns along the way. The difference between players who finish their material sweep in twenty minutes and players who lose an hour to it is almost never movement skill. It is route knowledge.
This page collects 17 community-drawn farming route maps covering every major region in the game, plus a legend explaining the marker system they all share. Each map marks where to start the run, which fast-travel point or Depot to drop in at, and, crucially, which segments to zipline, which to sprint on foot, and where a short walk is unavoidable. The routes cover the full Valley IV side (The Hub, Valley Pass, Aburrey Quarry, Originium Science Park, Origin Lodespring, and Power Plateau) and the full Wuling side (Wuling City, Jingyu Valley, Qingbo Stockade, Marker Stone, the Test Area, and Sword Vault Dale).
Use these circuits as the traversal layer of your farming plan, not the whole plan. If you have not yet decided what to farm, the farming guide covers which materials actually bottleneck progression, and the dailies and weeklies guide shows where a gathering sweep fits into an efficient login. The maps below assume your regional zipline anchors are unlocked.
One scope note before the maps: these are overworld gathering and Energy Alluvium circuits. They do not cover Sanity-gated stage farming, boss material runs, or factory logistics. Those live in their own guides. Routes are drawn on current map layouts and re-checked when major versions drop, so the Last Updated date at the top of the page is your freshness signal.
Quick Answer
Teleport to the circled starting point on the map for your region, red circles for standard Gathering or Energy Alluvium runs, orange circles for runs that begin at a Depot, then follow the arrows in order. Blue arrows mean take the zipline, yellow arrows mean running is faster, and green arrows mean a short walk is required because the segment cannot be started right beside the waypoint.
The routes work identically at every world tier, since tier changes enemy strength but not node placement or zipline anchors. If a blue zipline segment looks impossible in-game, you almost certainly have an undiscovered anchor in that region, discover it once and the route works permanently.
How to Read These Maps
All seventeen maps use one shared marker language, so it is worth thirty seconds to internalize it before scrolling. Circles are starting points and arrows are movement instructions. The color of each tells you what kind: a red circle is where you spawn in for a Gathering or Energy Alluvium circuit, while an orange circle means the loop is anchored to a Depot. Several regions have more than one circle on the same map. Those are separate loops within the region, not a single mega-route, and you can run them independently depending on which nodes you actually need.
The arrows are where the time savings live. Blue arrows trace zipline connections, and on most maps they carry the bulk of the route. Yellow arrows flag stretches where sprinting on foot beats the zipline, typically because the glide path detours or the anchor geometry forces a slow approach. Green arrows mark the awkward segments: connections that need a bit of manual walking because they cannot be executed from directly beside the waypoint. The full key is below.
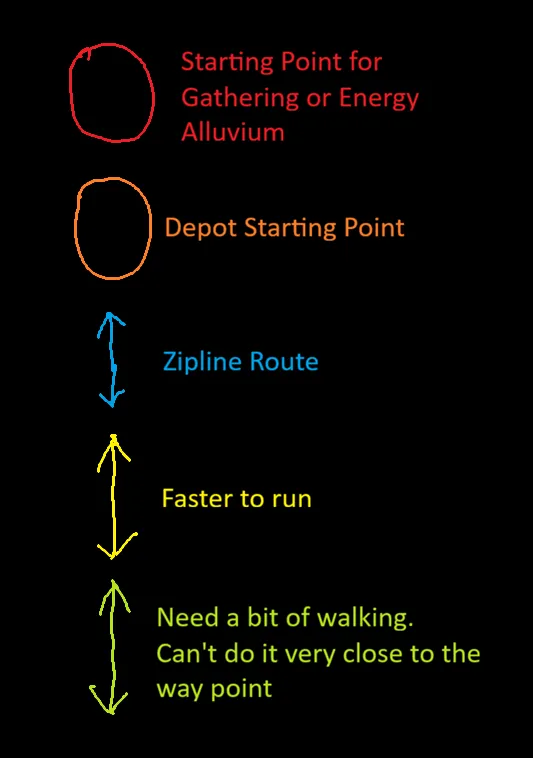
Memorize the two big ones, red means start here, blue means zipline, and read the rest as exceptions. When a map suddenly switches from blue to yellow mid-route, that is the author telling you they tested both options on that segment and the zipline lost. Trust the colors over your instincts; the entire value of a community route is that someone already burned the time comparing alternatives.
The Hub
The Hub is the densest of the Valley IV maps and the one most players farm first, since its waypoint coverage is generous and the region's gathering nodes sit close to landmarks you already know from the early story. The route threads the central green belt, from the Corsinic Area down past the Old Water Plant and the Construction Site, with separate red starting points covering the Hill Passage in the north and the Worker Dorms cluster in the southeast.
Because The Hub's terrain is relatively flat, this is also the map where the zipline arrows matter most: the blue segments here chain cleanly, and skipping a zipline to run on foot almost always loses time except where the map explicitly marks it. Treat the multiple red circles as independent mini-loops and run only the ones covering materials you need.
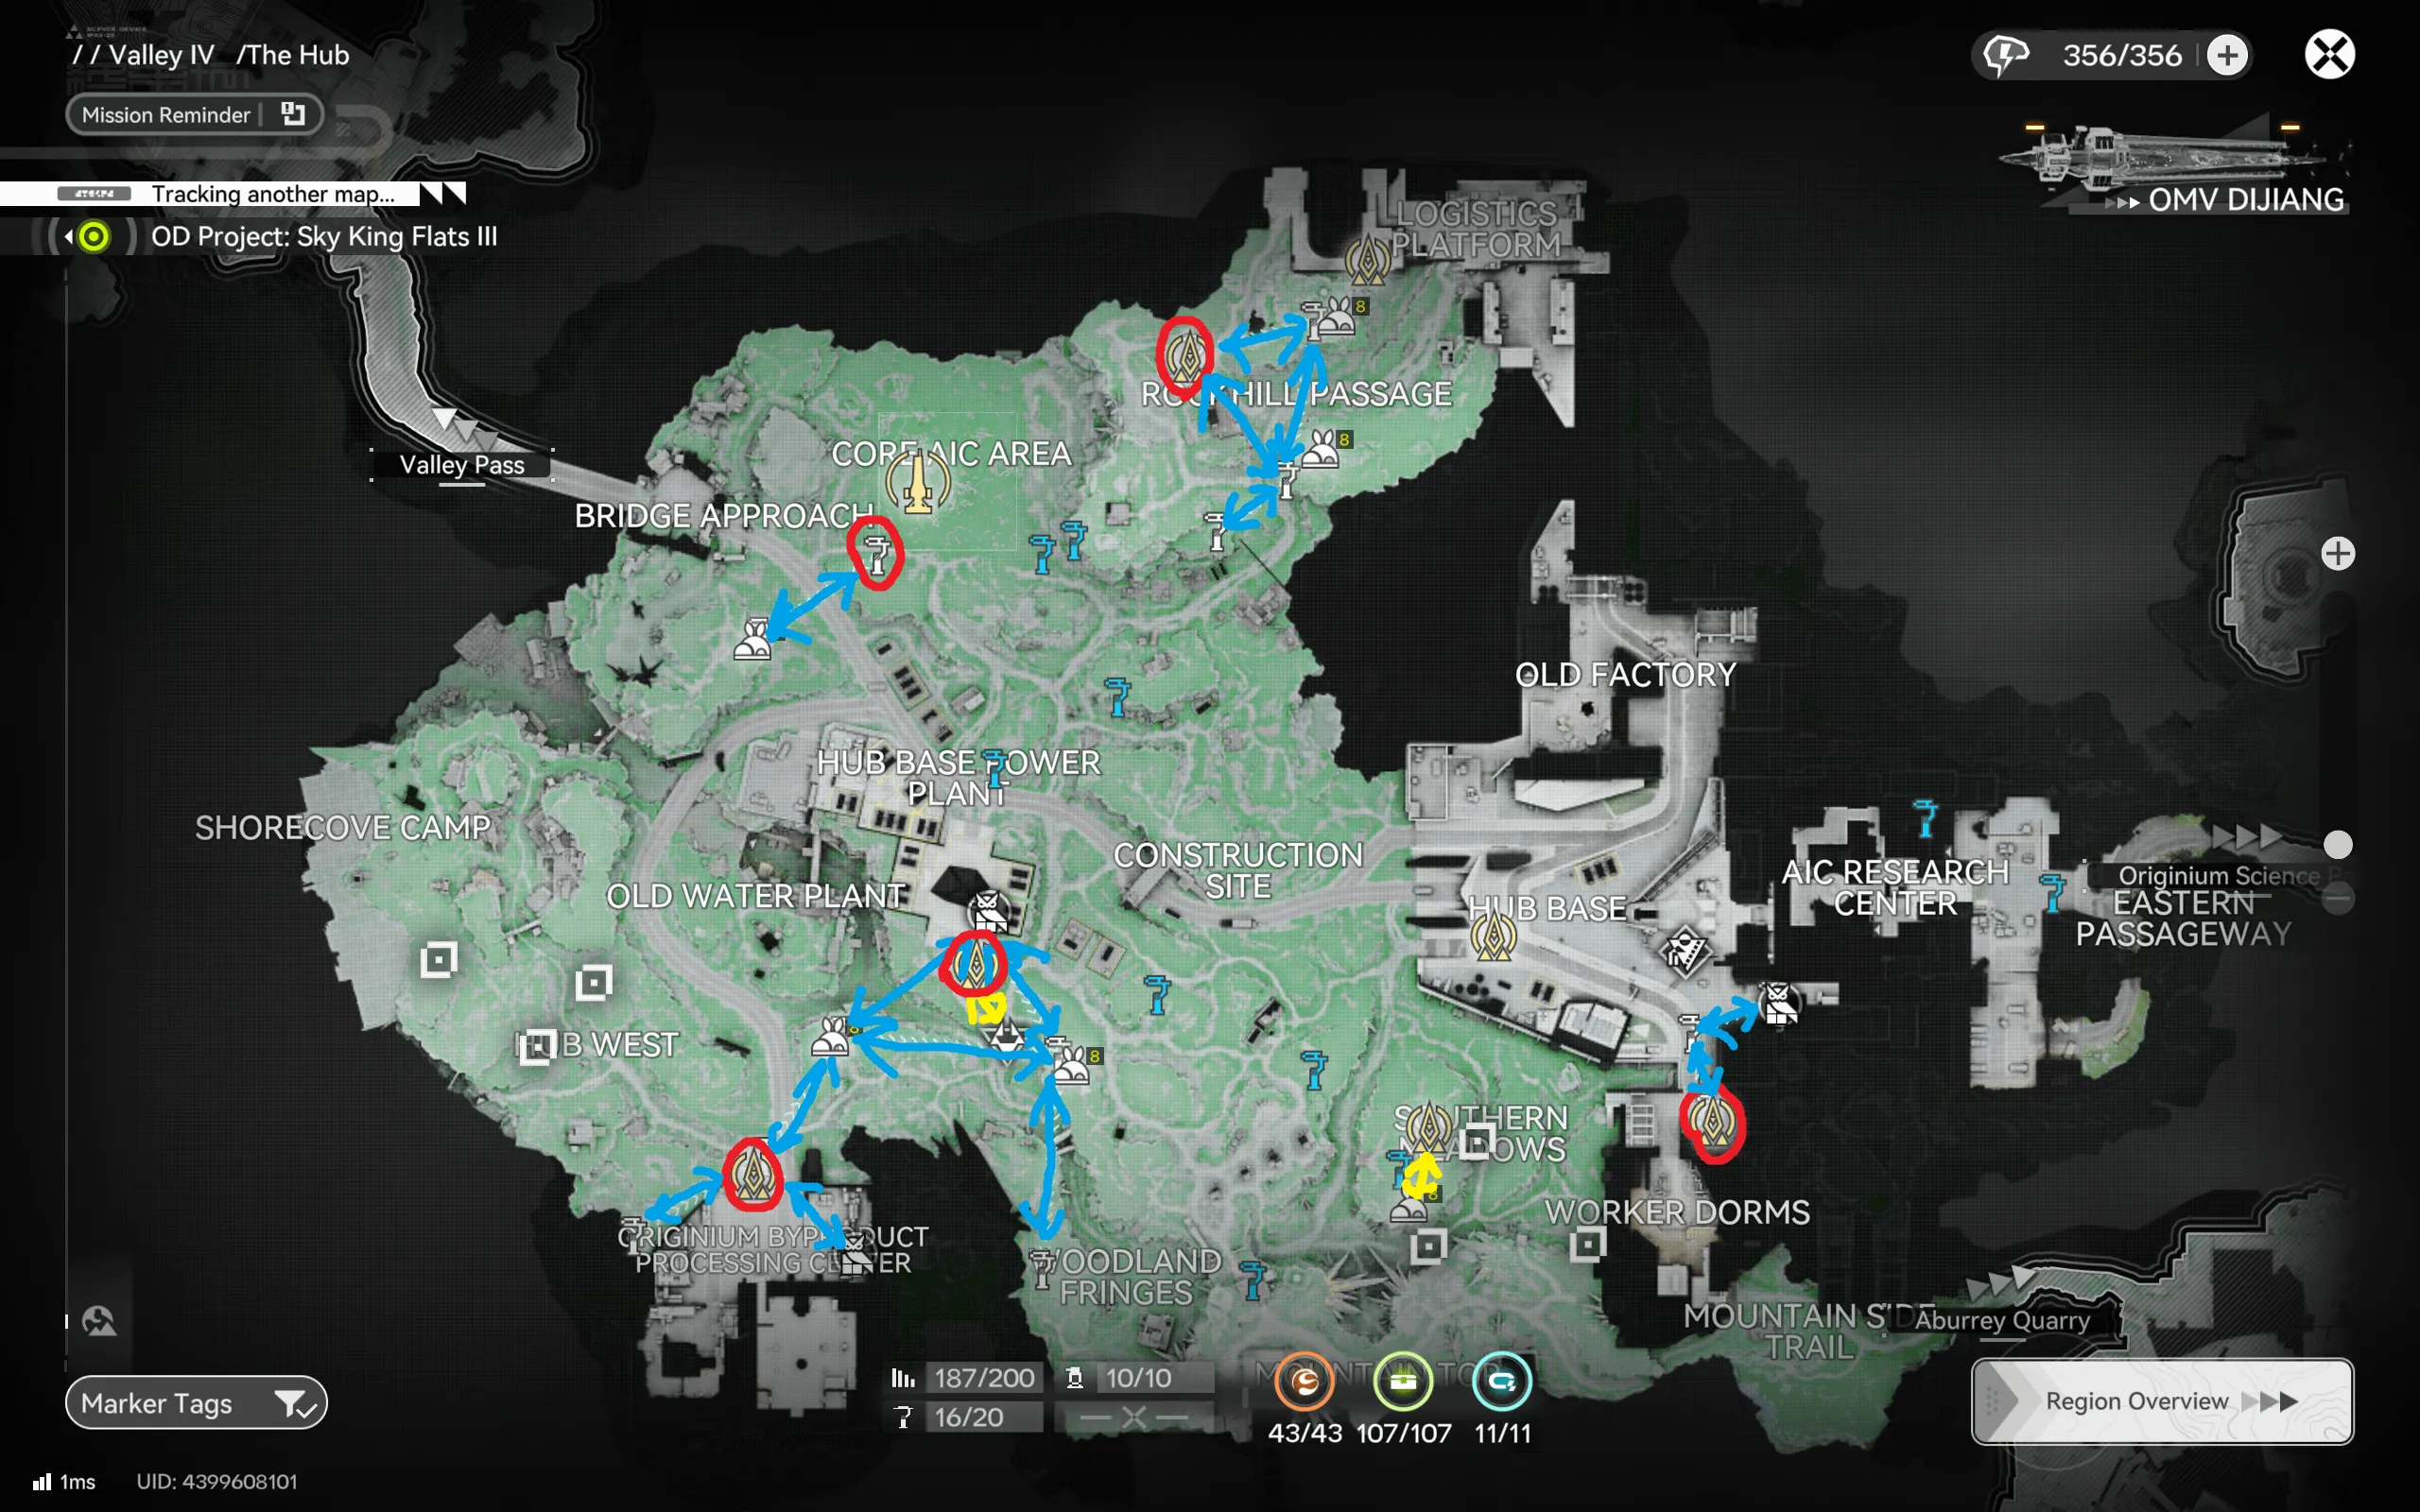
The southeast loop near the Worker Dorms is the quickest of the bunch and a good fit for the end of a session. One starting point, a short arrow chain, and you are out. The longer central run pairs naturally with daily commission stops in the same area.
Valley Pass
Valley Pass is a compact connector region, and its route reflects that: two red starting points near the Valley Fort and Valley Transfer, a clean zipline spine running south through the Arsenal toward the Passage Entrance, and one marked stretch where the map switches you off the zipline because running wins. It is the shortest circuit on this page and slots easily between bigger sweeps.
The route's shape follows the region's elevation. The northern half around Valley Fort and the Temporary Shelter sits high, so the blue segments there glide downhill efficiently. The southern approach to the Passage Entrance is where you should watch for the color switch rather than autopiloting onto every anchor you see.

If you are routing a full Valley IV session, Valley Pass works best as the bridge leg between The Hub and Aburrey Quarry. Its exit at the Passage Entrance drops you next to The Hub's southern edge, so you can chain regions without a teleport.
Aburrey Quarry
Aburrey Quarry's bowl-shaped layout makes it deceptively annoying to farm without a plan: the rim and the pit floor are separate traversal layers, and picking the wrong descent point means climbing back out. The route solves this with a red starting point near the Quarry Entrance and a second one at the Stockpile Area, sweeping the Refinery and Loading Area before dropping toward Lifter Central and the Staff Lounge.
The quarry is one of the regions where the gathering markers concentrate around industrial landmarks rather than greenery, so the arrows hug the structures. Follow the drawn order, the route descends in a controlled spiral rather than cutting straight across the pit, which looks longer but avoids the dead vertical walls that force re-climbs.

The Stockpile Area start is the better of the two if you are only after a quick partial sweep: it sits roughly mid-route, and the southern leg from there past Lifter Central to the Staff Lounge is a straight shot with no backtracking.
Originium Science Park
Originium Science Park has the most sprawling route on the Valley IV side, and it is the first map on this page with an orange Depot starting point, the loop is anchored to the Depot near the western Control Center, with additional red starts by the Research Center and the Kohl Plant. From the Depot, the arrows fan east through the Transport Nexus and the central Science Park before splitting toward the Research Center, the Mountain Path Slope, and the Eco-Farm in the far east.
This is a region where trying to do everything in one pass is a mistake. The drawn route is really three connected lobes, west (Control Center and The Depression), central (Science Park and Research Center), and east (Eco-Farm and the Cliffside Trail), and the smart play is to enter at the lobe that matches the materials you are short on. The Kohl Plant start in the south exists precisely so you can hit the southern nodes without traversing the whole park.
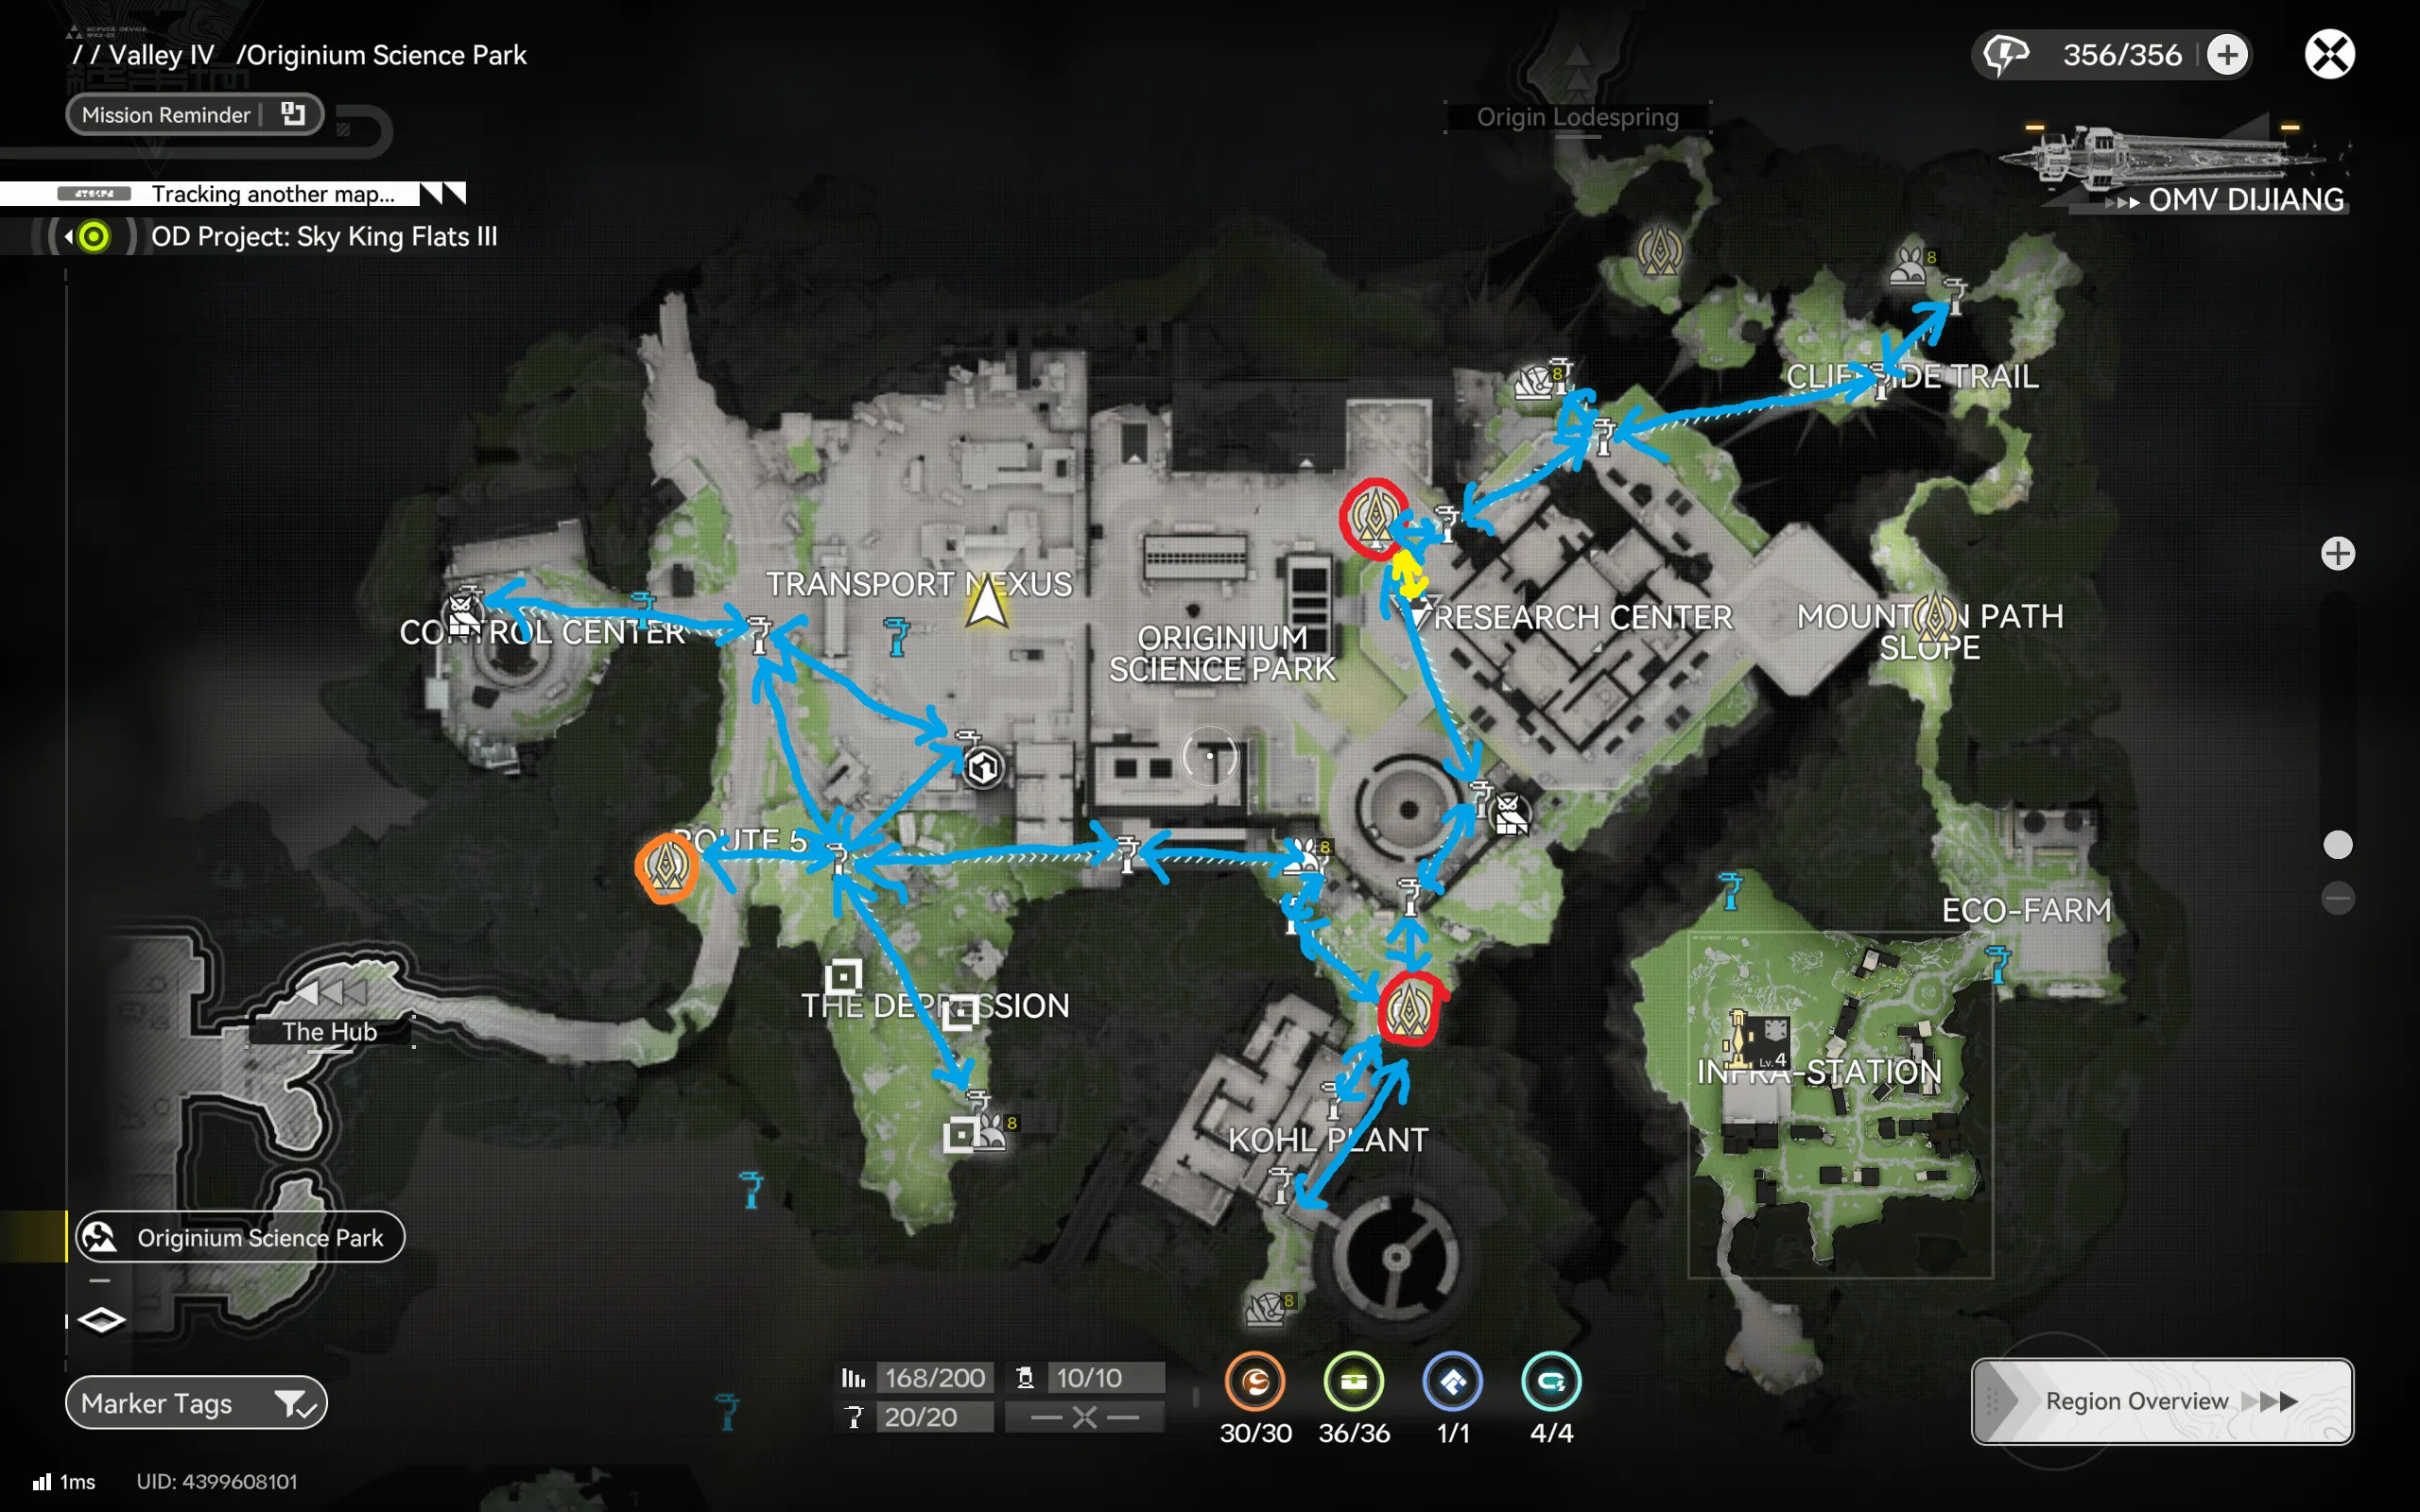
Note how much of this map is blue: the Science Park's zipline coverage is excellent, and almost every lobe-to-lobe connection rides an anchor. If any segment refuses to connect in-game, this is the region where an undiscovered anchor is most likely the culprit, sweep the route once slowly to pick up any you are missing.
Origin Lodespring
Origin Lodespring is big enough that the community splits it into two separate circuits, and this page carries both. The northern loop is a Depot-anchored run through the industrial heart of the region; the southern sweep is a longer red-start circuit through the mining terraces. Run them as separate sessions, stitching them together crosses the Containment Zone Intersection twice and wastes the middle leg.
North Loop: Logistics Area
The north run starts at the orange Depot circle by the Logistics Area and branches out in a star pattern: west to the Mines Cable Car Station, east toward the Containment Zone Intersection and the Old Mines approach, and south past the Meteorological Station. Because the legs radiate from the Depot rather than forming a ring, you return toward the center between legs, convenient if your bag fills up mid-run.
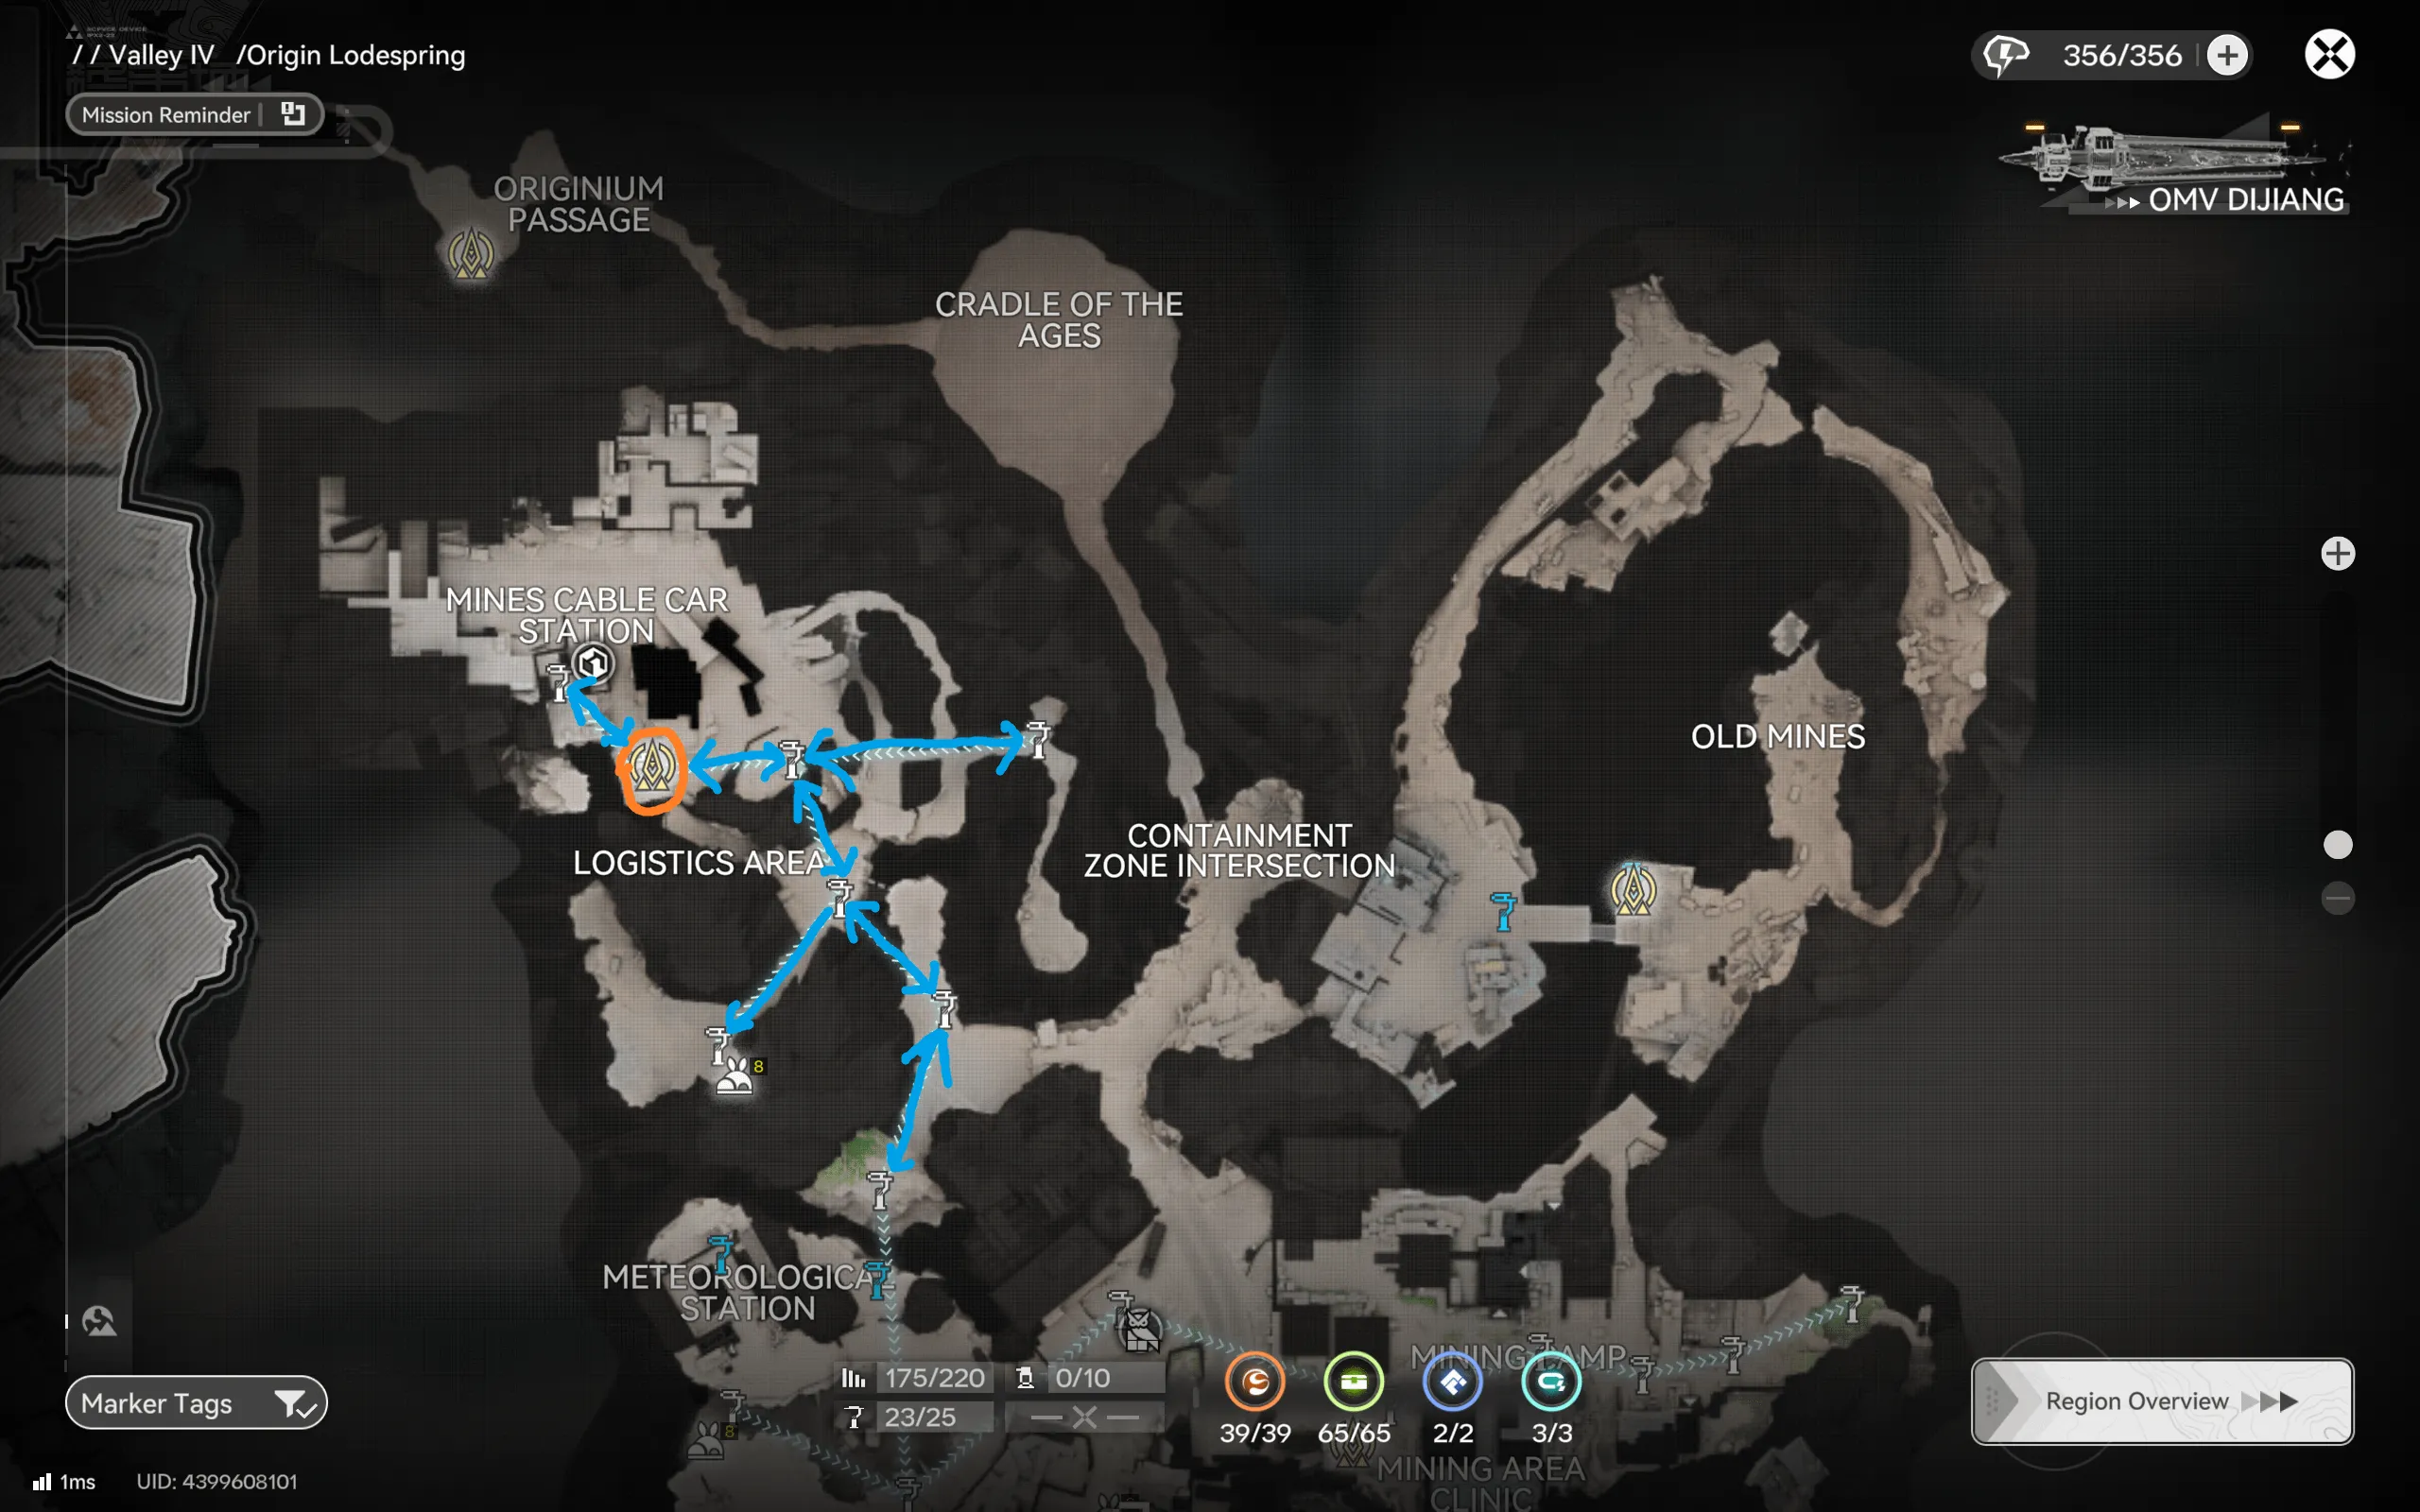
The star shape also means you can drop any leg without breaking the rest of the route, skip the Old Mines branch entirely on days you do not need its nodes and the remaining legs are unaffected.
Southern Mining Sweep
The southern circuit starts from a red circle near the Mining Area Clinic and covers the terraced mining country below the Meteorological Station: the Cliffside Mining Area, the Temporary Storage shelf, and the long southern run down to the Brightcliff Observation Post, with eastern spurs toward the Mountain Passage and Landbreaker Camp. This is the most vertical route on the page, and the blue zipline segments do the heavy lifting on every elevation change.
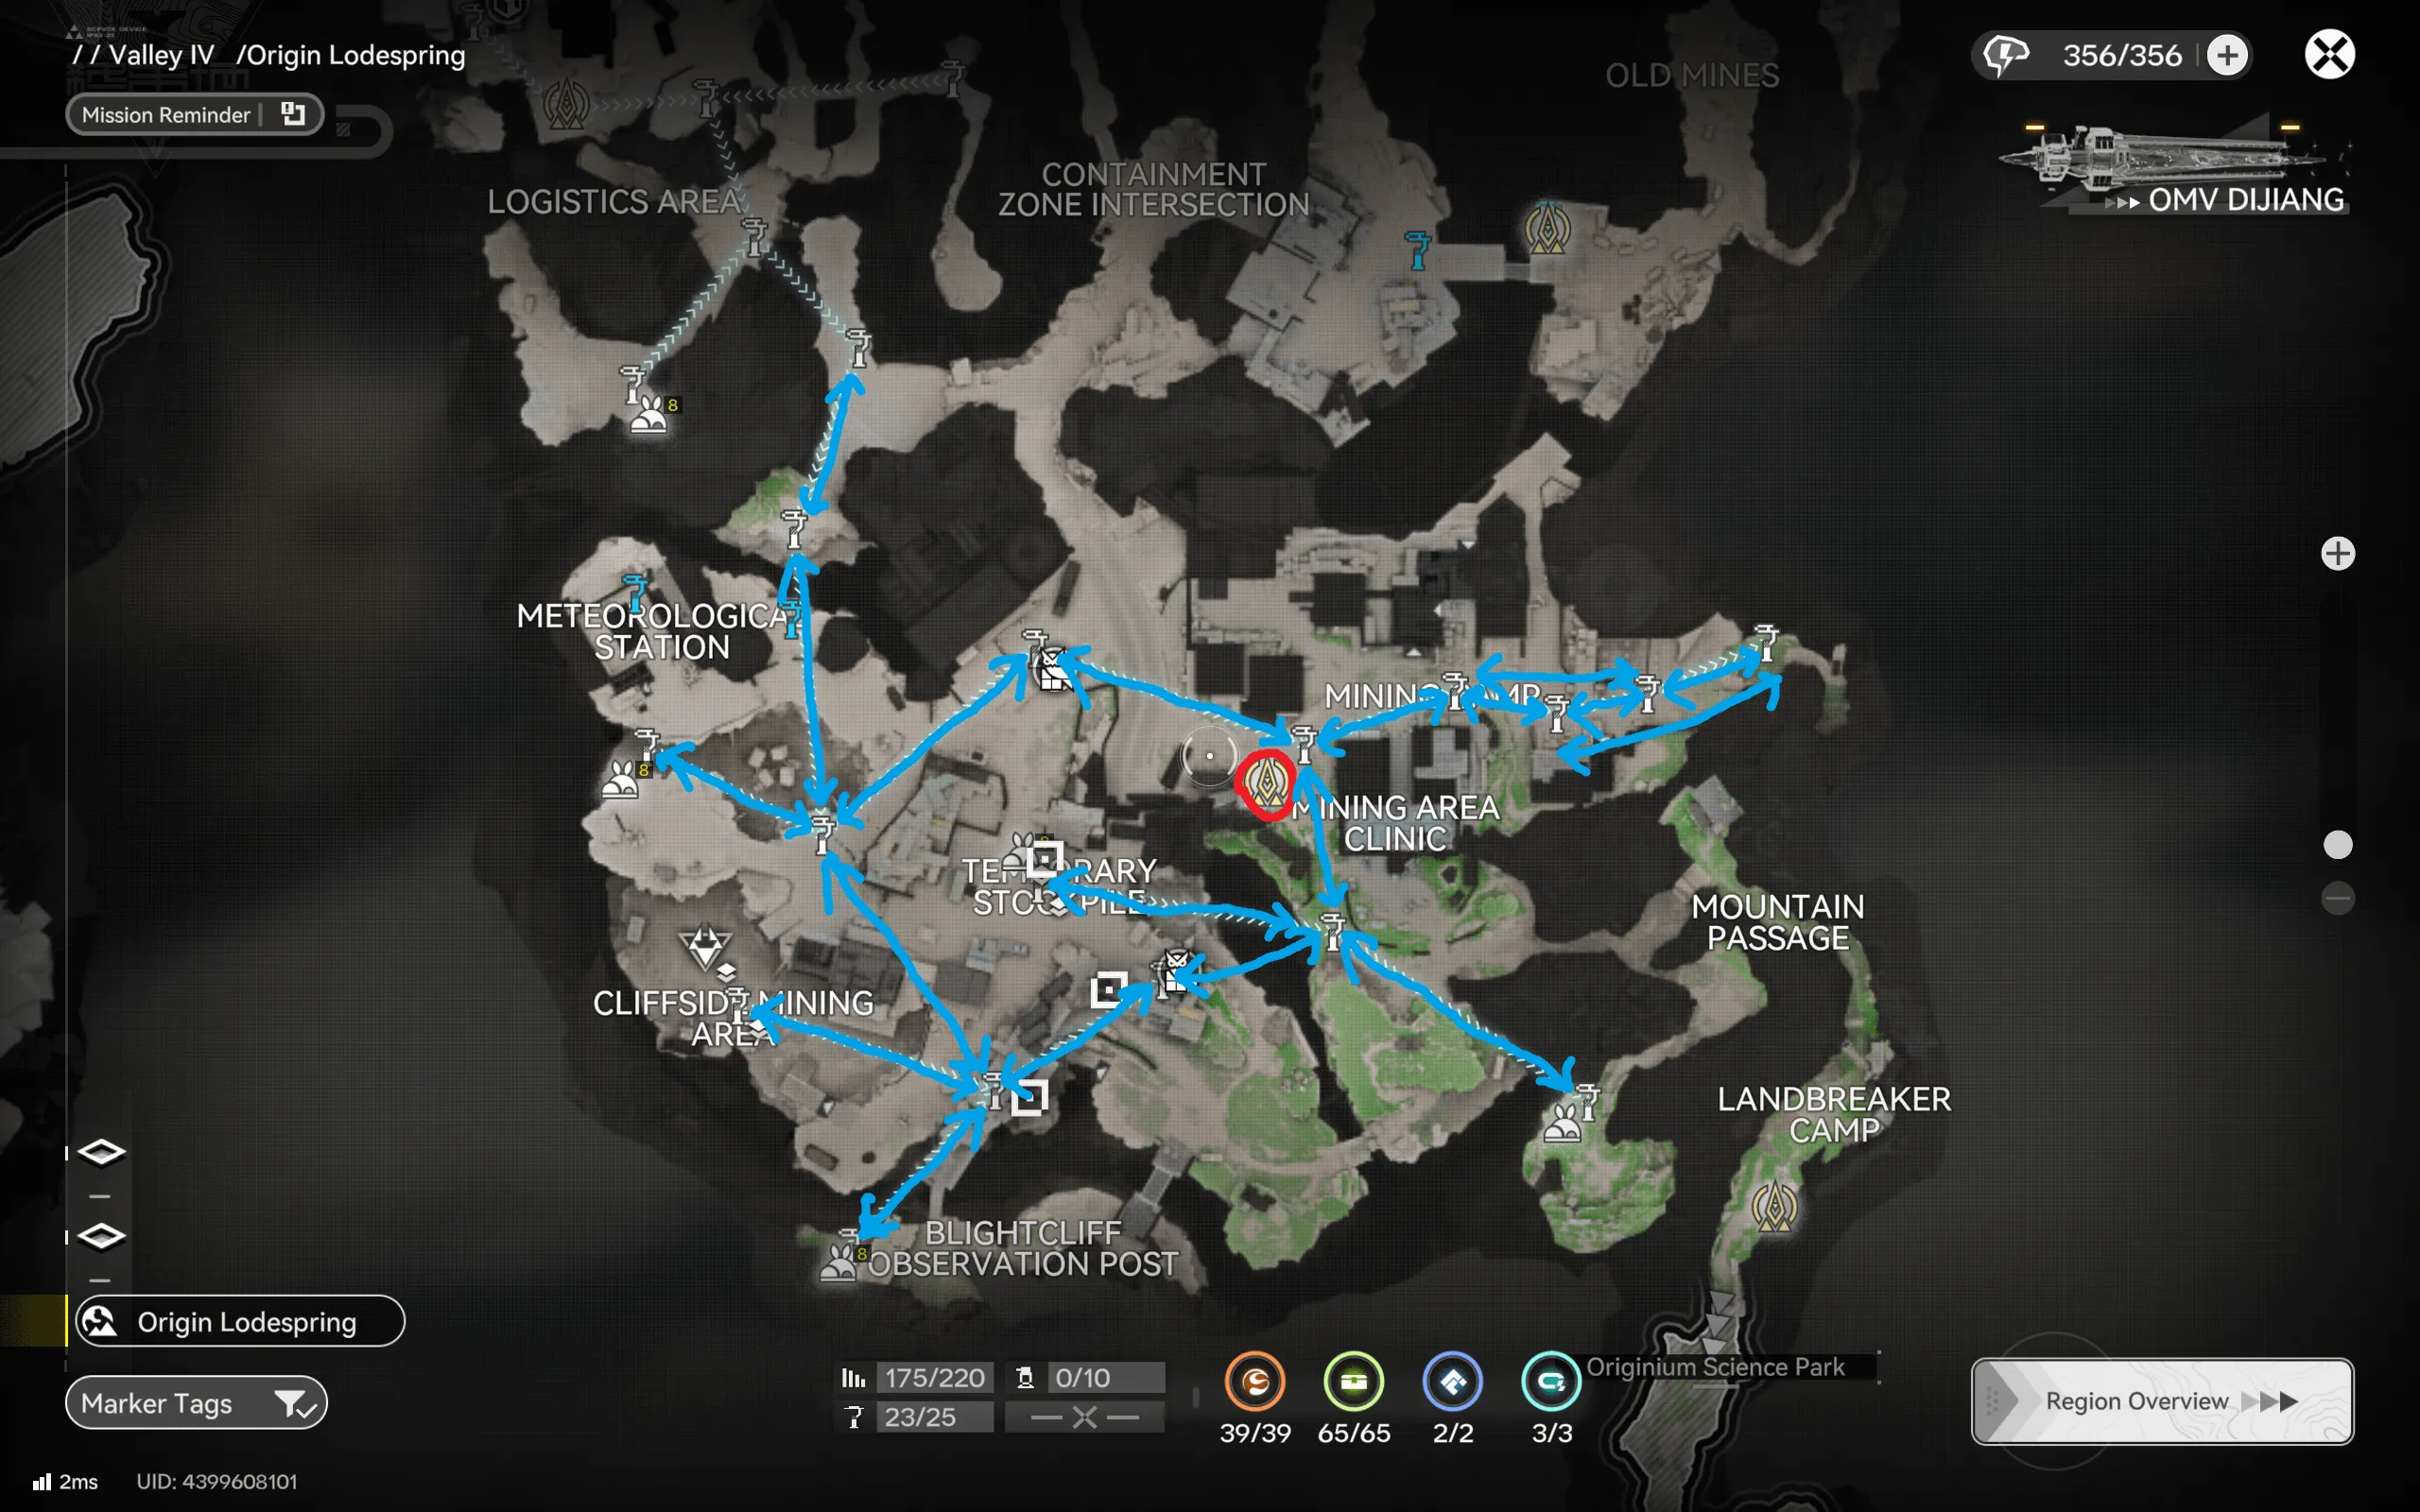
Resist the urge to shortcut downhill on foot here, the terraces look adjacent on the map but are separated by sheer drops, and the drawn anchor order is the only sequence that avoids fall damage detours.
Power Plateau
Power Plateau's route is the busiest single map on the Valley IV side: a dense arrow web linking Old Dorms, the Originium Power Plant, the Bridge Approach Camp, the United Parking Lot, the East Tram Way, and the Shattered Fringe, with the marked start sitting near the Evacuation Zone in the south. The density is the point, the plateau's gathering nodes cluster tightly around its ruined structures, and the web shape lets you enter the loop at multiple points.
Because so many arrows converge on the central ruins, this is the easiest map on the page to get turned around in. Pick one direction around the web and commit; the route is drawn so that either rotation works, but alternating directions mid-run is how you end up re-visiting cleared nodes.
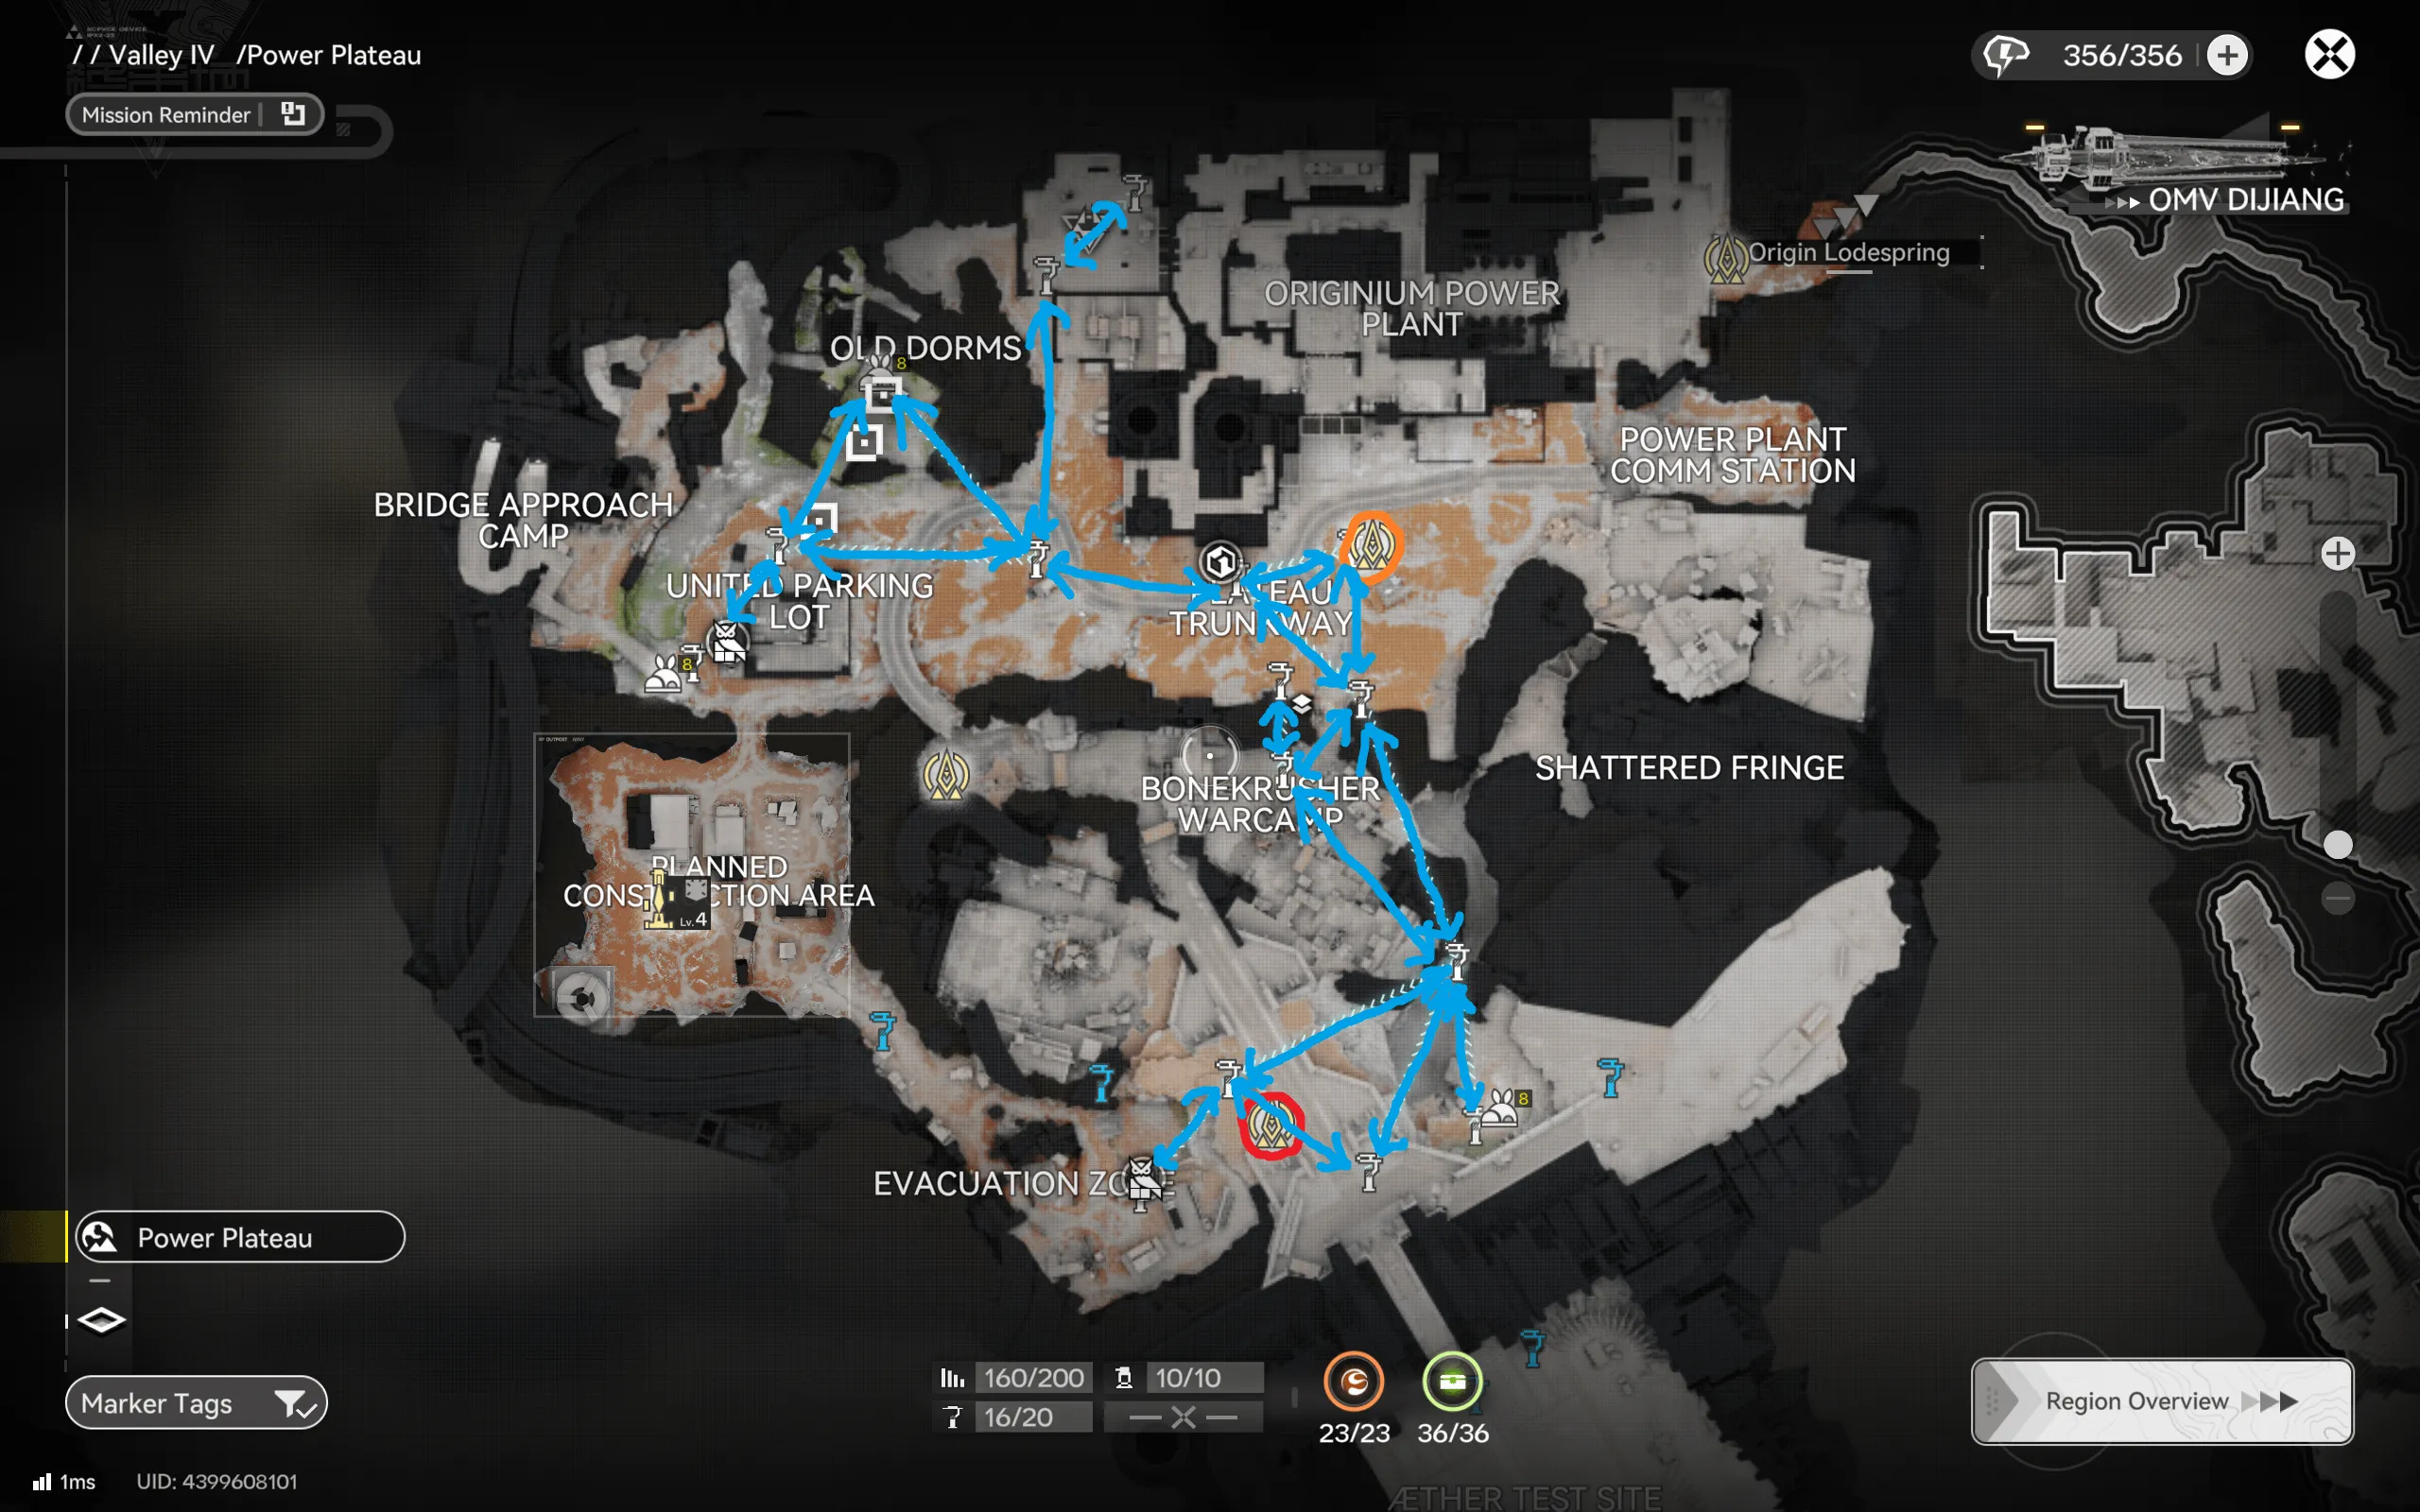
If you only have time for half the plateau, prioritize the northern arc, Old Dorms across to the Originium Power Plant, which carries the longest unbroken zipline chain and the best node density per minute.
Wuling City
Wuling City is the largest farmable region in the game, and like Origin Lodespring it needs two maps to cover properly: one for the dense city core and one for the wetland outskirts. The two circuits share no segments, so treat them as fully independent runs. Both assume Version 1.1+ story progression has unlocked the regional traversal network.
City Core
The core route runs three red starting points through the urban grid, up from the Bureau of Applied Technologies through Chenshan Way and the Core AIC Area toward the Technological Production Office and the Bugui Grove Agricultural Test Site, with an eastern branch crossing the water toward the Maintenance Zone. Urban farming is waypoint-rich, so the route leans on short zipline hops rather than long glides.
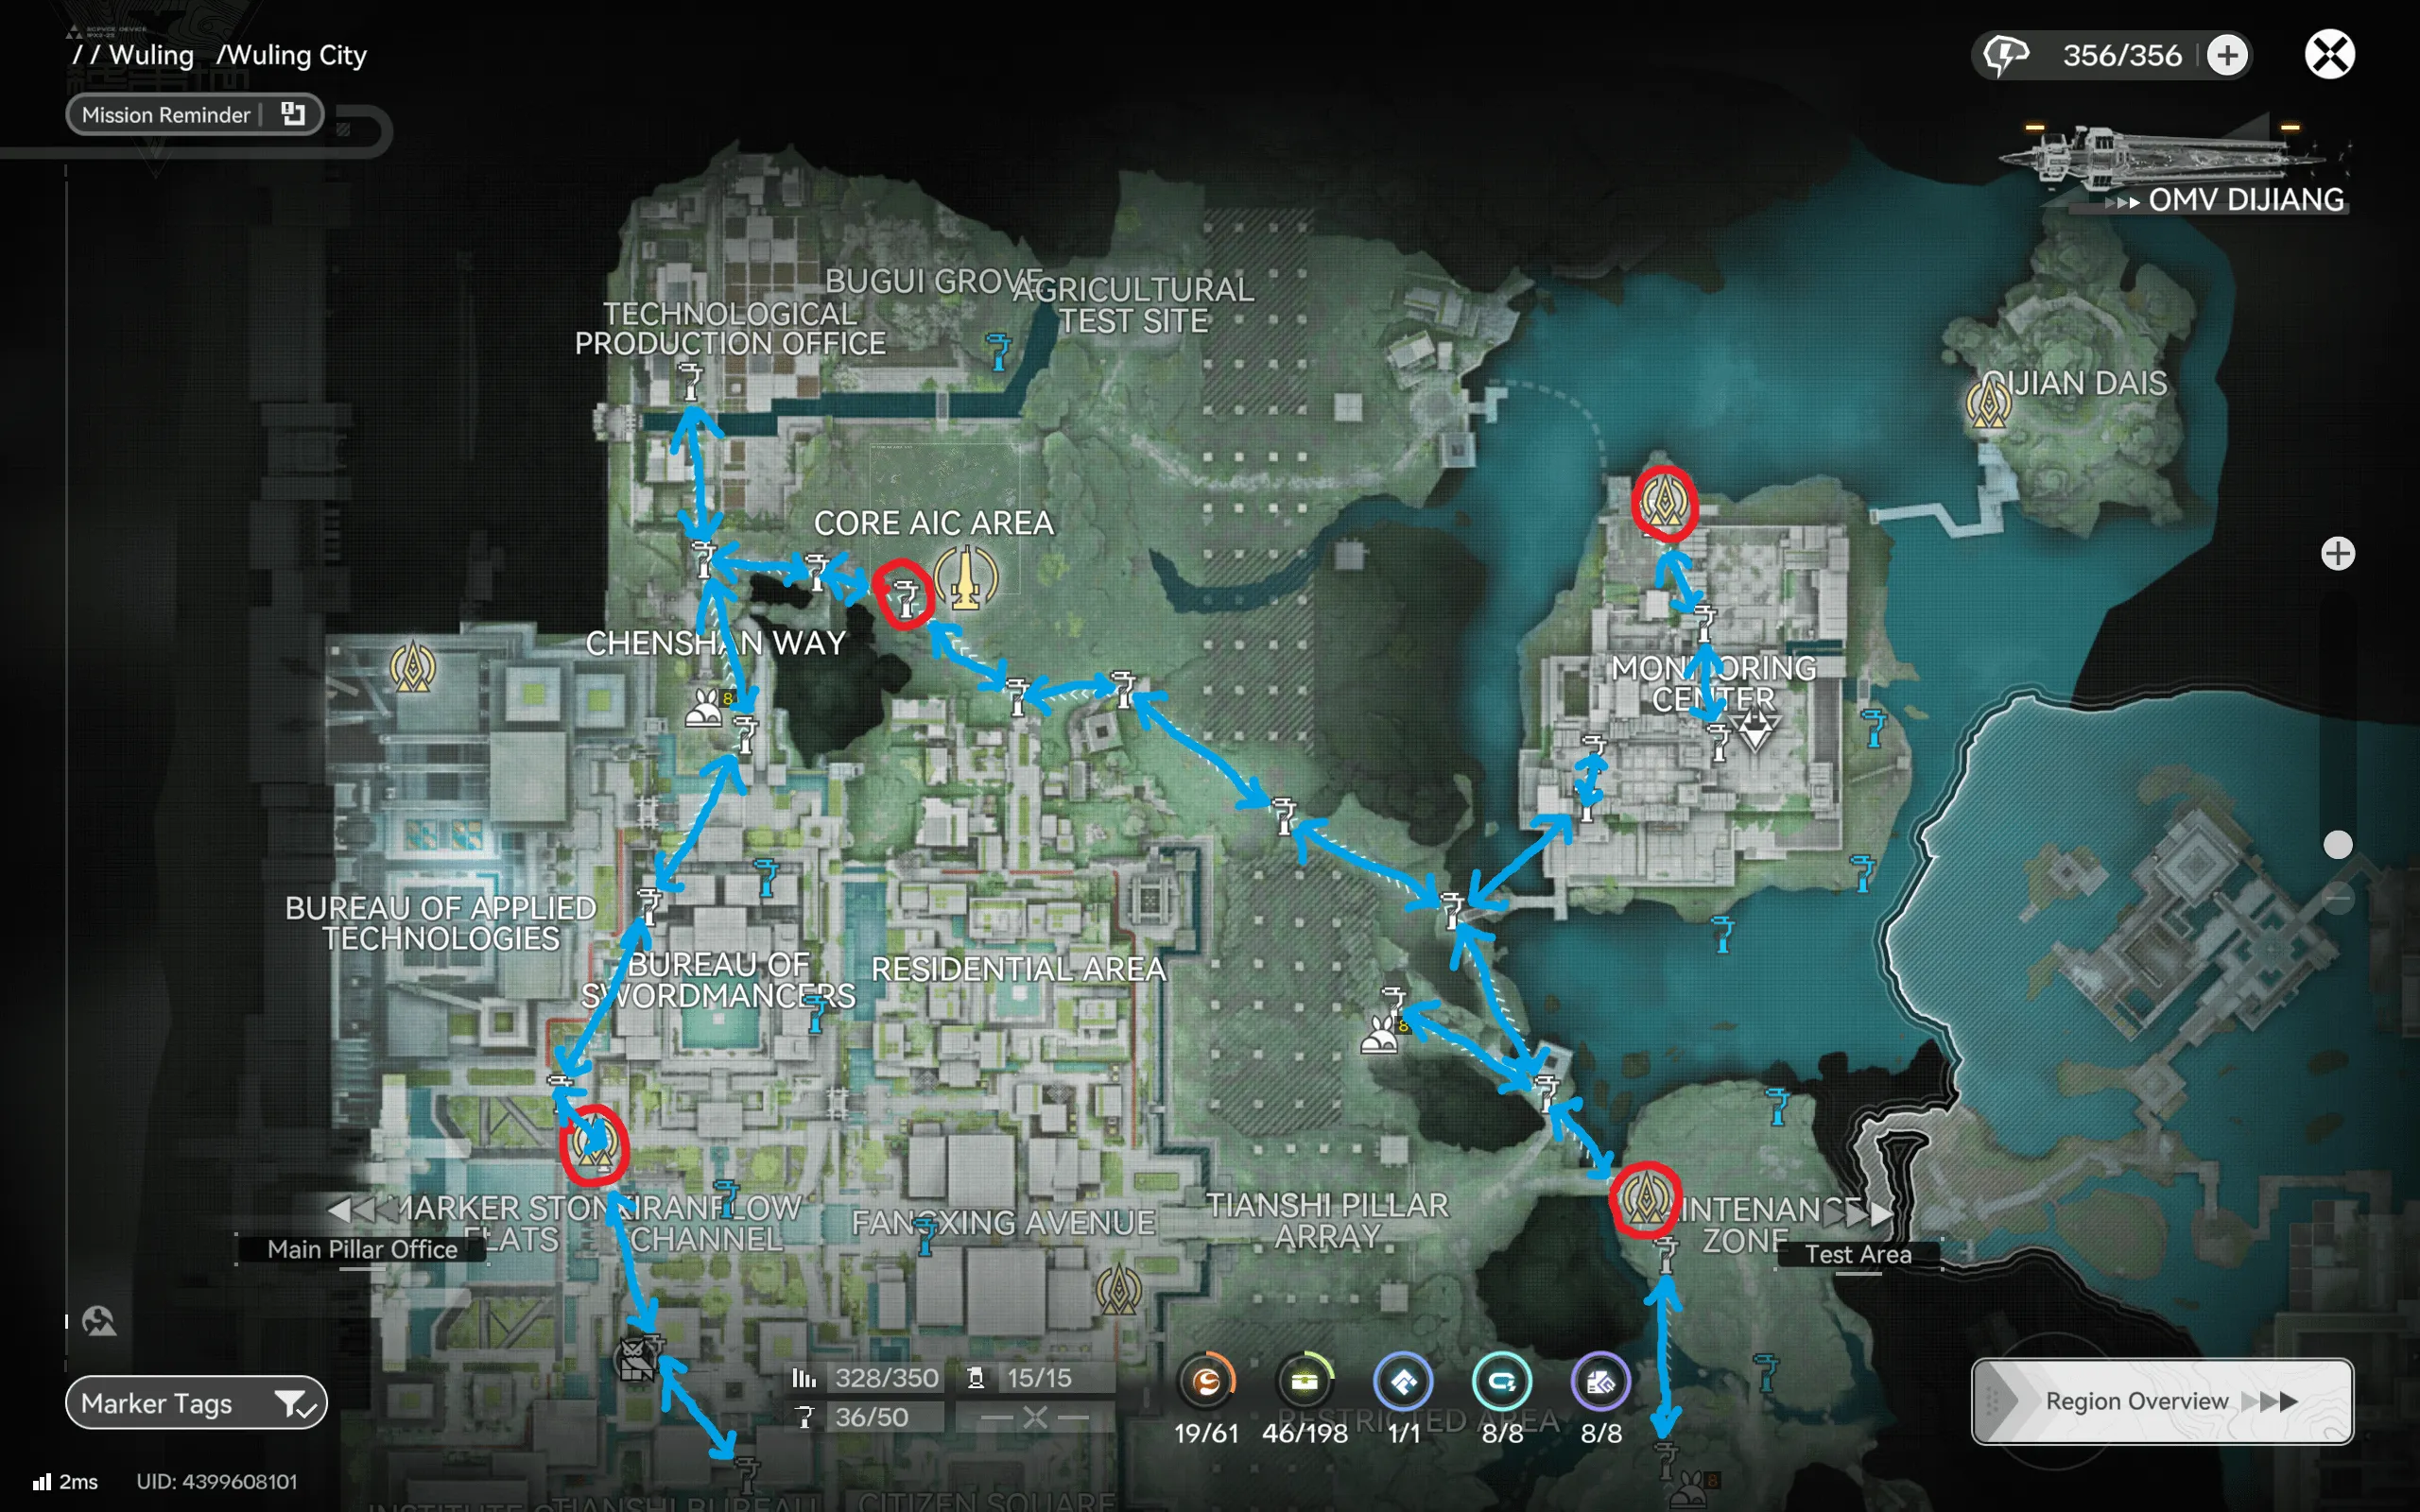
The eastern over-water branch toward the Maintenance Zone is the one stretch where you should check the arrow colors carefully, the map mixes movement types there because the shoreline geometry breaks up the zipline chain.
Outskirts & Marshes
The second Wuling City map covers everything the core route skips: the Restricted Area in the east, the Riverbank Grotto, the Outskirt Burrens, and the marsh country in the south around Hutou Marsh and Hulu Cave, with starts spread across the Institute district and the southern wetlands. This circuit is longer, wetter, and more enemy-dense than the core, at high world tiers expect to disengage from patrols more often here than anywhere else on this page.
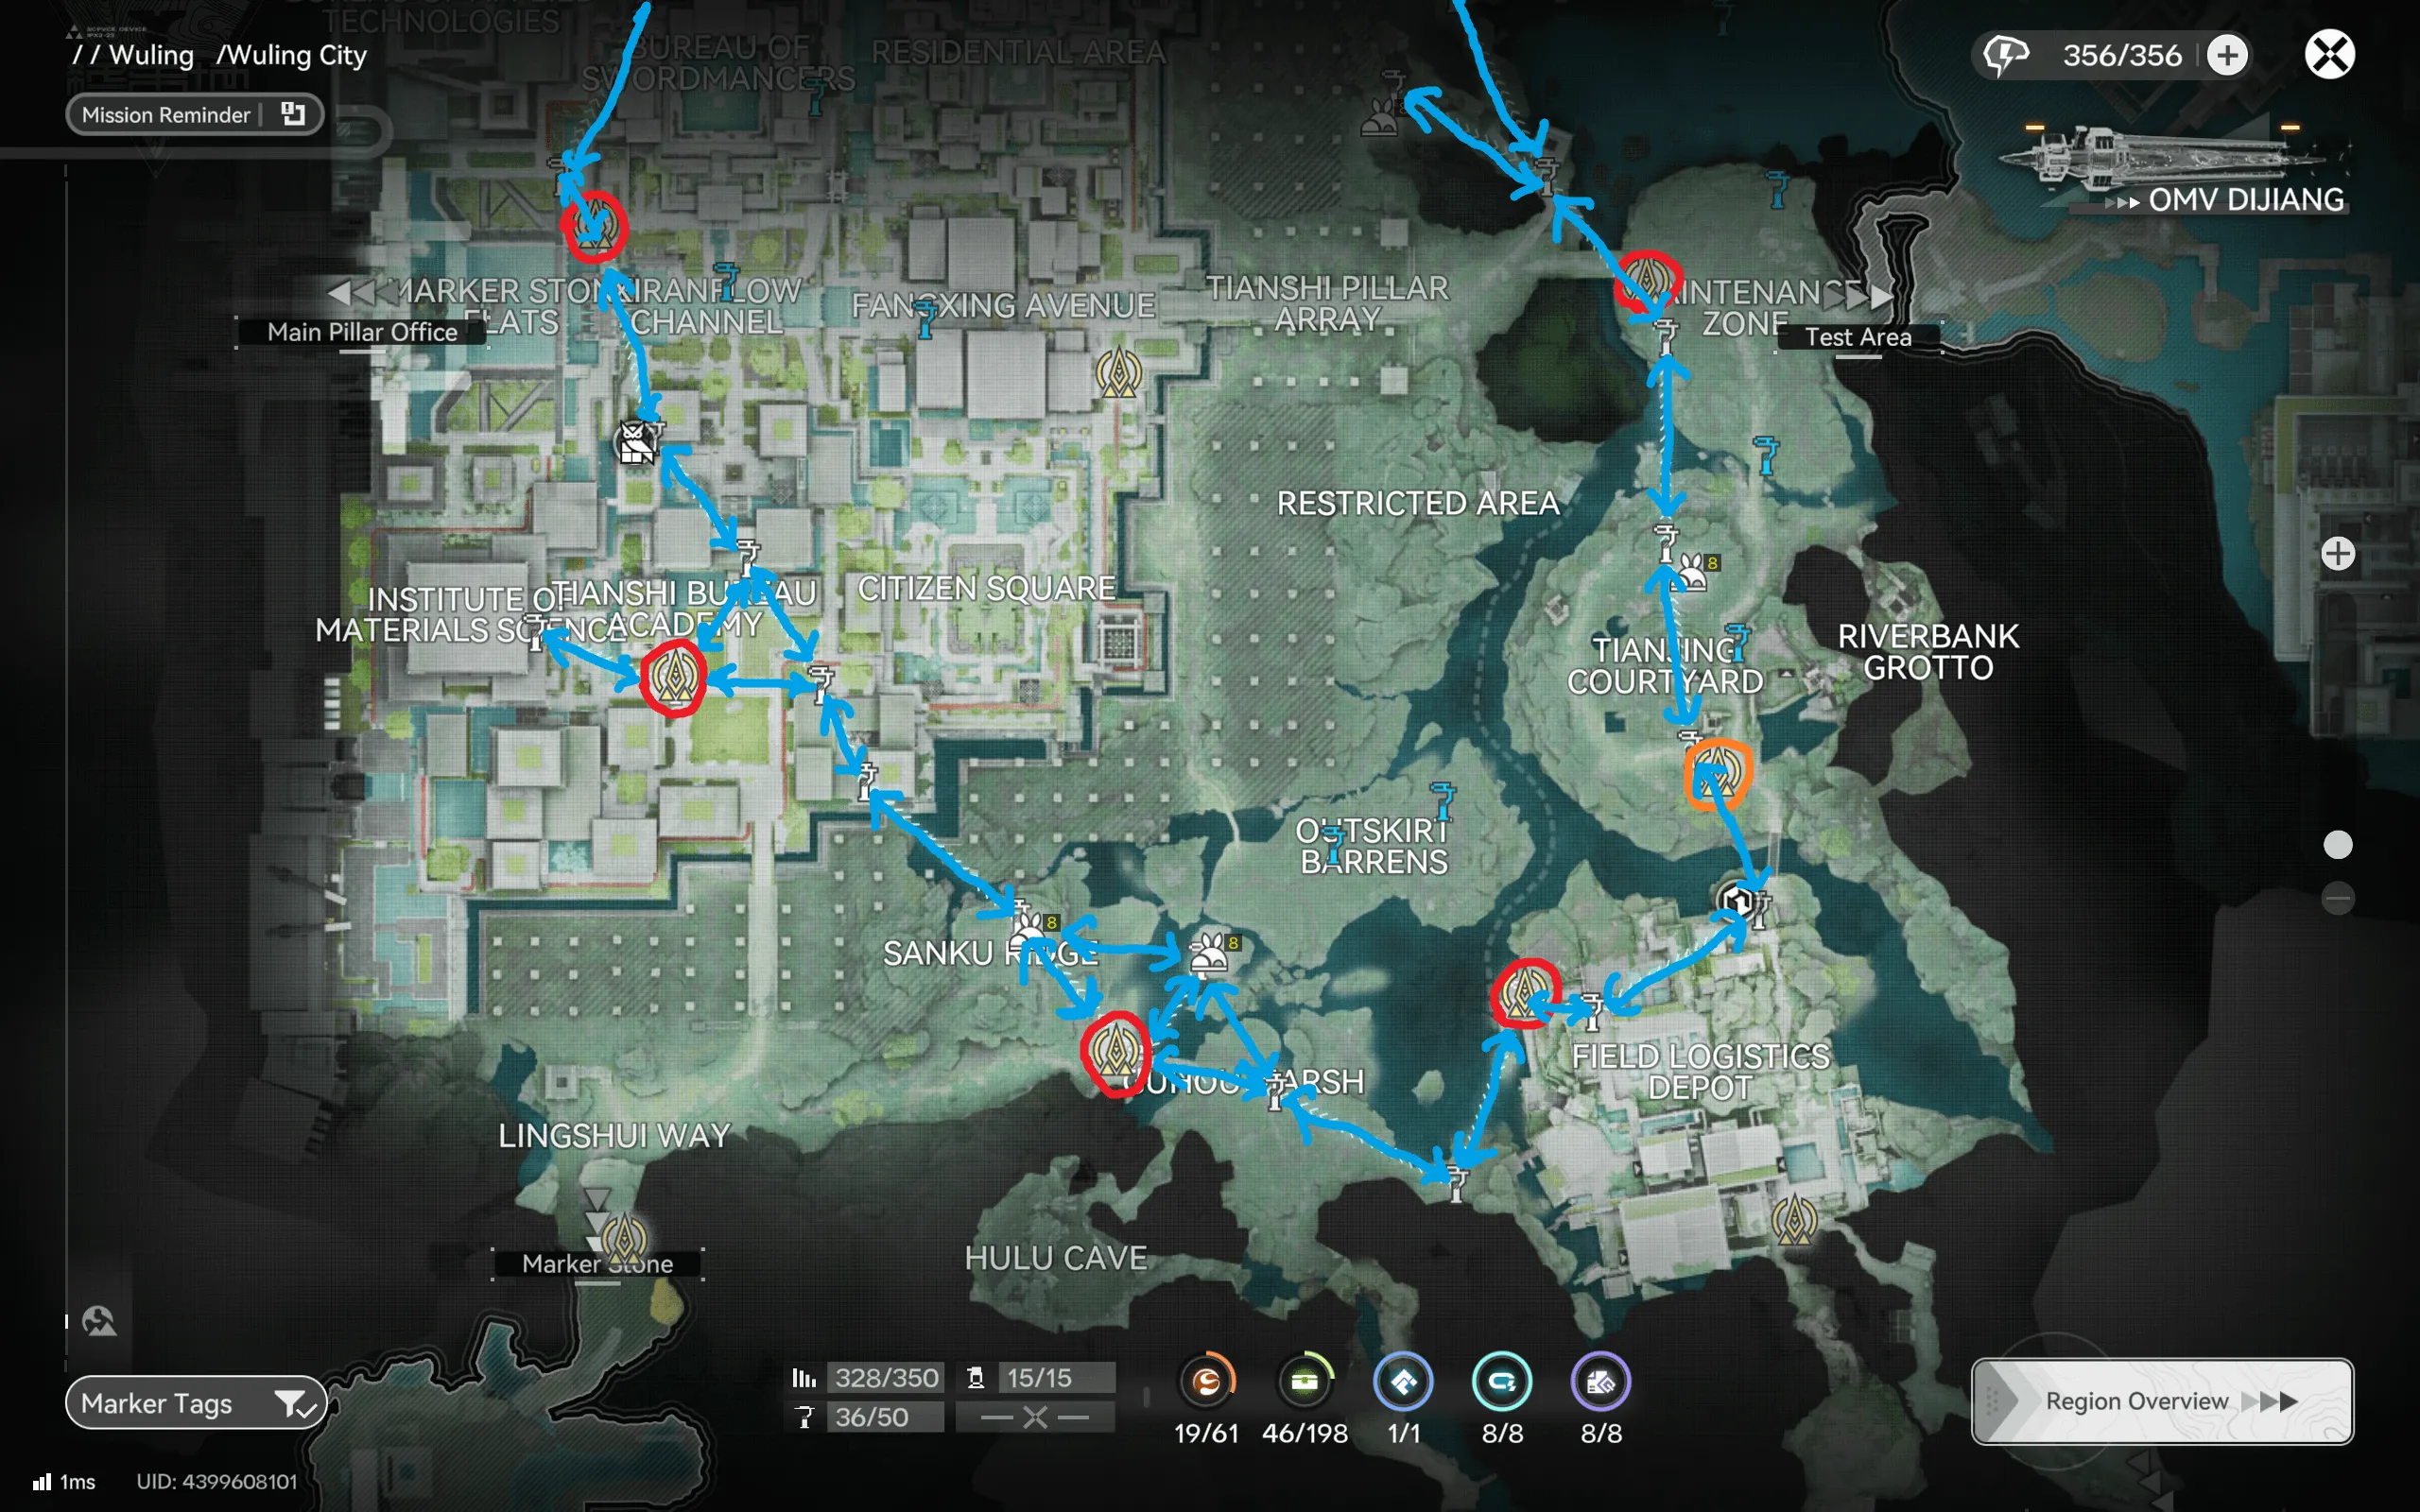
The marsh legs in the south reward patience: the nodes sit off the obvious paths, and the green walking segments on this map exist because the final approach to several spawns simply cannot be done from beside the waypoint. Follow them as drawn rather than hunting for a faster line that is not there.
Jingyu Valley
Jingyu Valley's drowned topography, islets, fords, and grottos separated by water, makes it the most fragmented farming region in Wuling, and the community answer is two small, surgical circuits instead of one long one. Neither takes more than a few minutes, which makes Jingyu the best region on this page for topping off a material type without committing to a full sweep.
Western Run: Treasure Grotto
The western map is two short segments: a red-start hop up to the Treasure Grotto near the Marker Stone border, and a second mini-route along the northern shore by the Ecological Research Station and the Treadway. Both are nearly straight lines, teleport in, follow two or three arrows, done.
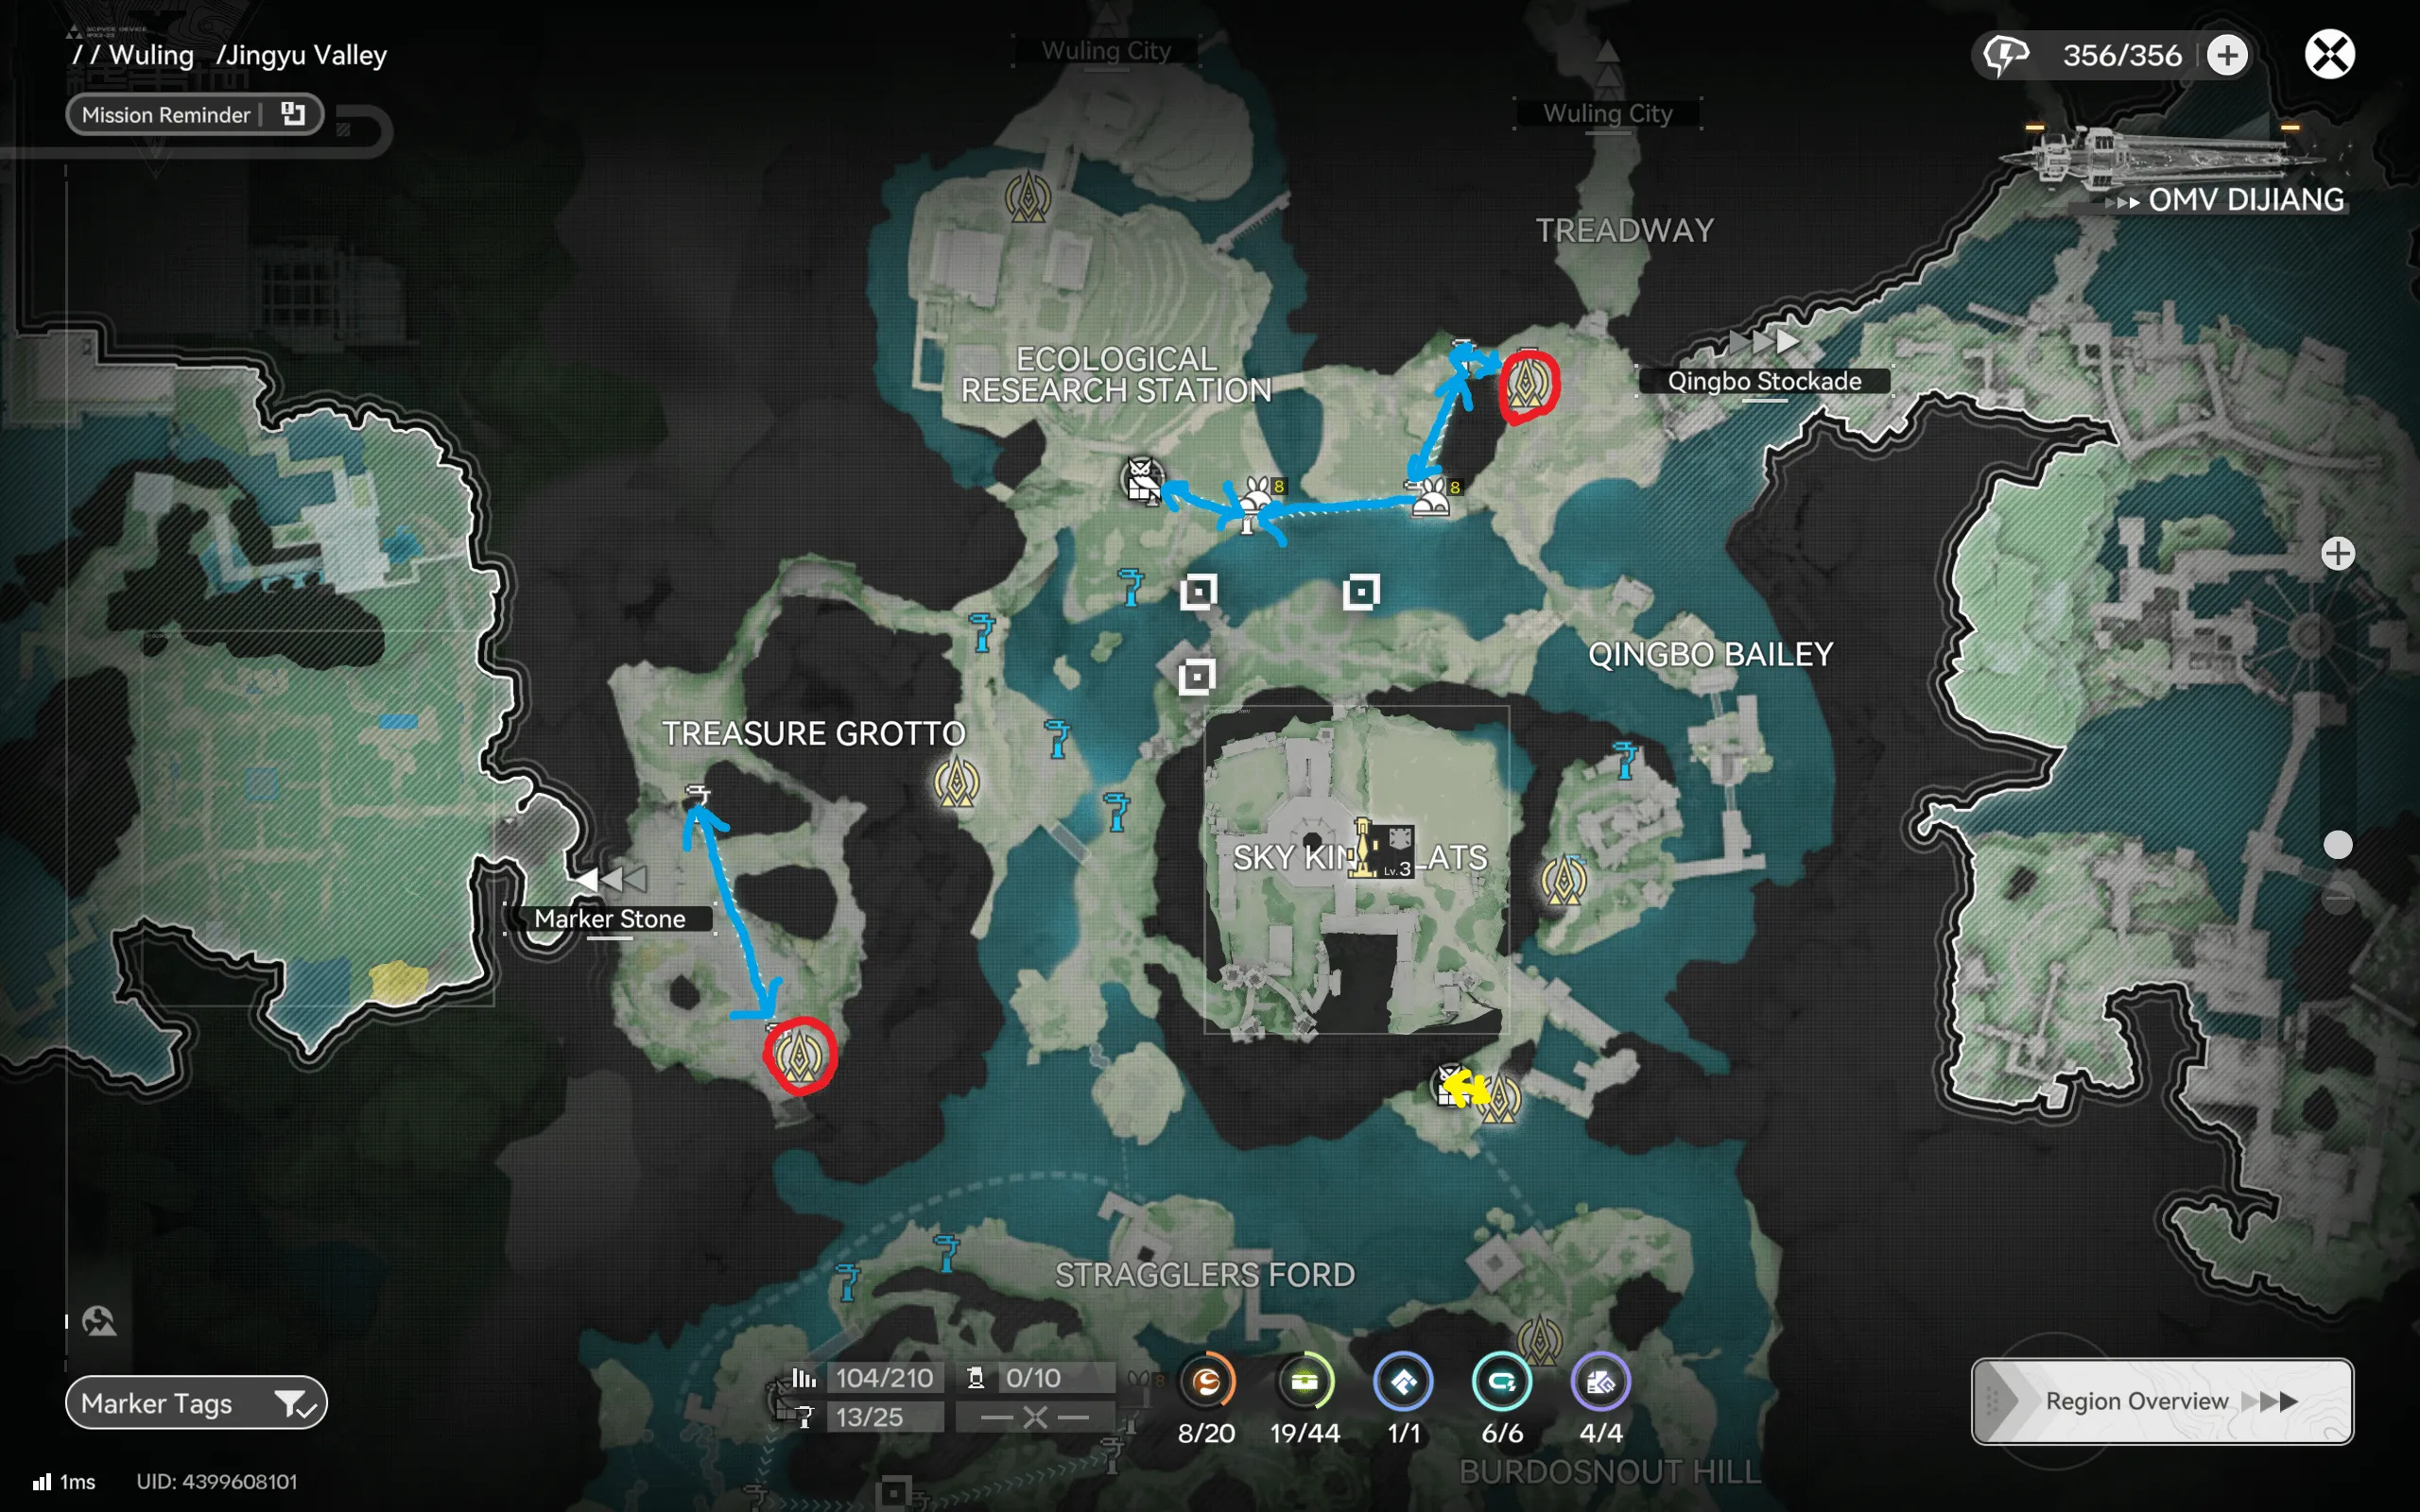
Because these segments are so short, they are ideal candidates to bolt onto the end of a Qingbo Stockade or Marker Stone session, the region exits feed into both.
Central Run: Stragglers Grove
The central circuit starts from the circled point near Zhaling Islet and works through Stragglers Grove toward Stragglers Ford, skirting Gloomvale's edge. It is short like the western run but denser, with the route's few arrows linking a tight cluster of spawns rather than crossing open ground.
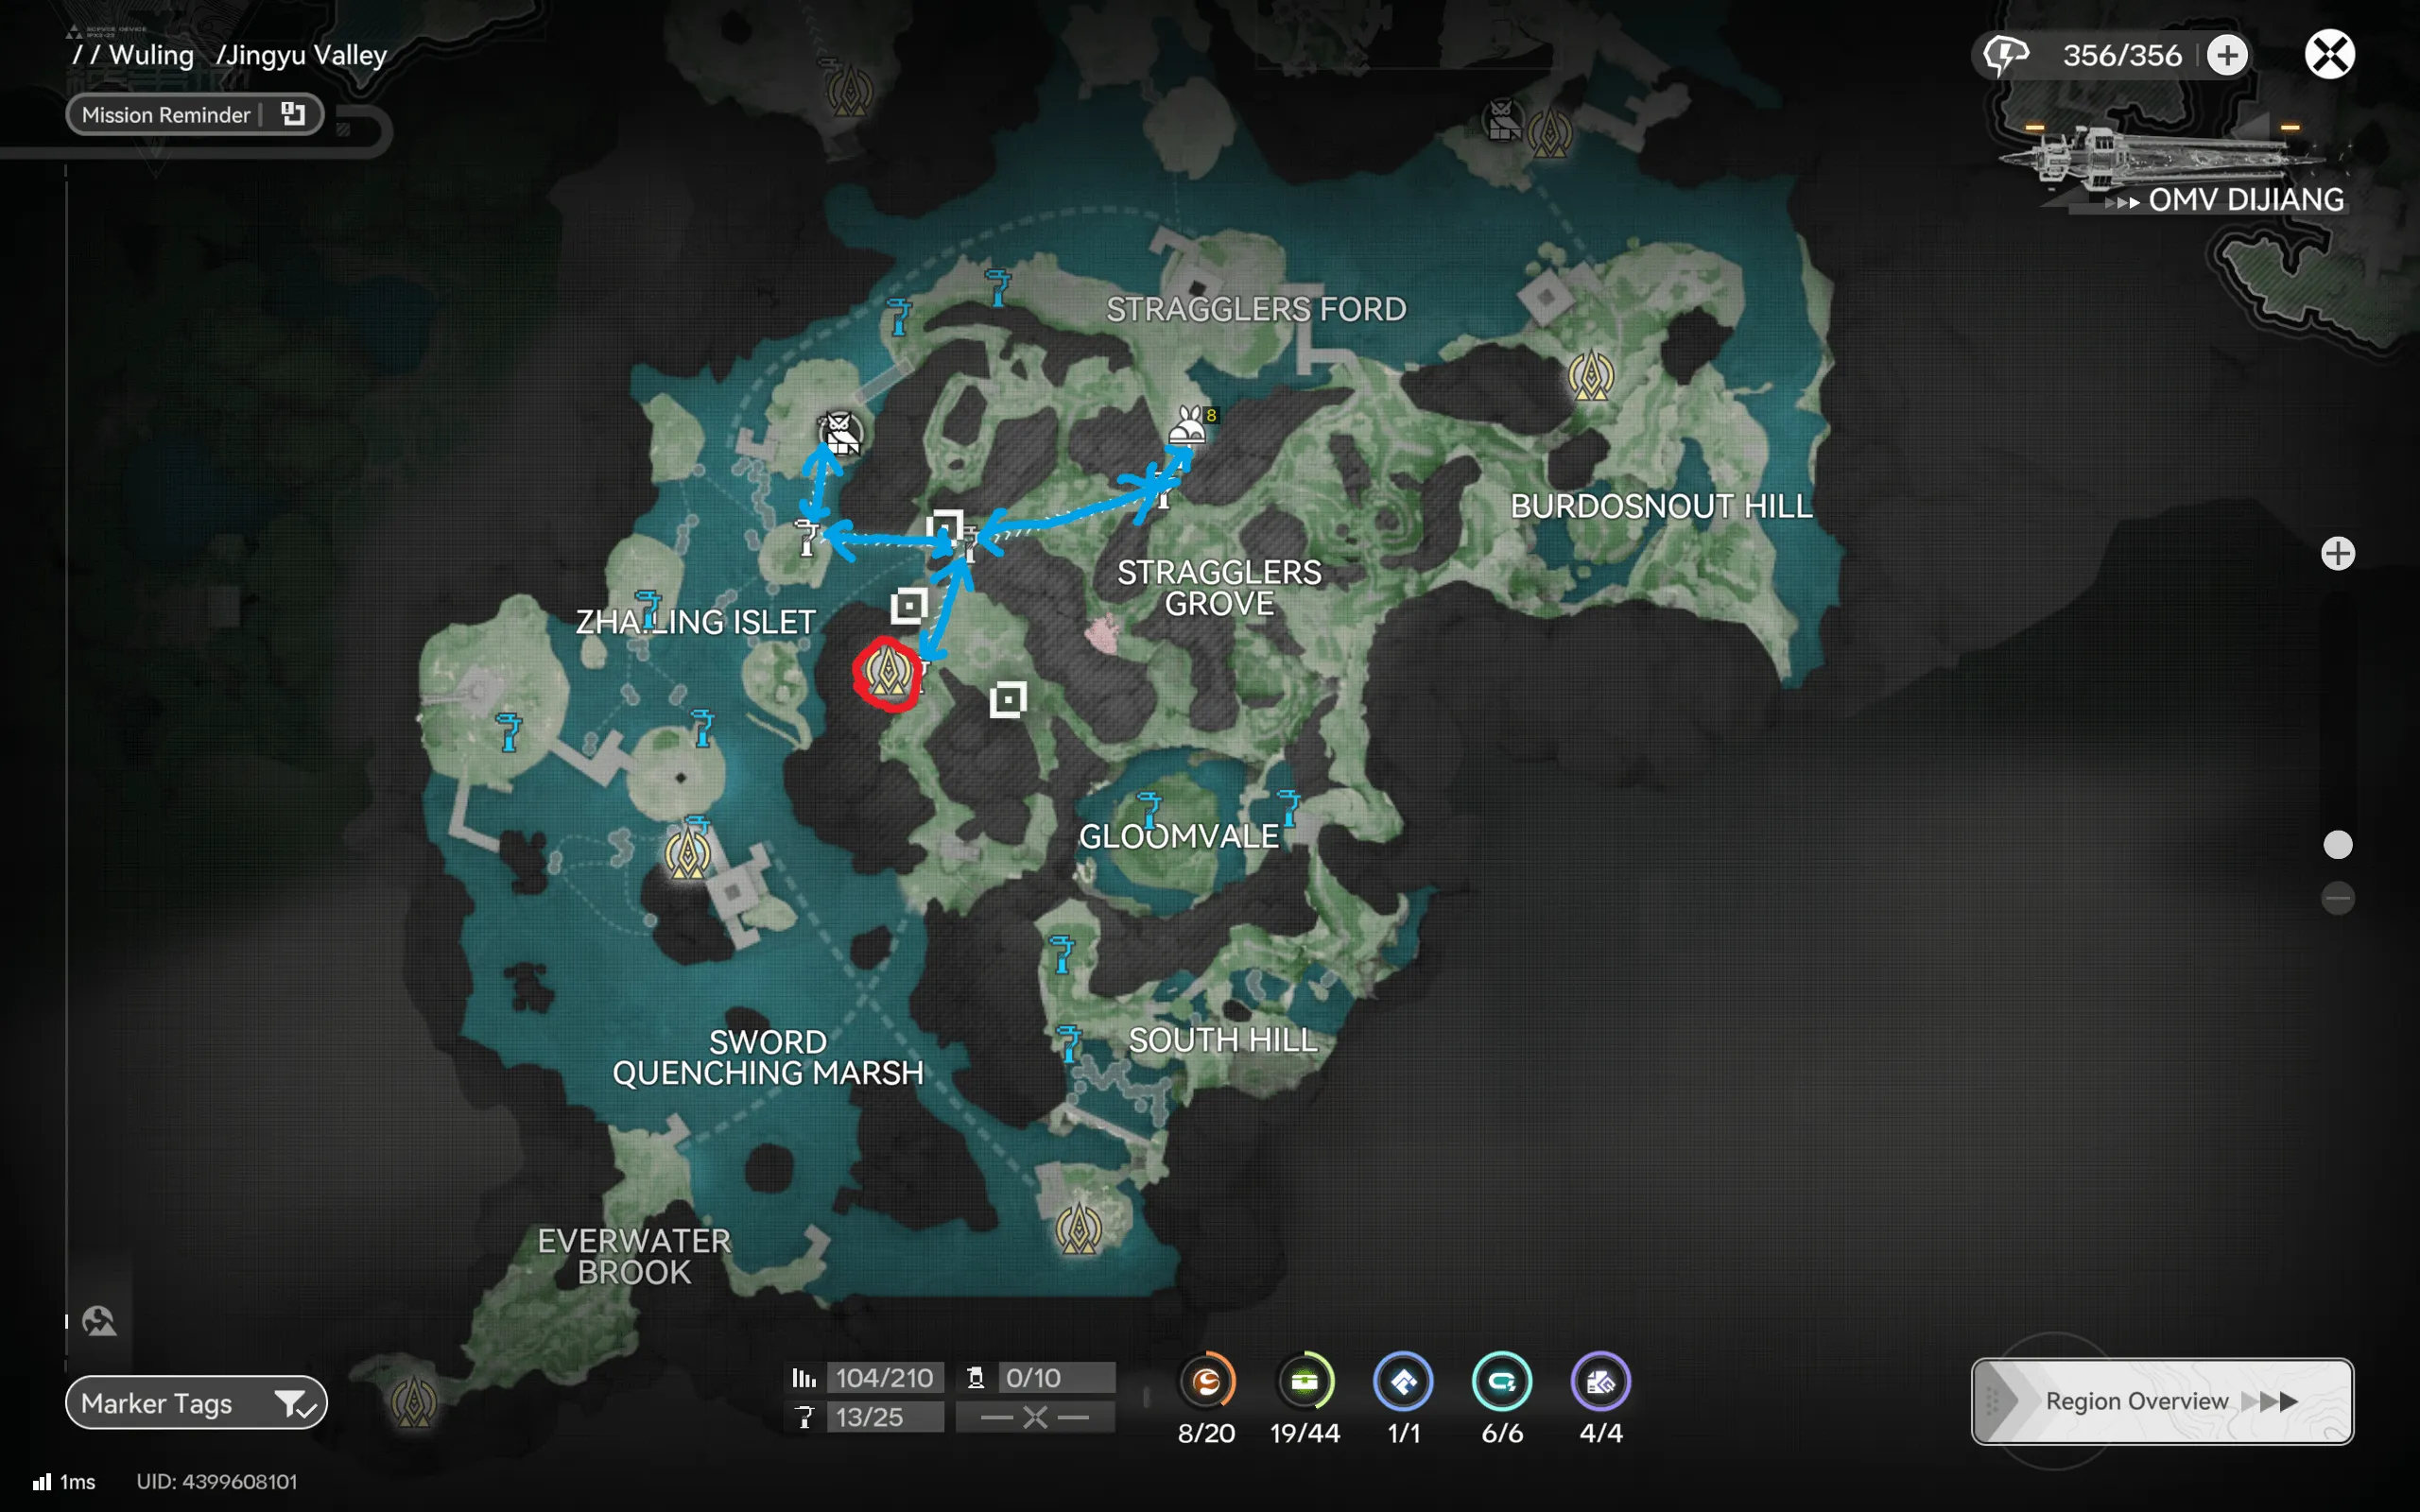
The grove sits on mixed elevation, so the blue segments here are genuine time-savers despite the short distances, the islet-to-grove hop in particular saves a long swim.
Qingbo Stockade
Qingbo Stockade splits into a long northern ridge run and a short fort circuit, mirroring the region's two personalities: open ridgeline in the north, dense fortifications in the center. The ridge run is the meat; the fort circuit is a quick supplemental loop.
Skyhold Ridge → Ancestral Spring
The ridge route starts from the circled point on Skyhold Ridge near the Wuling City border and runs the full east-west spine of the region, ending at the Ancestral Spring in the northeast. It is one continuous line with no branches, the purest point-A-to-point-B route on this page, and almost entirely zipline-borne, with the anchors riding the ridgeline the whole way.
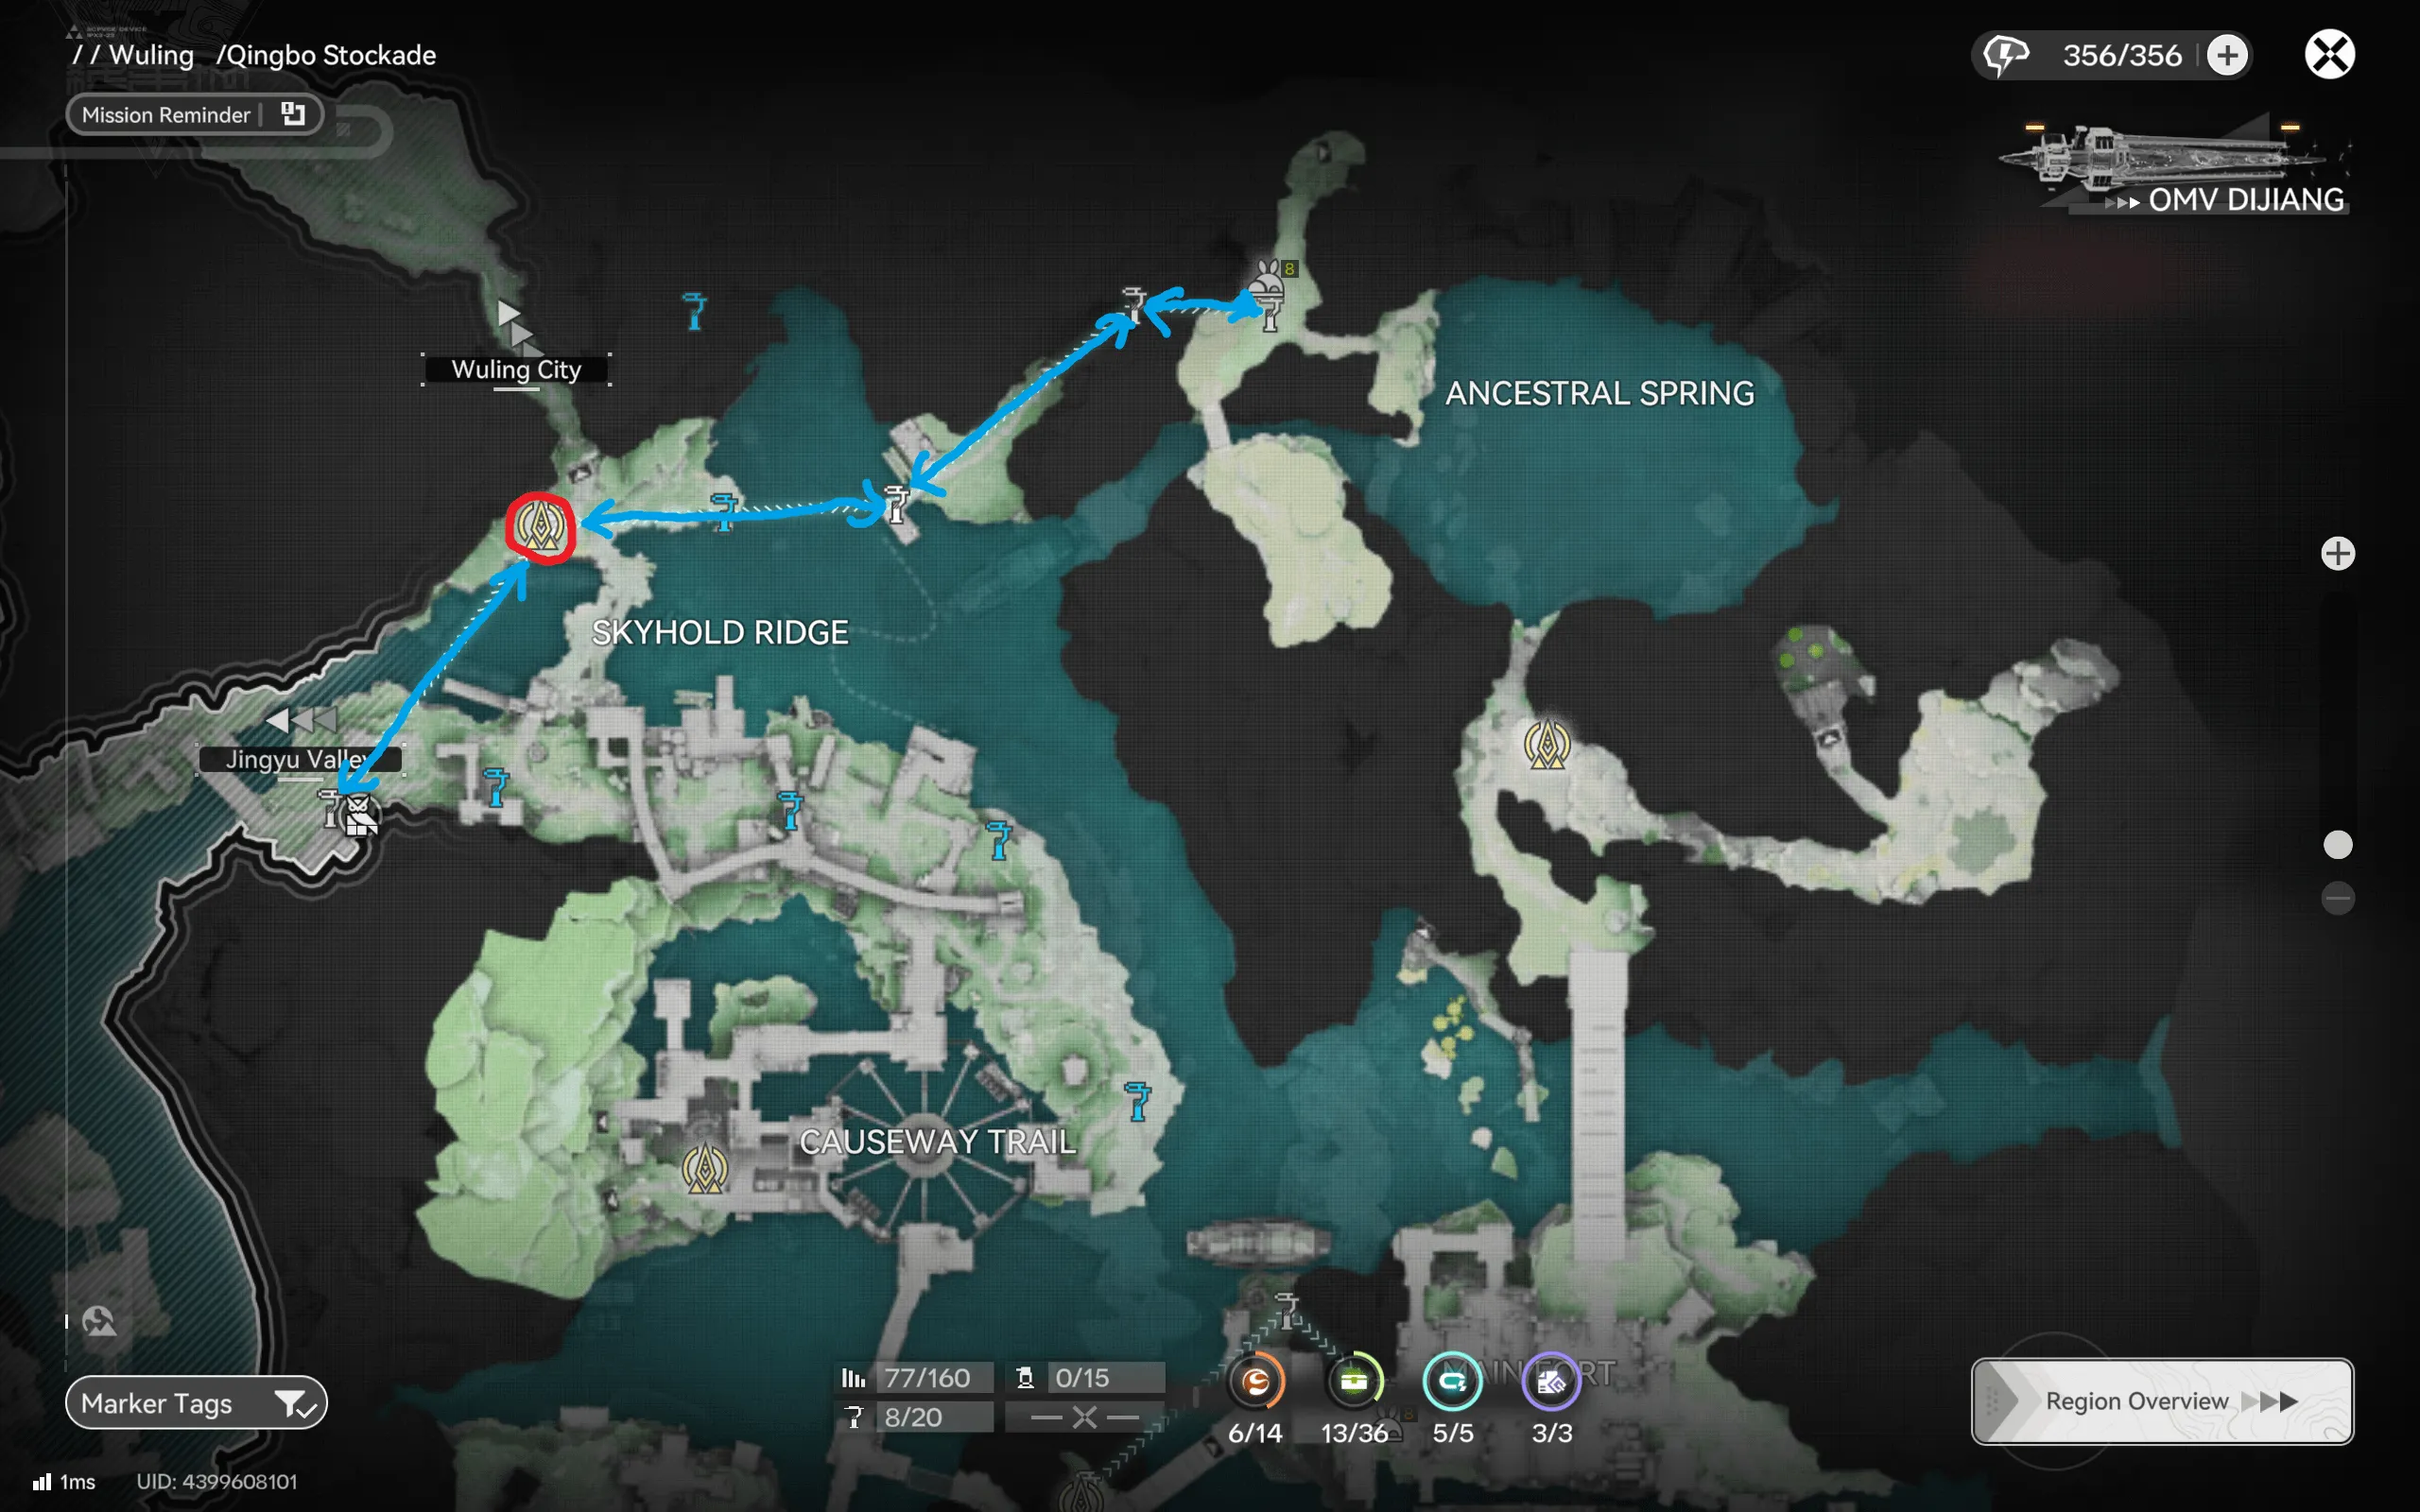
Since the route ends far from where it starts, plan your exit: the Ancestral Spring end sits near the region's eastern waypoints, so finish your session there rather than teleporting back west for no reason.
Main Fort Circuit
The fort map is a short red-start loop around the Main Fort, with one yellow-marked stretch where sprinting through the fortifications beats riding the anchor chain around them. It covers the cluster of spawns the ridge run bypasses.
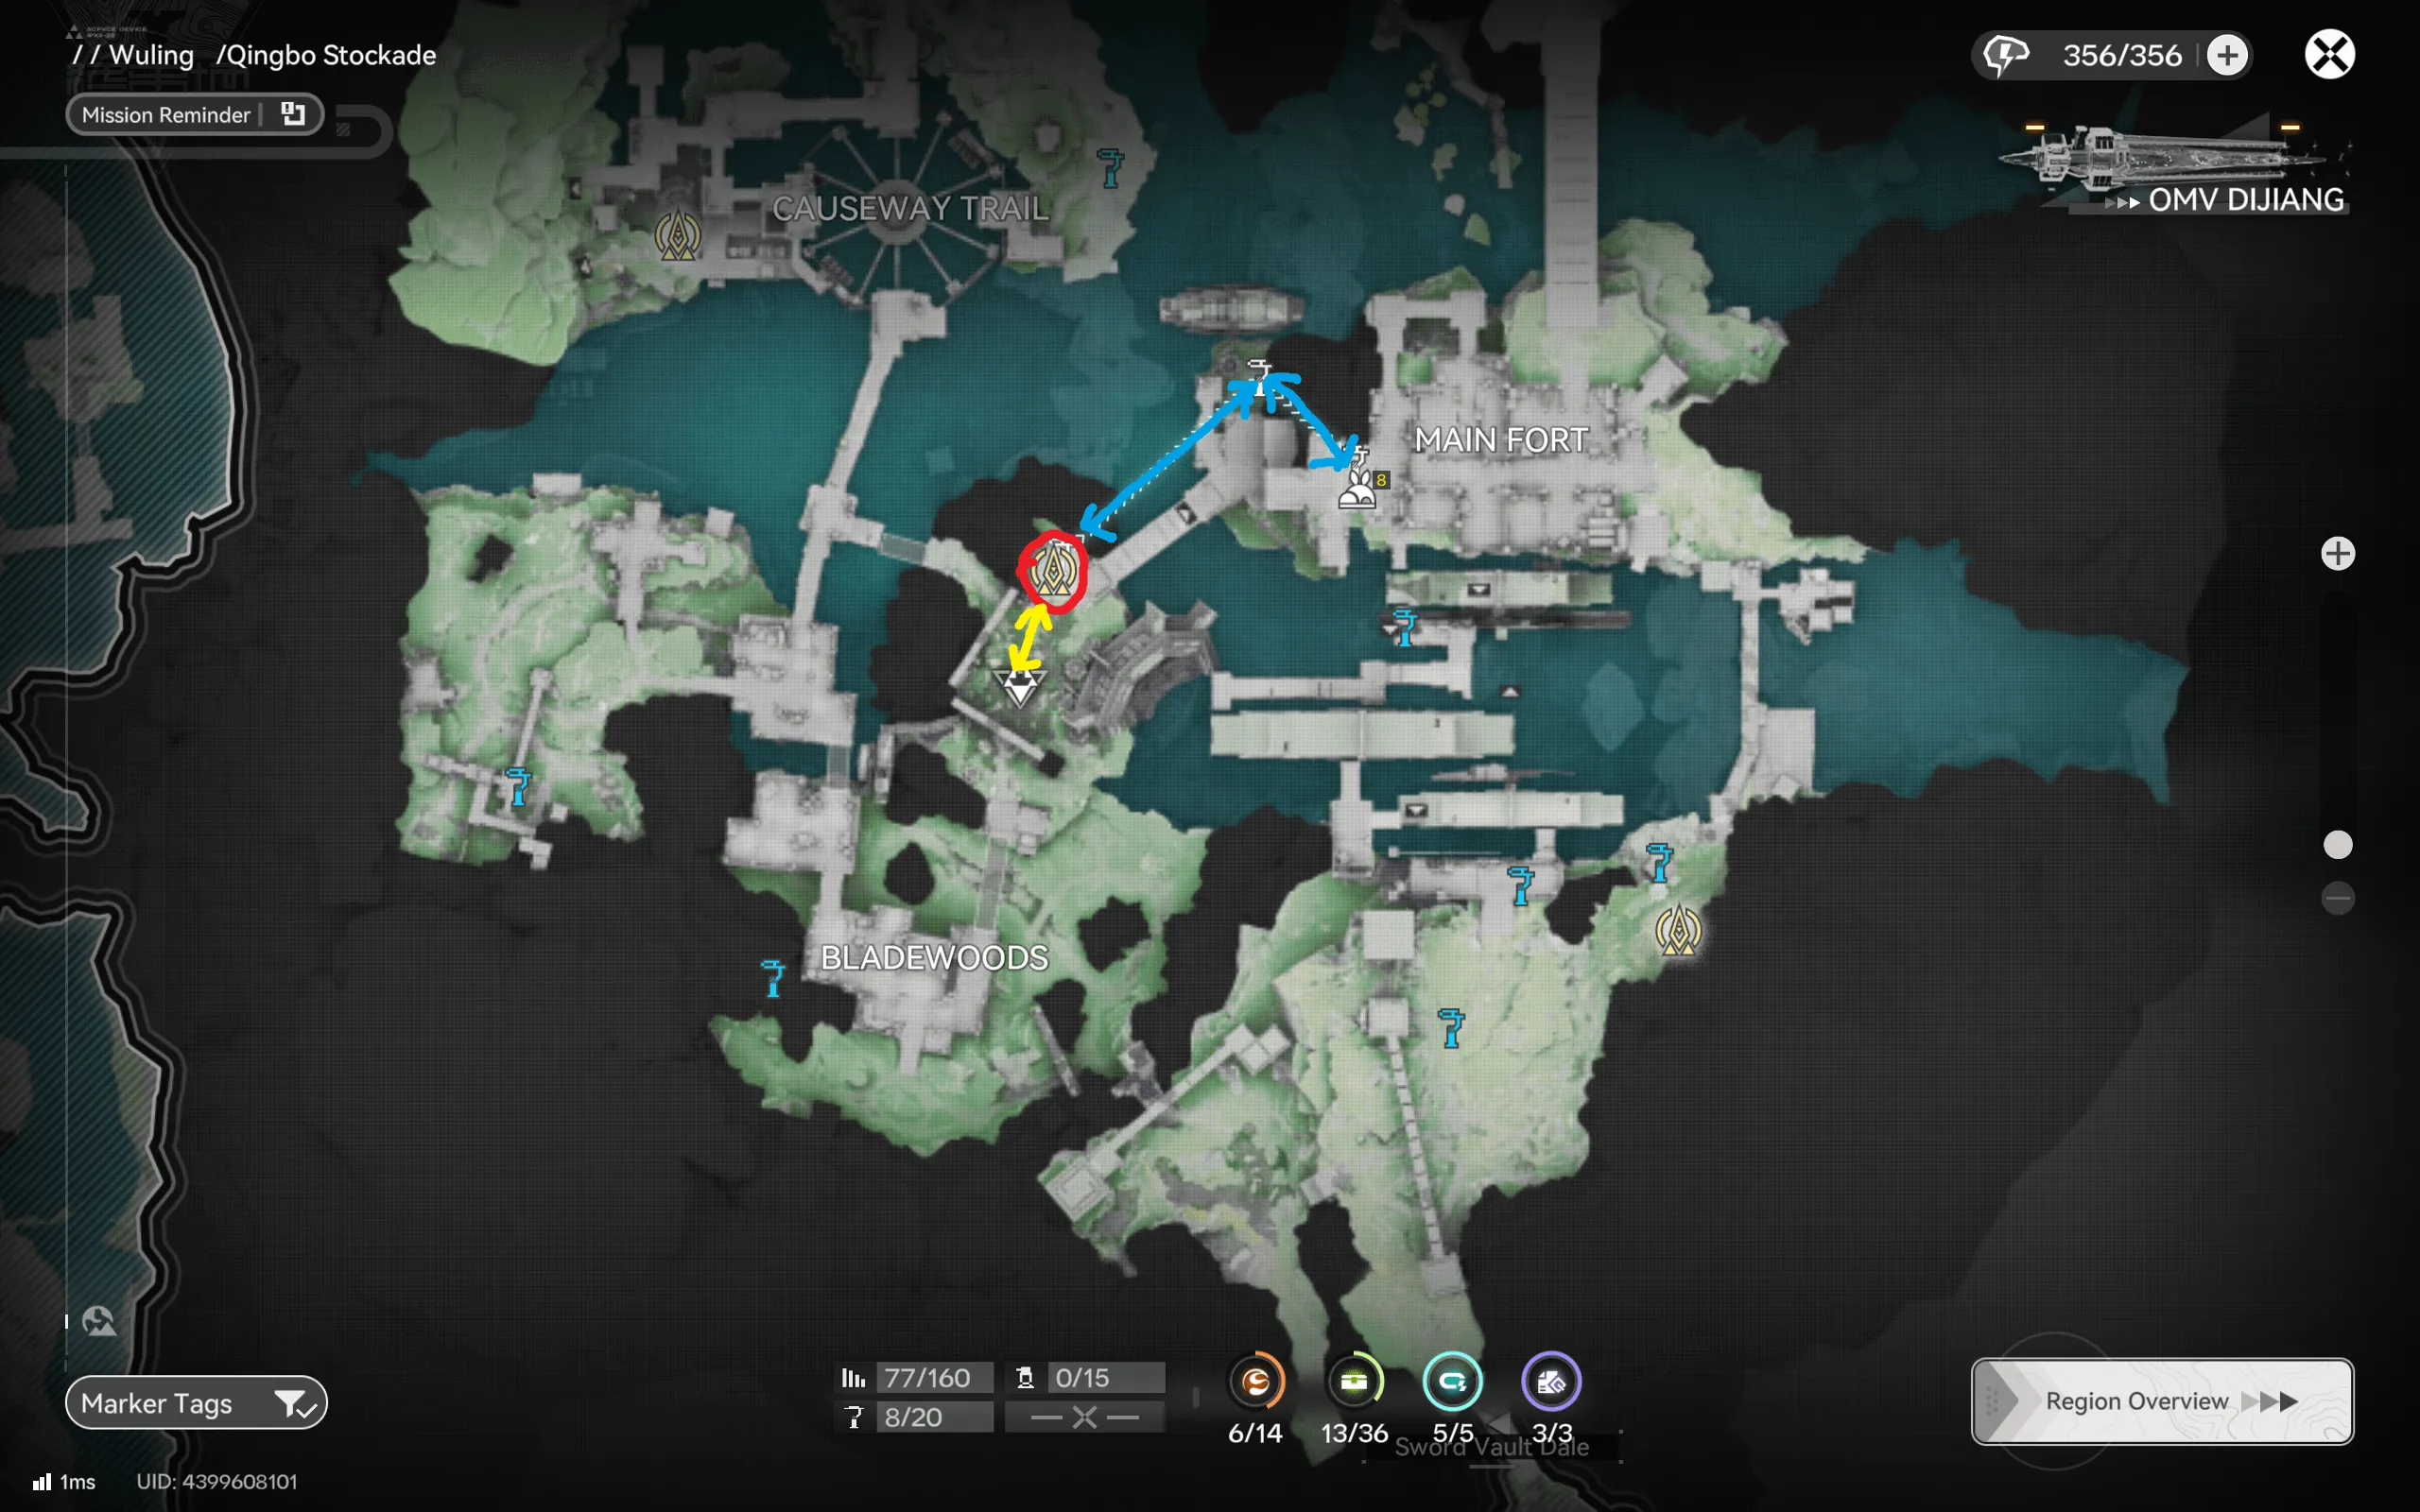
Run the fort circuit immediately before or after the ridge, the ridge route passes within sight of the Main Fort, and the two together clear the region completely.
Marker Stone
Marker Stone pairs a lake-and-garden route on the region's signature islets with a separate self-contained grotto circuit. The two maps cover different traversal layers entirely, surface and cave, so check both before deciding the region is farmed out.
Lake Islet Crossing
The surface route is a short diagonal: a red start near the Lake Islet's northern tip, a zipline run southwest across the Solitary Garden, and a marked yellow-and-walking section over in the eastern Restricted Area near the Jingyu Valley border. The middle of the map, the lake itself, is empty by design; the spawns hug the built-up edges.
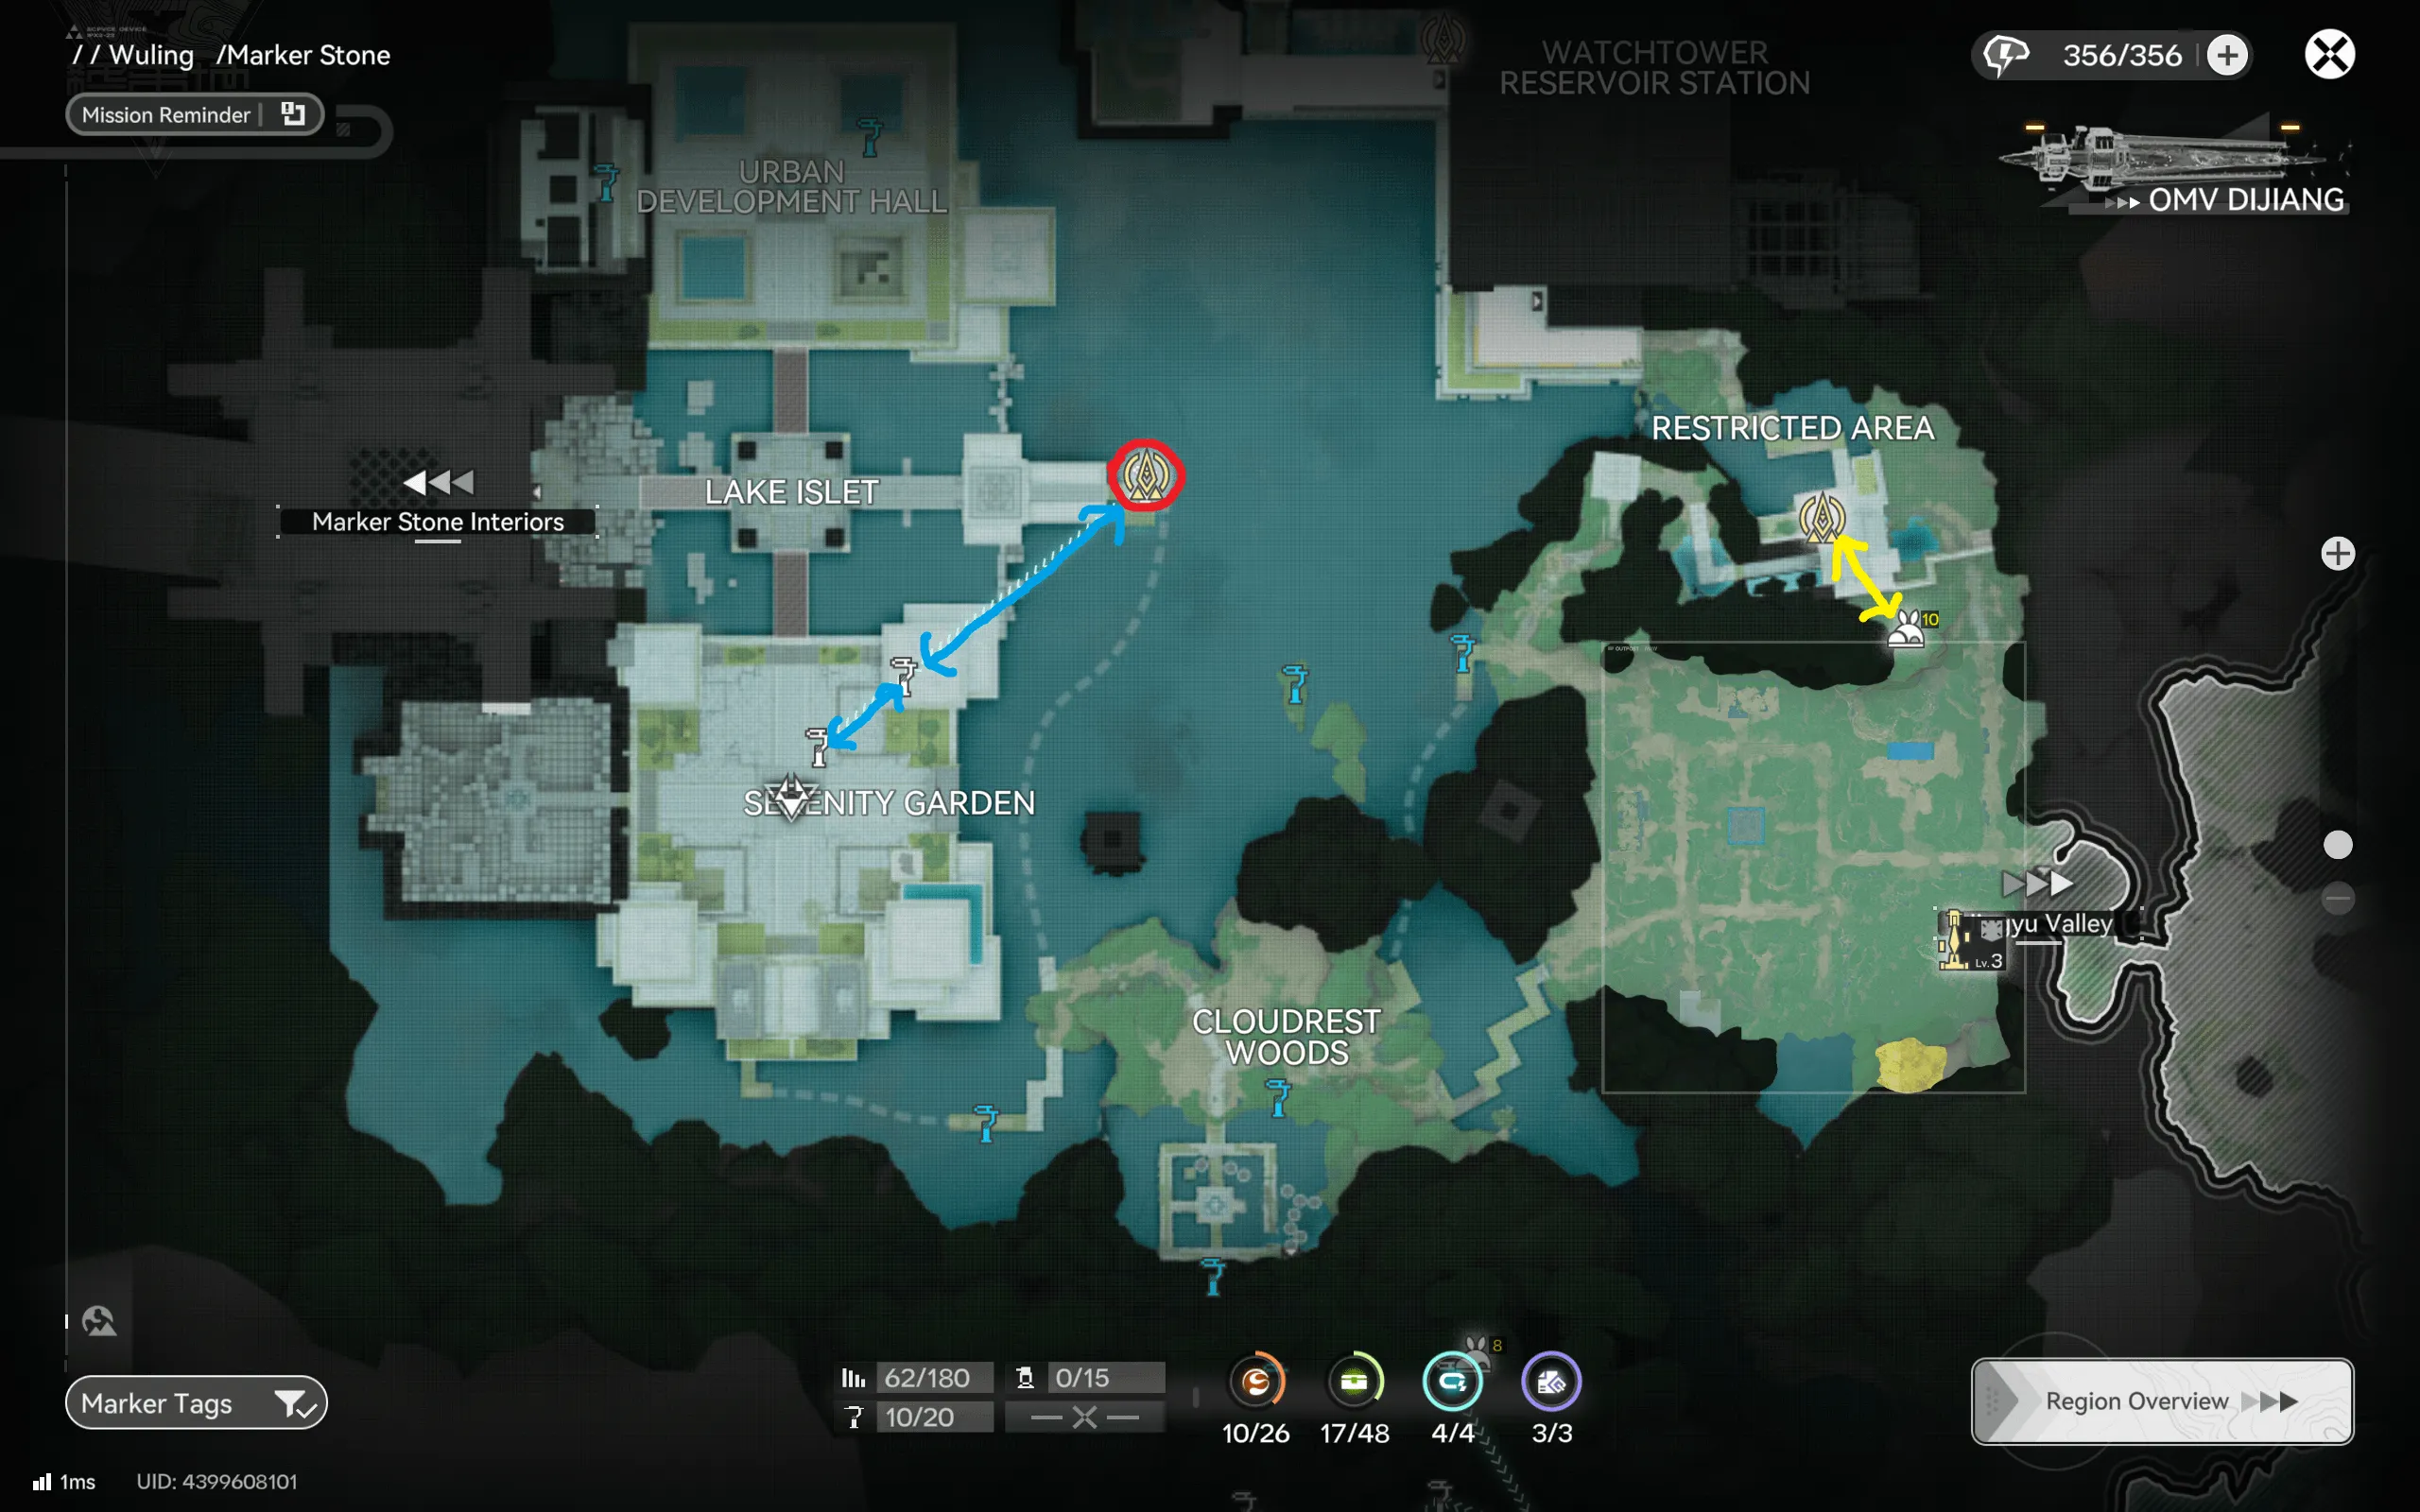
The Restricted Area pocket in the east is easy to overlook because it is visually separated from the main route. It is a standalone mini-loop, not a continuation, so teleport rather than swimming over.
Cloudrest Grotto Circuit
The grotto map covers the Cloudrest Grotto cave system with a single red-start circuit that snakes through the interconnected chambers. Cave routes live and die on their drawn order, junctions look identical from the inside, and the arrows are doing navigation work, not just optimization work.
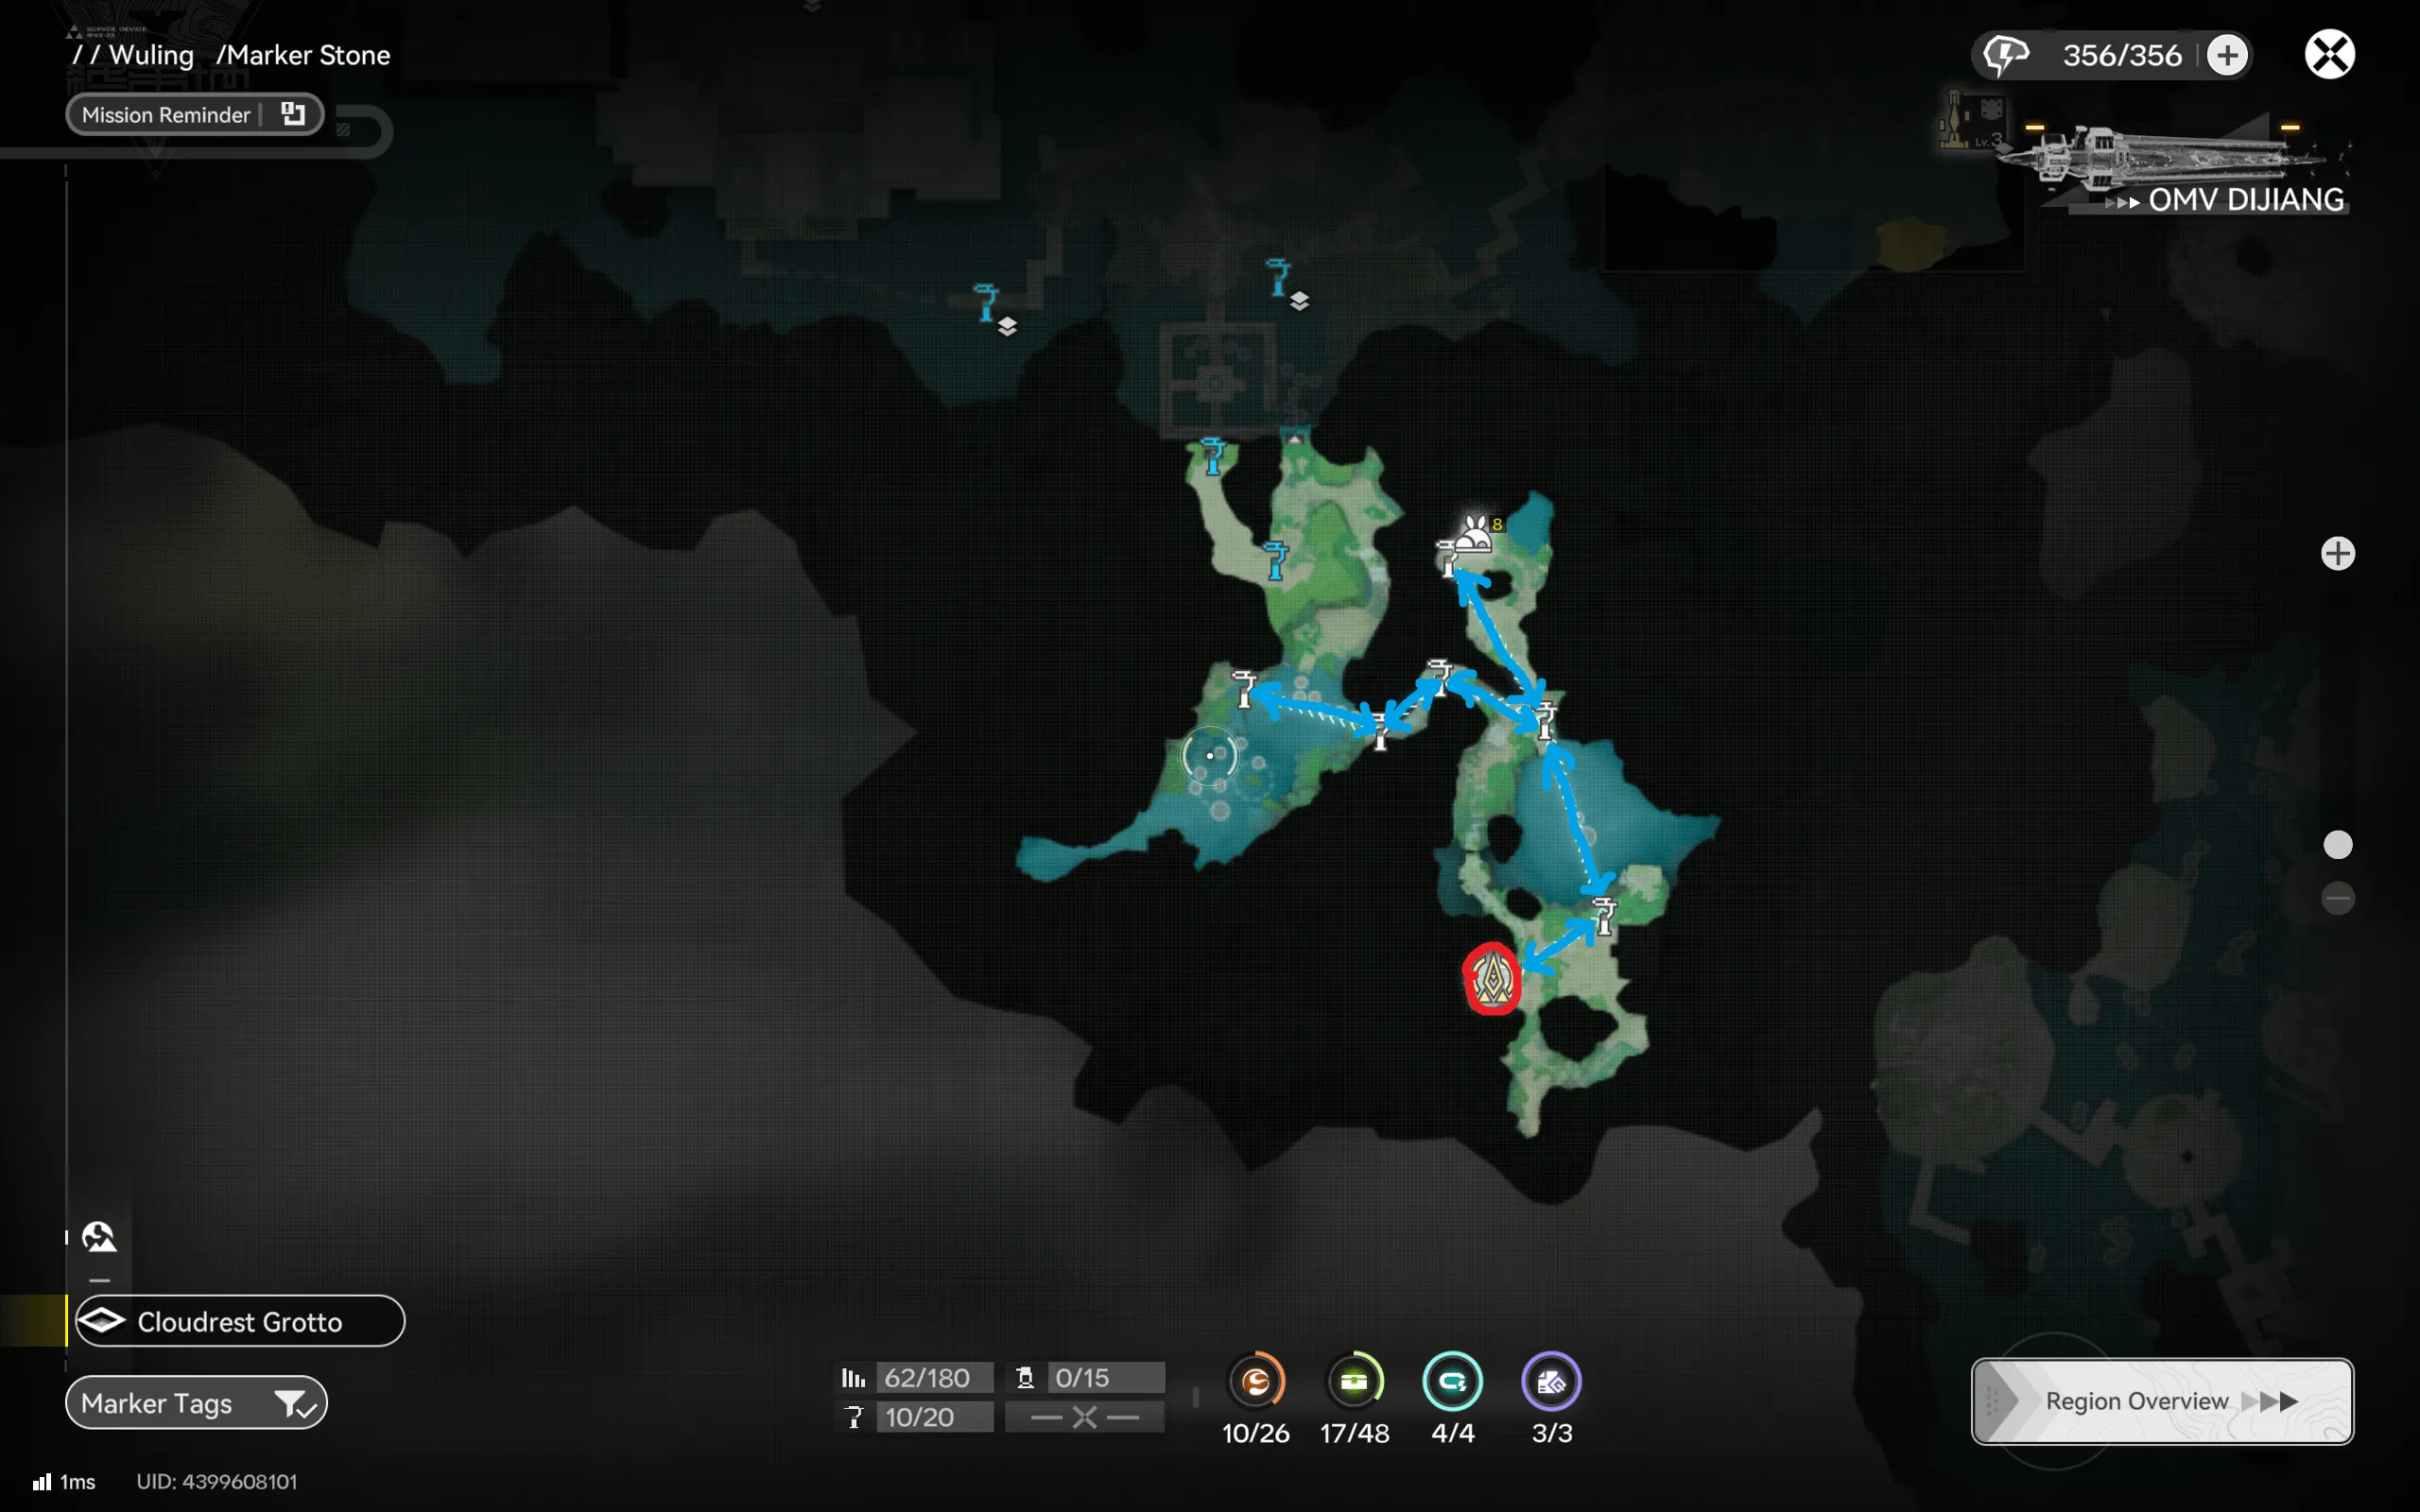
Follow the chamber order exactly on your first few runs; once the layout is in your head, the circuit becomes one of the fastest node-per-minute loops in Wuling.
Test Area
The Test Area is the newest farmable region and the most structured: a facility grid of Type-C Auxiliary Pillar Areas, the Meridian Grid Area, the Water Treatment Sector, and the Integrated Grid, ringed by the Test Area Peripheries. The route reflects the grid, long straight zipline runs along the facility axes, with both a red gathering start near the western entrance from Wuling City and an orange Depot start anchoring the southern loop.
Because the facility is symmetrical, the biggest mistake here is drifting off the drawn line and farming by sight, the pillar areas look alike, and it is genuinely easy to clear the same quadrant twice while skipping another entirely. The arrows sequence the quadrants deliberately.
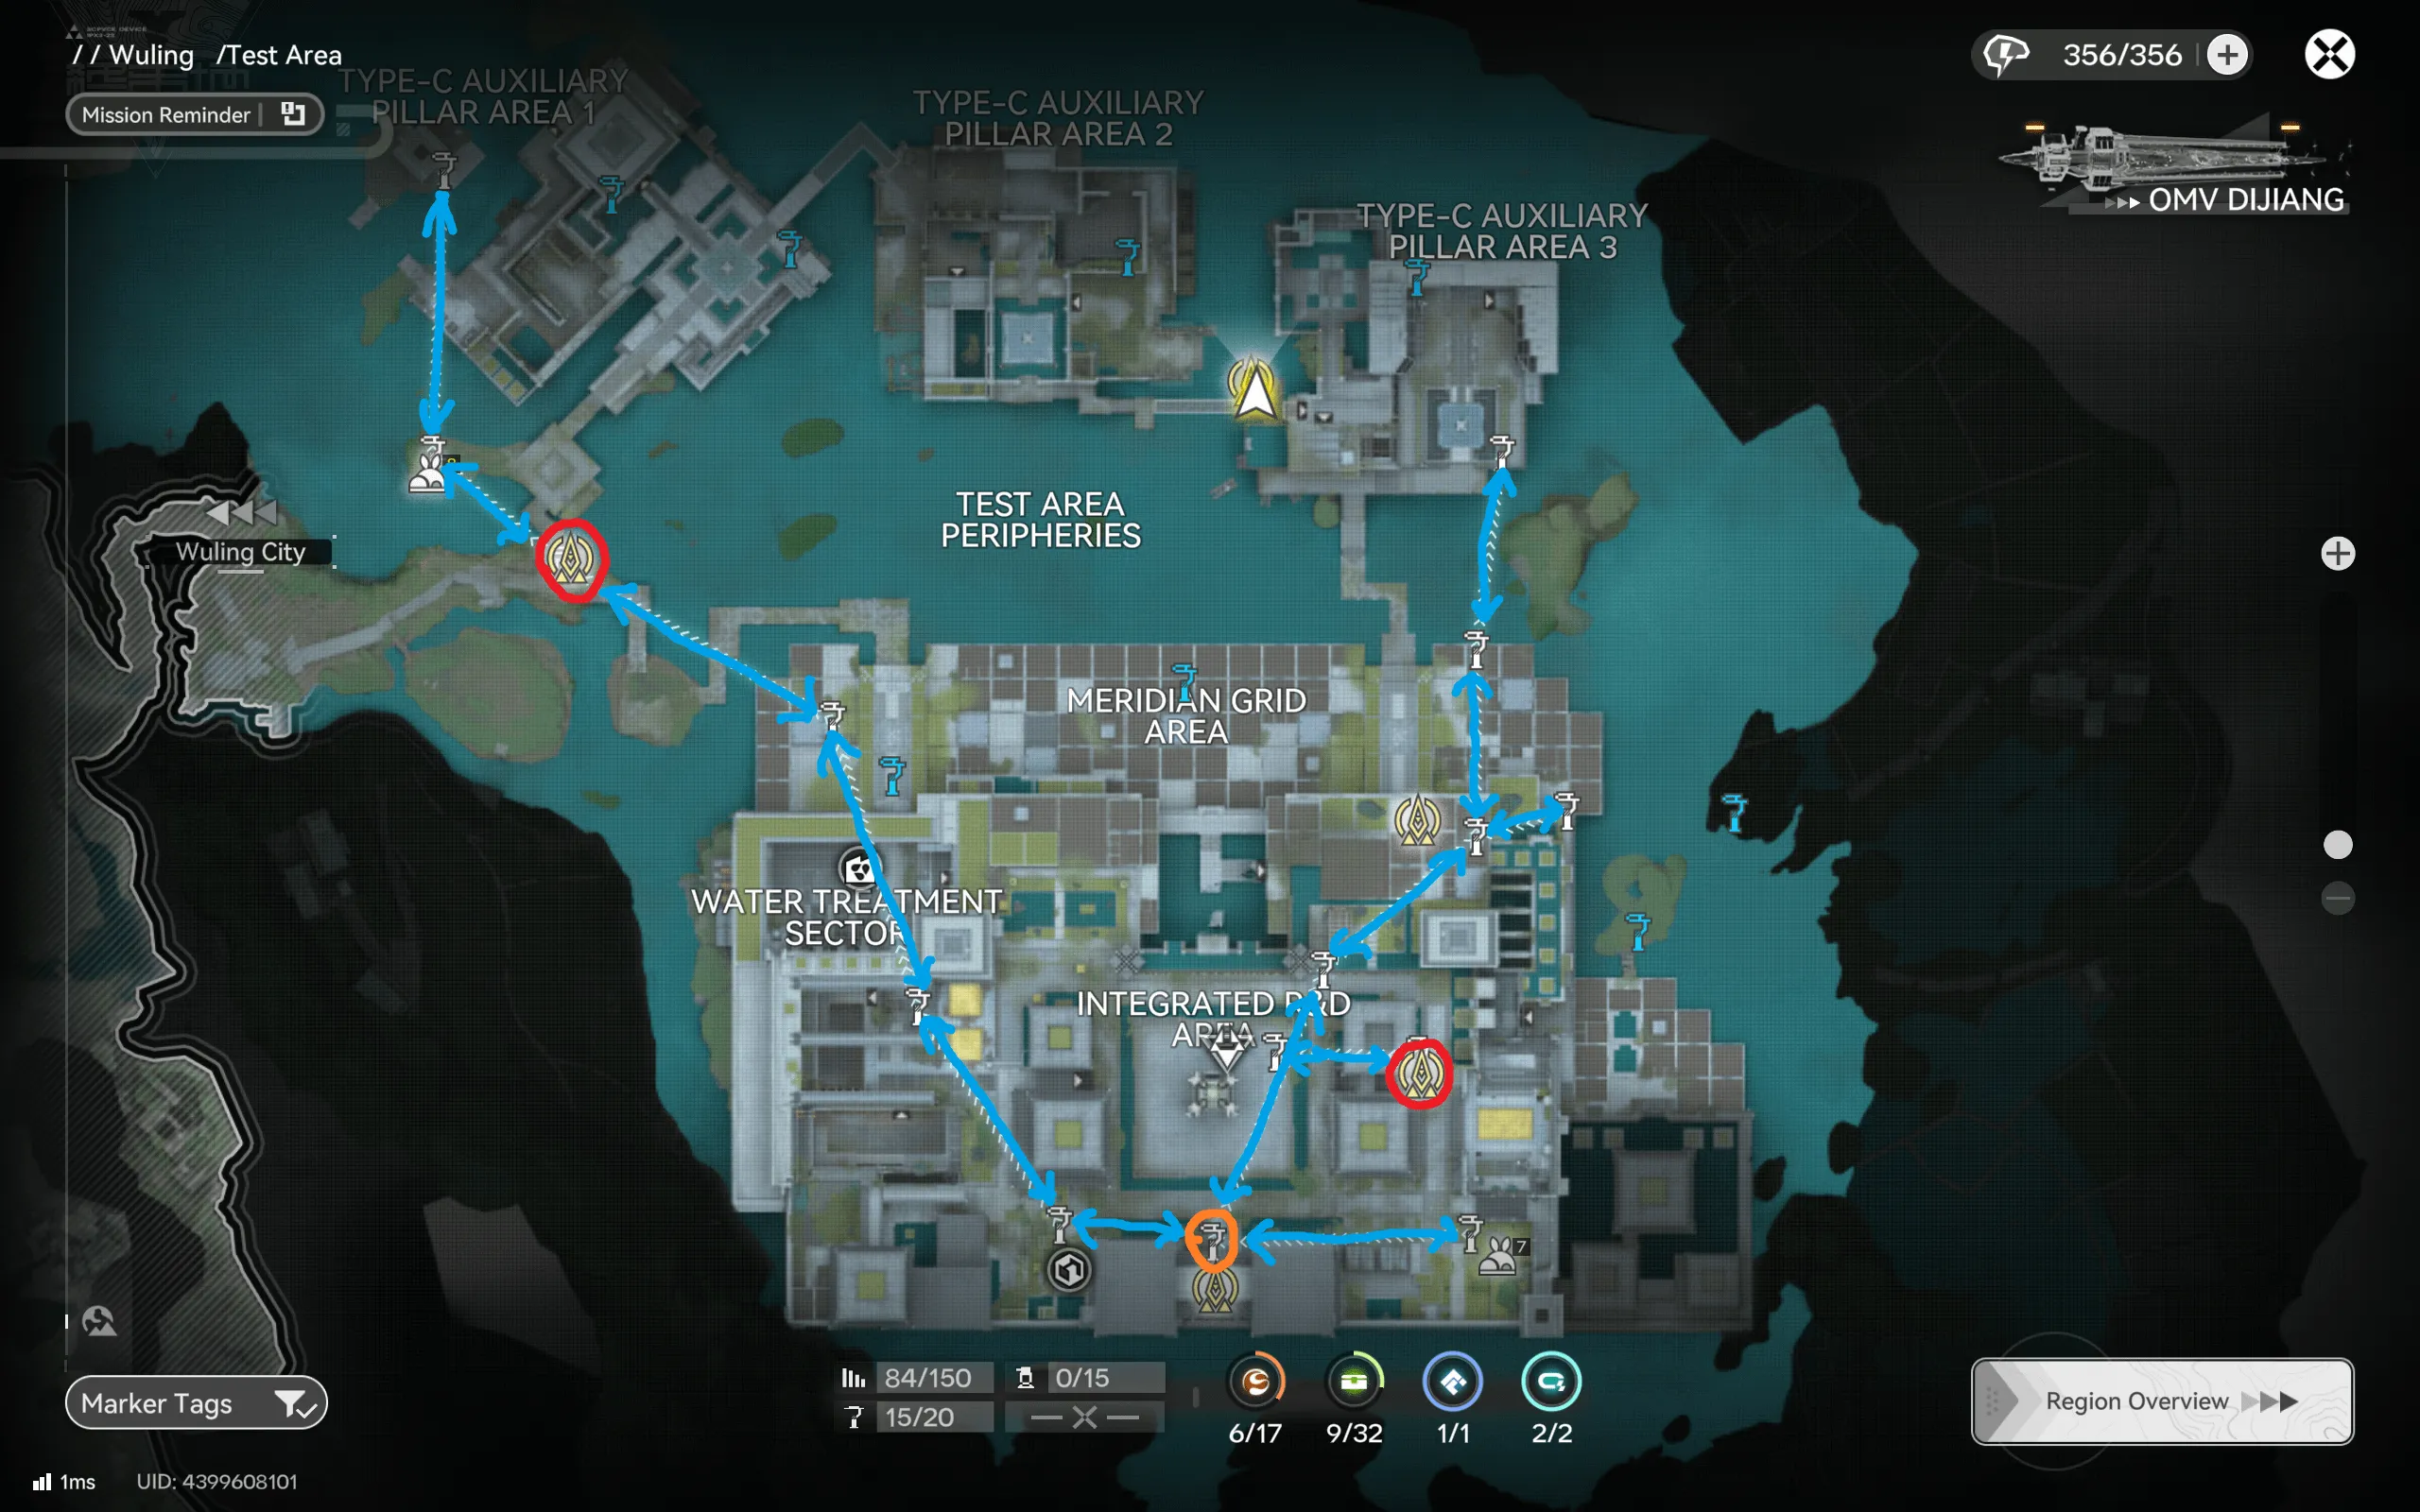
The northern spurs toward Pillar Areas 1 and 3 are out-and-back legs rather than loop segments, run them when you need their nodes and skip them when you do not, and the southern Depot loop still closes cleanly.
Sword Vault Dale
Sword Vault Dale closes the set with the longest single circuit on the page: a gorge-country epic running from the Qingbo Stockade border in the northwest along the West Gorge Path, through Deep Gorge Vault and the North Gorge Crag, then south through the East Gorge Ruins toward the Gorge Overhang, with red starting points splitting the route into western and eastern halves. The dale's canyon walls funnel movement, which is exactly why the zipline chain matters, the anchors fly over chokepoints the ground route has to thread.
Treat the two starting circles as a built-in halfway split. Running the full circuit in one sitting is doable but long; starting at the eastern circle near the East Gorge Ruins covers the back half on days you only need its nodes.
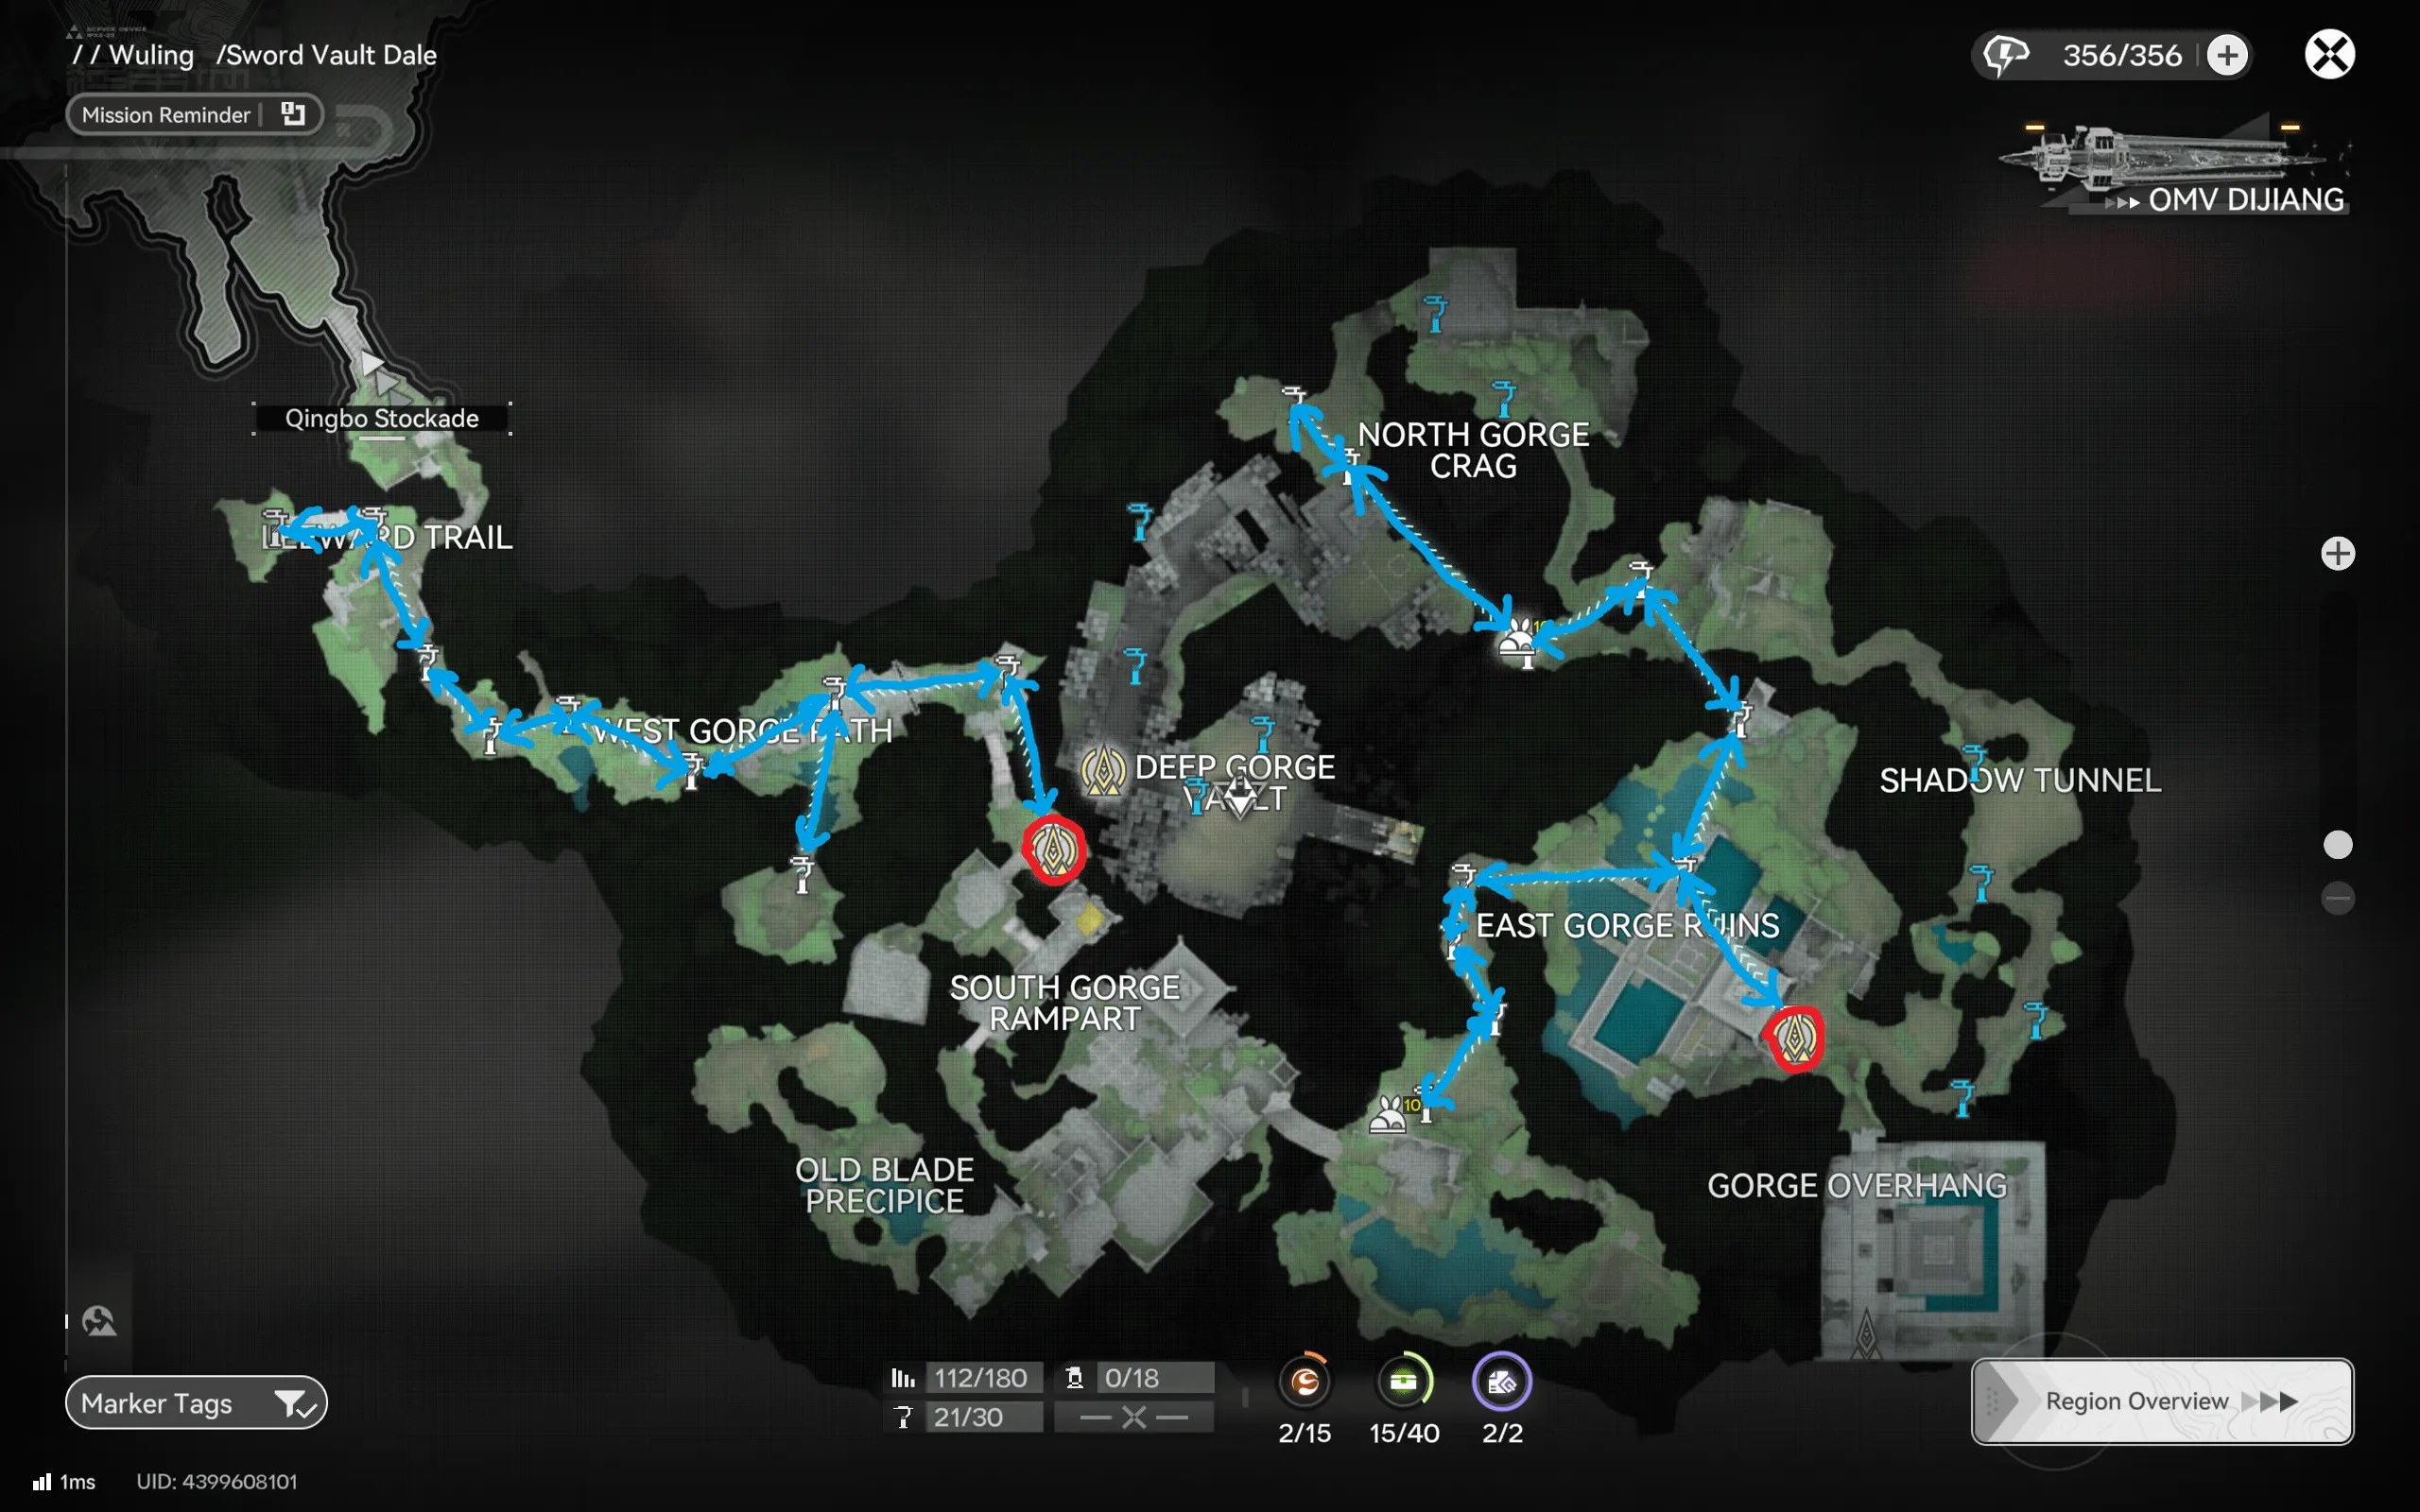
The southern landmarks, South Gorge Rampart and the Old Blade Precipice, sit just off the main line as short detours. The map keeps them out of the primary chain because their node yield does not justify the descent on every run; add them when you are specifically short on what they spawn.
Frequently Asked Questions
That is the complete set, seventeen routes across twelve regions, one shared legend, and a circuit for every material sweep the open world asks of you. Routes are community-sourced, so verify them in-game before committing a long session, and check the Last Updated date after major patches. If you are still deciding what deserves your farming time in the first place, start with the farming priorities guide, then come back here for the traversal layer, or browse the full guide index for everything else.