WULING 1.3 SWORD VAULT DALE MAX PROFIT MEGA BASE BLUEPRINT
 Razer Kraken Kitty V2Chroma RGB cat-ear headset with THX Spatial Audio. A streamer favorite.Shop on Razer.com
Sponsored. We may earn a commission at no extra cost to you.
Table of Contents
Patch 1.3 opens up Sword Vault Dale, the newest Wuling sub-region, and with it two changes that make a bigger base worth building: the Regional Development Level cap rises to 17, which means more ore, and the Jingyu Valley Outpost gains a level 4, which means the outpost wants more crafted goods than the 1.2.2 setup can supply. This guide covers the new mega base sized for both — roughly 68,000 bills per hour of sellable production against an outpost demand of 63,900 bills per hour with every gear line running.
This is a direct successor to Part 8 — Wuling 1.2.2 Test Area Mega Base, and it reuses almost everything from that build. Wuling 1 through 6 come from Part 5, Wuling 7 comes from Part 8, and the entire Jingyu Valley Sub AIC carries over from Part 8 untouched. What 1.3 adds is one new Core AIC piece (Wuling 8), three small upgrade blueprints that patch the existing Core layout, and a redesigned Marker Stone pair. If you already run the Part 8 base, the migration is the shortest one in the series so far — skip straight to the upgrade path section. If you are building fresh, the full procedure starts at the Core AIC section.
The production lineup is the same family as 1.2.2 — SC Wuling Battery, Heavy Xiranite, Yazhen Syringe A, Hetonite Parts, and all three Gear Components on switchable lines — but at higher throughput, with enough headroom to buy out the expanded 120-catalyst weekly Artificing shop without touching your bill income. If you are completely new to Wuling, catch up with the earlier guides first: Part 1 for the upstream Valley IV pipeline, Part 5 and Part 8 for the Wuling base this one extends, and the Blueprint Curation hub for single-purpose factories.
Quick Answer
The Wuling 1.3 Mega Base is a three-AIC outpost factory tuned for patch 1.3's Sword Vault Dale unlock. Requirements: Regional Development Level 17, Jingyu Valley Outpost level 4, Mining Rigs connected to the new map area, Area Expansion 2 on all three AICs, the 4th bottom-side upgrade on the Core AIC (20 Depot Bus Section limit), Wuling Depot Bus on the JV Sub AIC, and the Depot Bus Section on the MS Sub AIC. At default settings it produces about 68,000 bills per hour of sellable goods against a 63,900 bills/hour outpost demand — with all three gear lines crafting in parallel.
Six codes are new in 1.3: Wuling 8 for the Core AIC, the 1.3 MS Top and Bottom pair for Marker Stone, and three upgrade blueprints that 1.2.2 players stamp over deleted sections of the existing Core layout instead of rebuilding it. Wuling 1–6 codes are in Part 5, Wuling 7 and the JV pair are in Part 8. All codes are region-locked — Asia and NA/EU are not interchangeable. Three temporary thermal banks at Marker Stone bridge the power gap during deployment; delete them once the MS battery output is climbing.
Requirements & AIC Upgrades
The requirements are the same whether you build fresh or upgrade from 1.2.2. First, reach Regional Development Level 17 — upgrading the rigs and pushing the Jingyu Valley Outpost to level 4 should give enough points on their own, without grinding any single objective. Second, connect your Mining Rigs to the new Sword Vault Dale map area. The extra ore from those connections is what the 1.3 production lines are sized against; if your ore income is lower than expected after deployment, missing rig connections are the first thing to check.
The AIC upgrade list is short if you come from Part 8 — only two Sub AIC upgrades are genuinely new. The Core AIC needs Area Expansion 2 and at least the 4th upgrade on the bottom side, which raises the Depot Bus Section limit to 20. The Jingyu Valley Sub AIC needs Area Expansion 2 plus the Wuling Depot Bus unlocked. The Marker Stone Sub AIC needs Area Expansion 2 and the added Depot Bus Section. None of these are optional — the blueprints are sized to those exact footprints, and a smaller AIC will simply truncate the deployment.
| AIC | Required Upgrades |
|---|---|
| Core AIC | Area Expansion 2 · at least the 4th upgrade on the bottom side (20 Depot Bus Section limit) |
| JV Sub AIC | Area Expansion 2 · Wuling Depot Bus unlocked |
| MS Sub AIC | Area Expansion 2 · Depot Bus Section added |
If you are completely new to Wuling, do not start here — use the 1.0-era base guides to catch up, swap to the 1.1 layouts for the newer materials, and once you have the outpost levels and materials you can skip the 1.2 builds entirely and deploy this one directly. Players on the Part 8 (1.2.2) base should jump to the upgrade path once the prerequisites are met.
Blueprint Import & Starting Materials
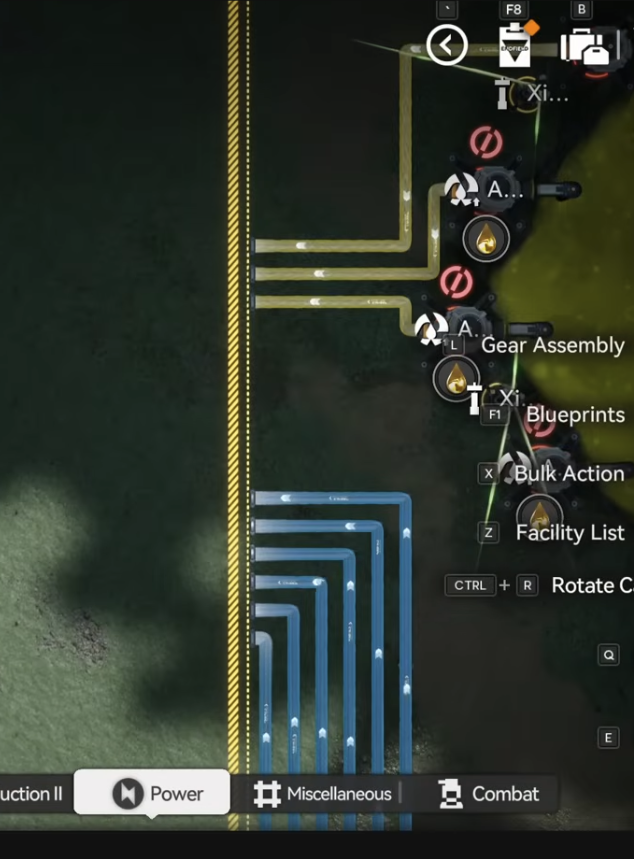
The import flow is the same as every part in this series. Open Blueprints from the facility menu, switch to Shared Blueprints, click Import Blueprints at the bottom, and paste the code. The copy buttons on this page eliminate the most common typo — the letter O versus the digit 0 — and watch for stray leading or trailing spaces, which will throw an import error. Make sure there is nothing on the ground where you deploy, as loose items block blueprint deployment. If you deploy a Hologram, build it first — the connected pieces cannot be deployed on top of an unbuilt outline; just click the Hologram and submit the facilities.
All the blueprints in this guide work as-is, so if you get an error, it is a setup problem on your end — double-check the prerequisites and the deployment area before retrying. Before starting, drop the bootstrap materials into the depot so the base does not stall in its first hour: a stock of SC Wuling Batteries (for the temporary thermal banks), 500 Sandleaf and 500 Yazhen (one stack per seed machine at Jingyu Valley), and enough Cooling Parts to build the new facilities. If you have no Cooling Parts, use the Temp Cuprium Parts blueprint from Part 5: connect a Fluid Pump to its two pipes and let it run until you have around 1,000.
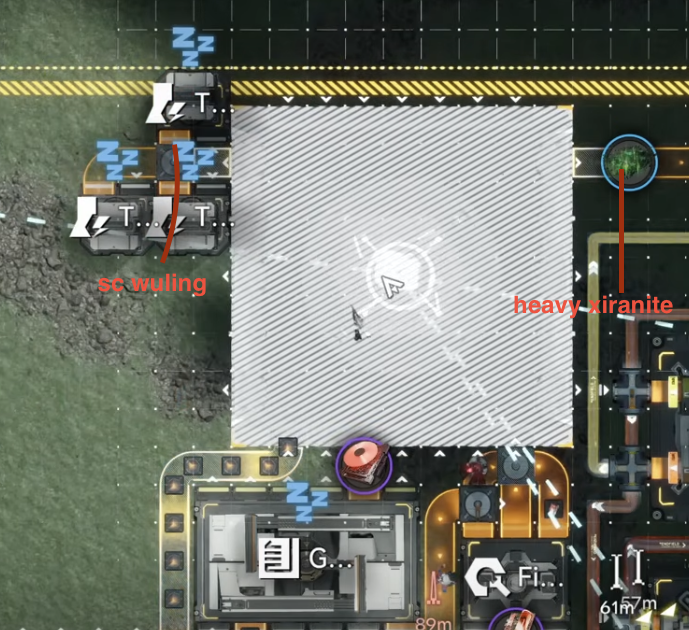
Temporary Thermal Banks
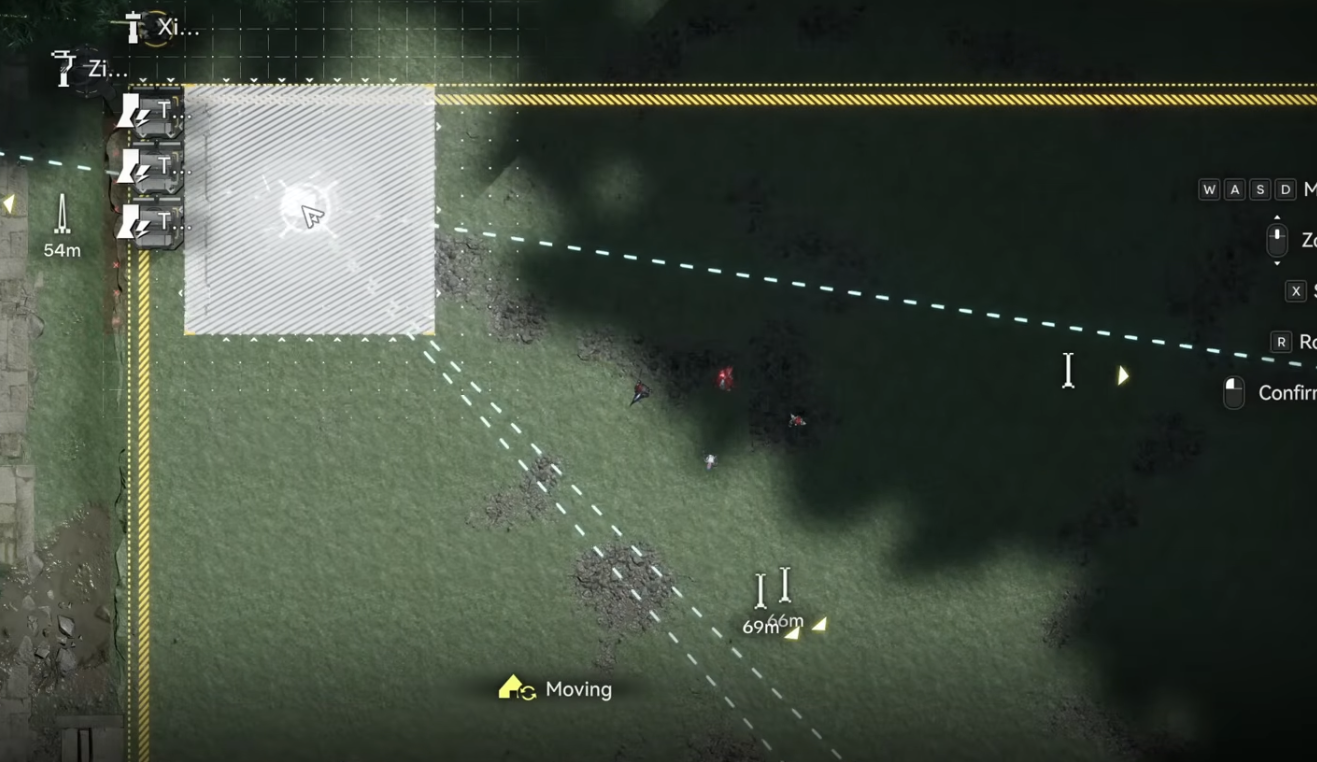
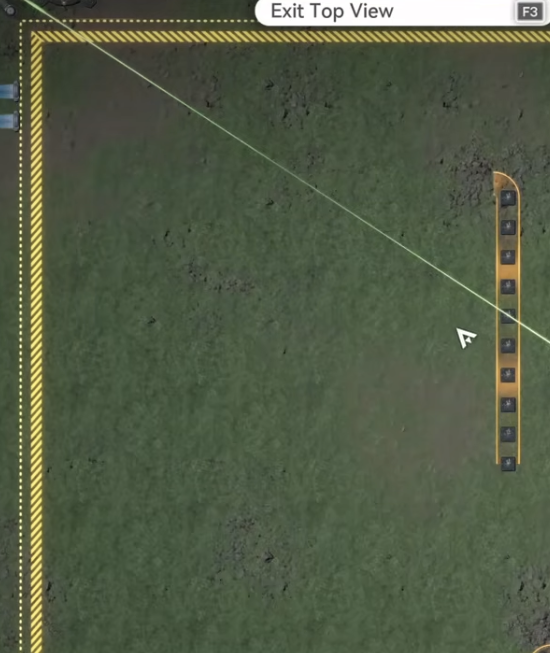
The base has no sustainable power source until the Marker Stone Sub AIC is producing SC Wuling Batteries, so the first physical step is temporary power. At the Marker Stone Sub AIC, delete the old layout, deploy three temporary Thermal Banks, and load them with batteries from your depot. They carry the whole base through the deployment window and get deleted at the very end of the Marker Stone section.
Delete the old Marker Stone layout and place three temporary Thermal Banks before anything else
If you are building fresh, also delete everything from the Core AIC and Jingyu Valley now — the importer will silently fail if any old facility overlaps the new footprint. 1.2.2 players only clear Marker Stone; the Core AIC gets surgically patched in the upgrade path instead.
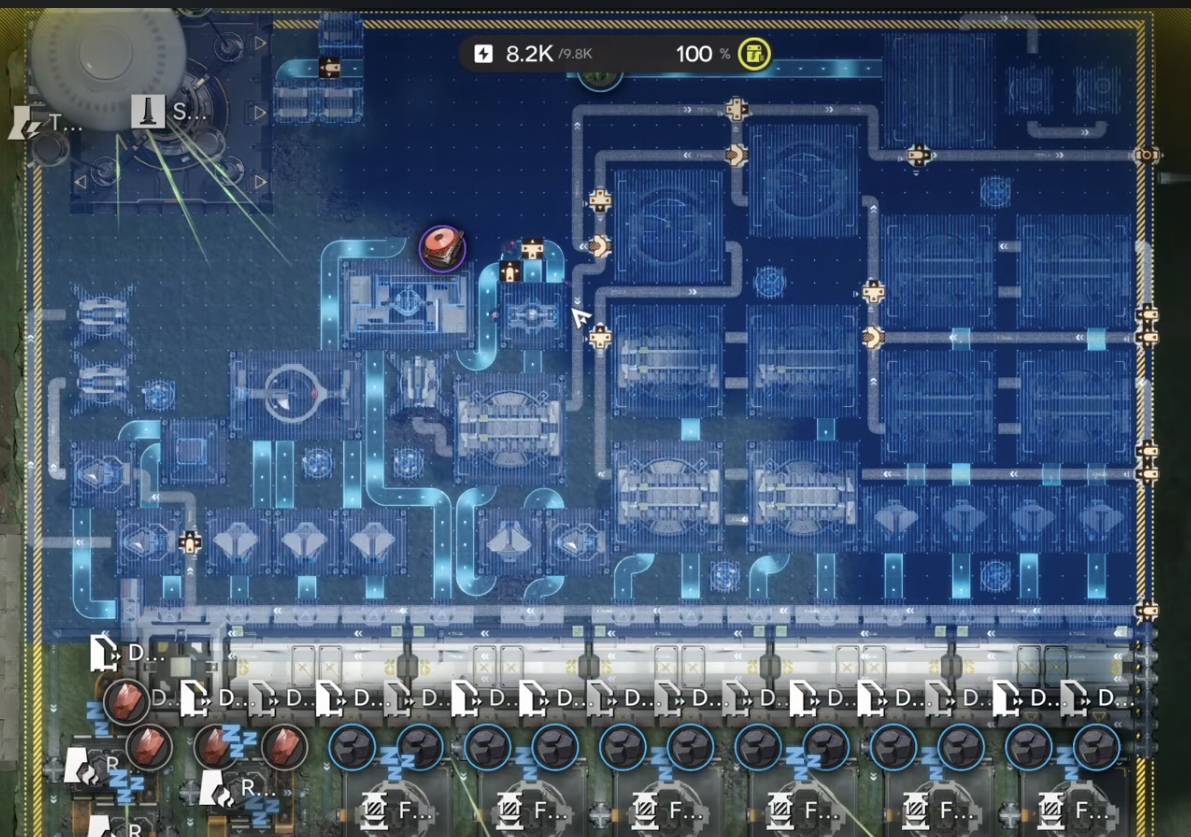
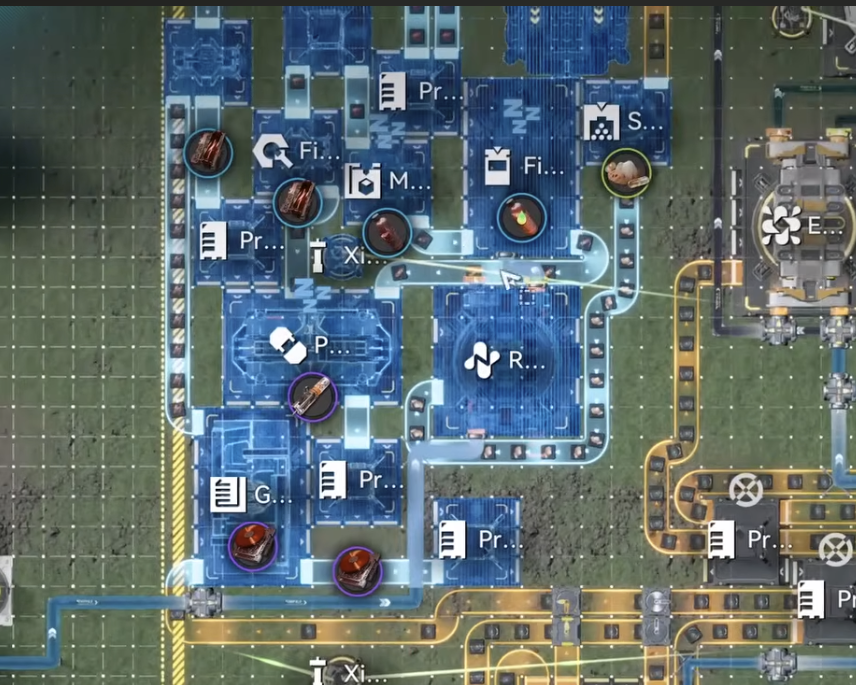
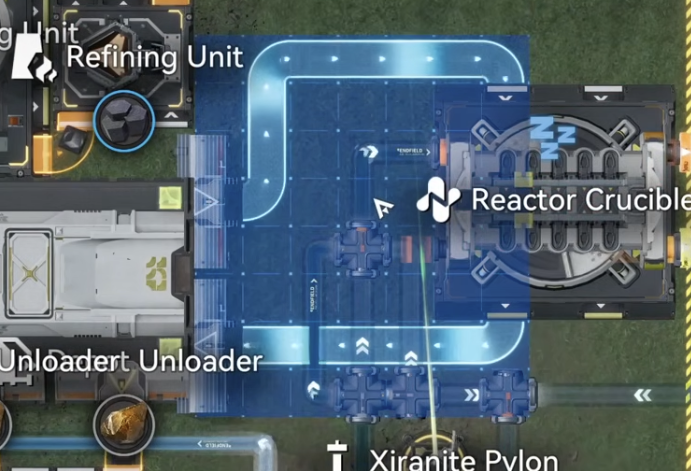
Fresh Setup — Core AIC (Wuling 1–8)
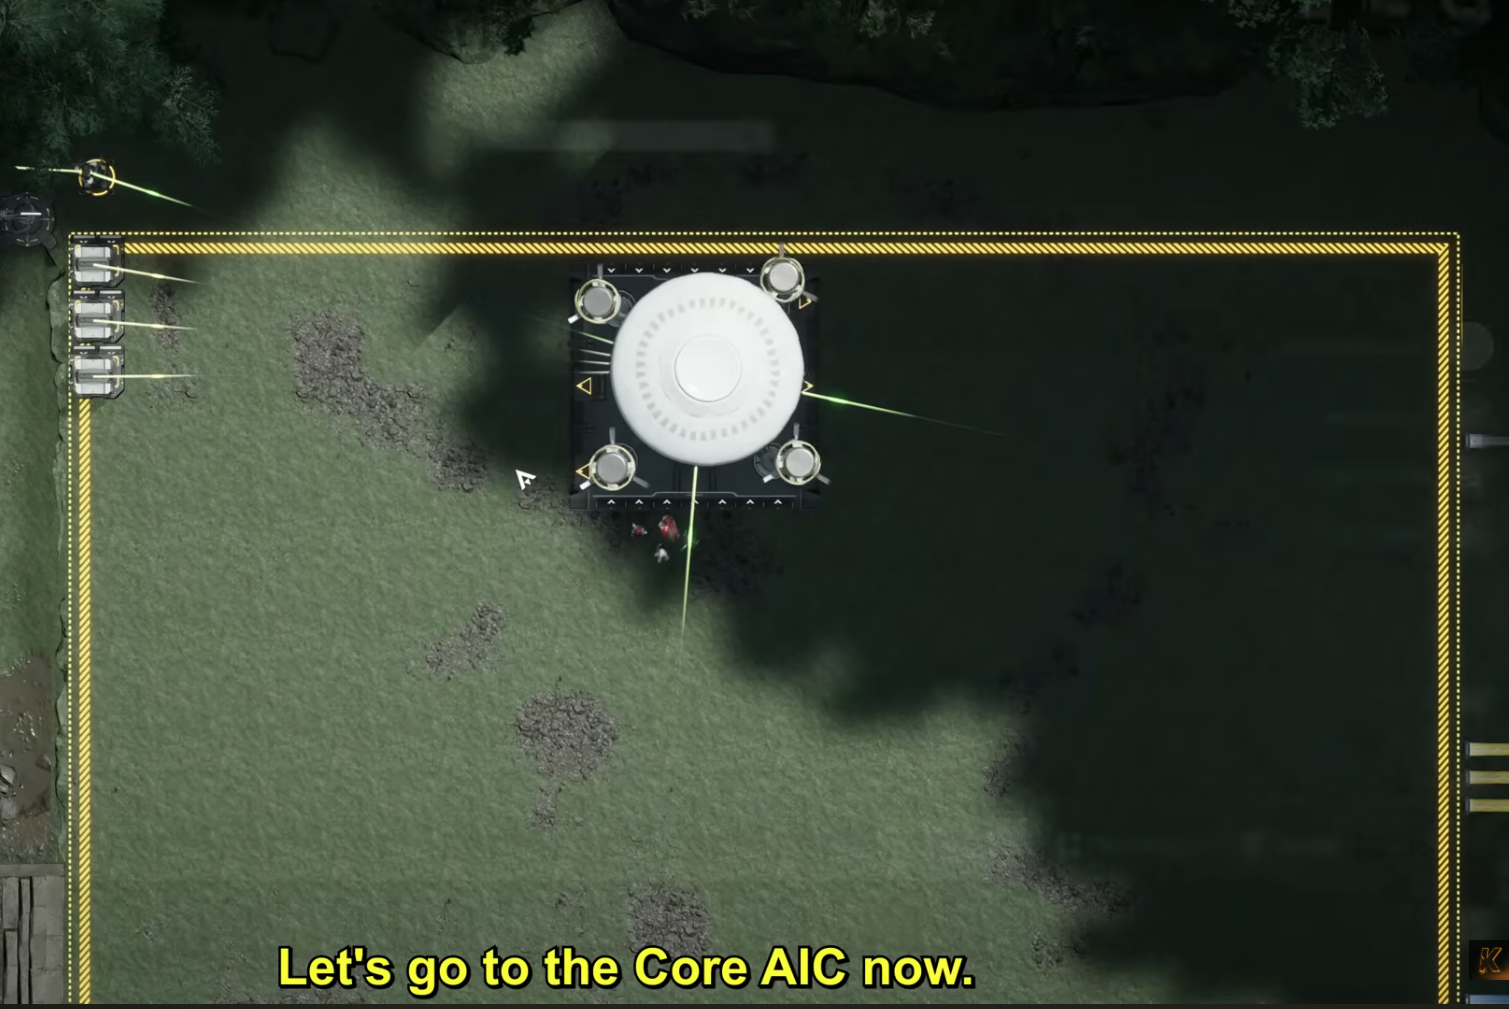
This section is the full from-scratch procedure for new builders; if you run the Part 8 base already, skip ahead to Upgrading from 1.2.2. Orient yourself first: face the map so the river is on your left side, then move the Core to the top-right corner to clear the deployment zone. The Wuling 1–6 codes are in Part 5's Core AIC section and Wuling 7 is in Part 8 — only Wuling 8 below is new. Deploy in this order:
- Deploy Wuling 1 matching the top-left corner.
- Deploy Wuling 2 connecting the Depot Bus, followed by Wuling 3 in the middle of the two.
- Place Wuling 4 on the bottom side, and Wuling 5 right next to it.
- Put Wuling 6 on the top-right side, then move the Core to the middle so it takes all the transport belts.
- Follow with Wuling 7 right below the Core, also taking all the belts.
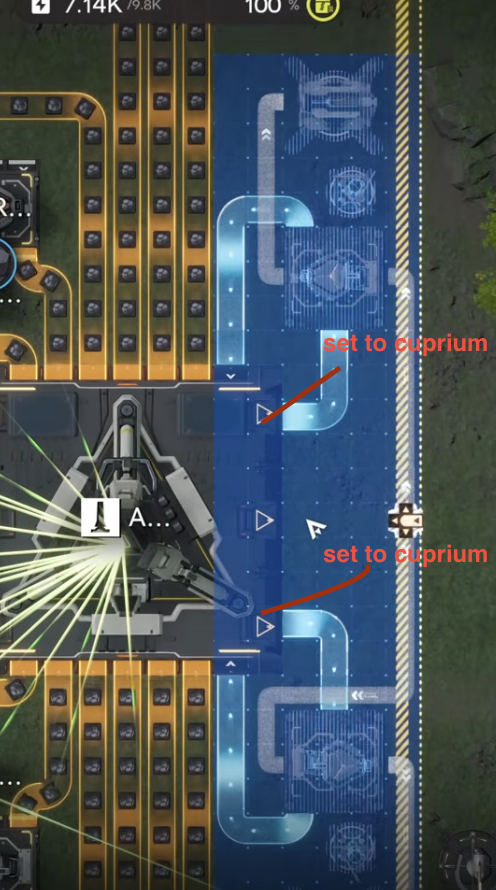
- Set the Core's top-right and bottom-right outputs to Cuprium Ore.
- Finally, deploy Wuling 8 to match the Core (placement screenshots are in the upgrade section — the position is identical for both paths).
| Blueprint | Asia Server Code | NA/EU Server Code |
|---|---|---|
| Wuling 8 | EFO017i89o8o6E587O0Ai | EFO011ea054779U7U3aO7 |
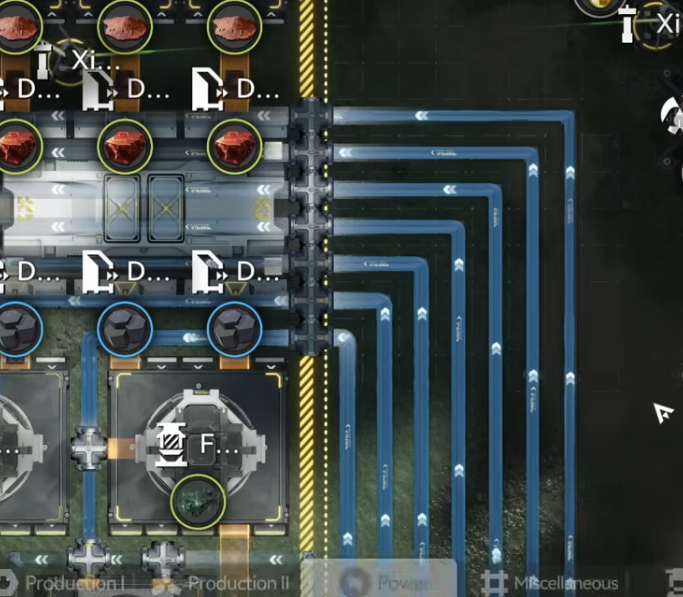
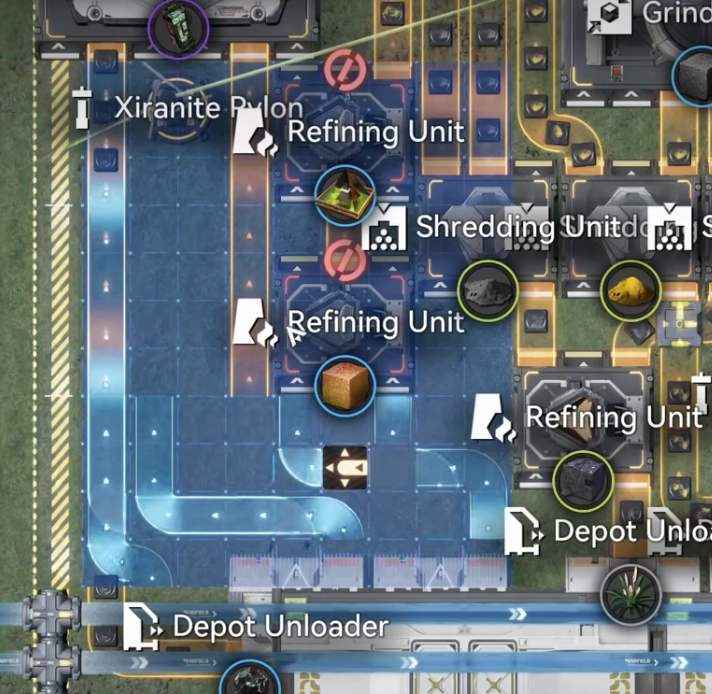
Conduits. With the blueprints down, link the conduits inside the base. On the top-left side, connect the double conduit inlet into the double outlet — you can move them into an open space, connect them, and put them back, but make sure they go back in their exact original place, or just walk over and connect them manually to be safe. Do the same for the two conduit inlets that need to link to the two outlets on the bottom-right side, and confirm both links are actually connected before moving on.
Water. In total the Core AIC needs nine Fluid Pumps and one Fluid Supply Unit. On the top-left, three Fluid Pumps — two into the two pipes there, and one into the pipe below the Gear Unit. On the bottom side, connect four pumps into the four pipes; check that each Fluid Pump goes into a single pipe, and connect the single pipe coming out of the base to a Fluid Supply Unit — the direction matters, the pipe must run out from the base into the unit. On the middle-right, connect one Fluid Pump into the remaining pipe; there is a small water source in that corner, and remember to power the pump up.
Protocol Stashes. In the middle of the base and in the Cuprium area sit unpowered Protocol Stashes that split items equally into different machines. Do not remove them and do not power them. They are unpowered by default, but for safety, manually toggle each one off and set it to storage mode — that way, if you ever drop a Pylon nearby, nothing gets force-powered and the production split stays intact. Accidentally powering these stashes is the classic cause of "the base looks right but the numbers are wrong."
Fresh Setup — Jingyu Valley Sub AIC
The Jingyu Valley layout carries over from 1.2.2 unchanged — the codes and deployment screenshots are in Part 8's Jingyu Valley section, and the original layout lineage goes back to Part 5. If you upgraded from Part 8, your JV base needs no changes at all; if you are building fresh, deploy it exactly as Part 8 describes.
The short version: face the map with the lake above you and place the Core in the bottom-right corner. Deploy JV Bottom matching the bottom line and place one stack of Sandleaf in each of the 10 seed machines, then deploy JV Top above it and place one stack of Yazhen in each of the 11 seed machines. Connect six Fluid Pumps in total — four into the center and two on the right side; all six fit in the lake, with one spot below the tree, and remember to power that one up. Finally, rotate the Core so the Ferrium Powder output flows into the depot, and double-check that every machine is producing crops before moving on.
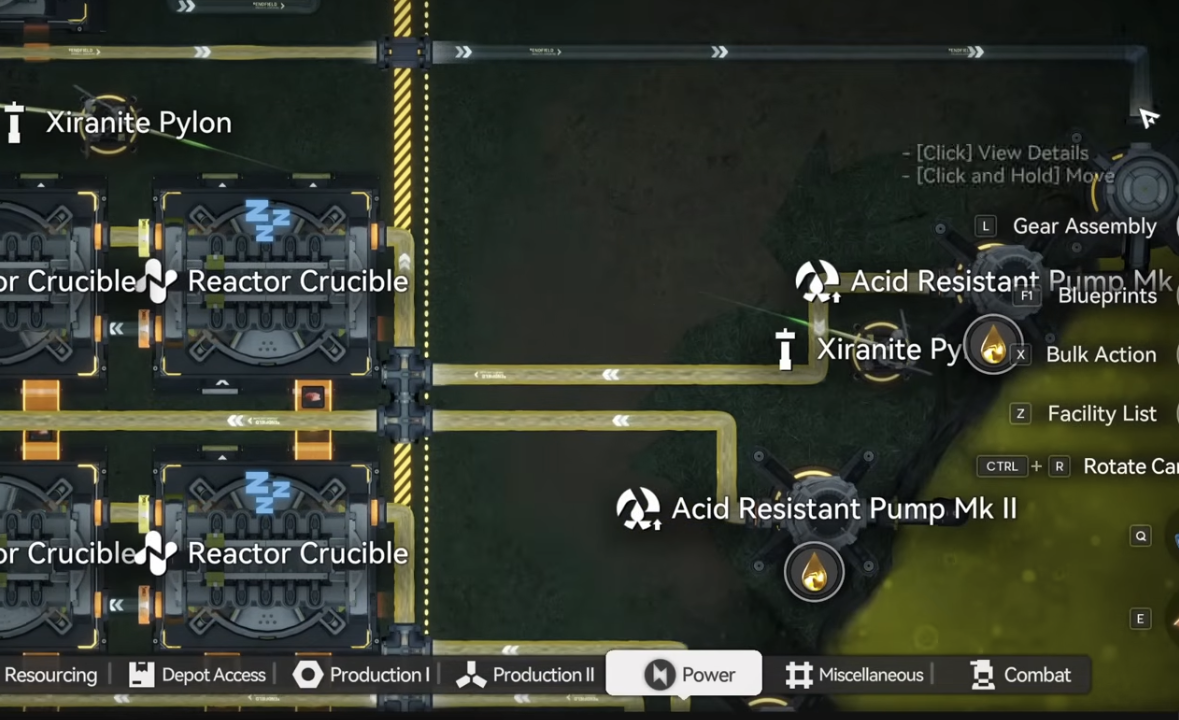
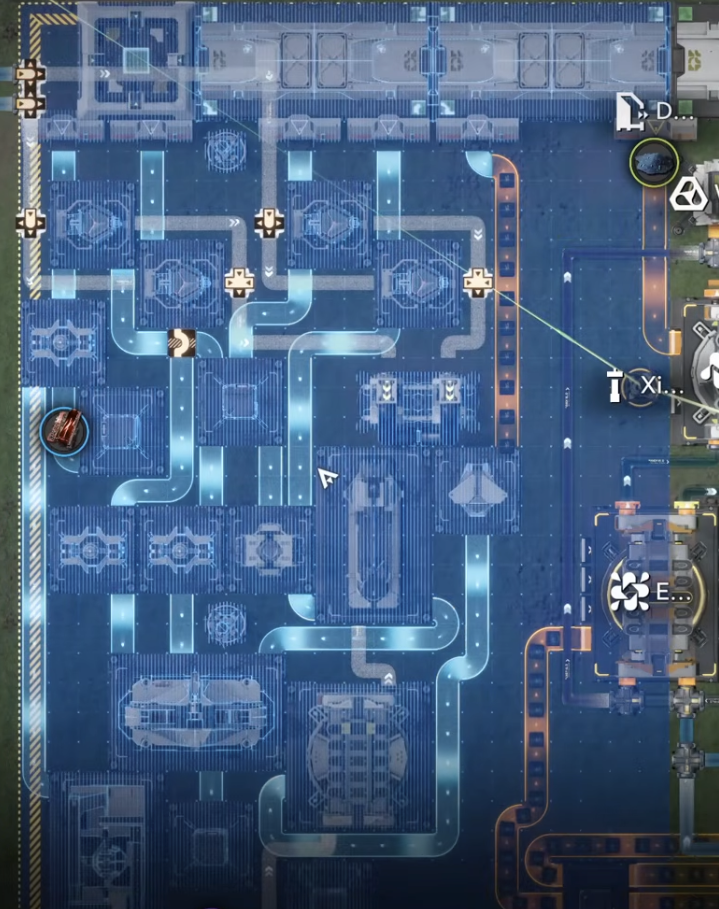
Marker Stone Sub AIC
The Marker Stone procedure is identical for fresh builders and 1.2.2 upgraders — both deploy the new 1.3 pair from scratch. Face the map with the acid lake on your right side, delete the old external pipes left over from the previous layout, and move the Core to the top-left corner. Then deploy 1.3 MS Bottom on the bottom side, followed by 1.3 MS Top above it.
Delete the old external pipes first
Move the Core to the top-left corner
| Blueprint | Asia Server Code | NA/EU Server Code |
|---|---|---|
| 1.3 MS Top | EFO01Ue3683812OOO76a8 | EFO01U4Aiu355eO9E71a8 |
| 1.3 MS Bottom | EFO01a6584543eAUuoe5e | EFO01iOe51u6E02A72U4 |
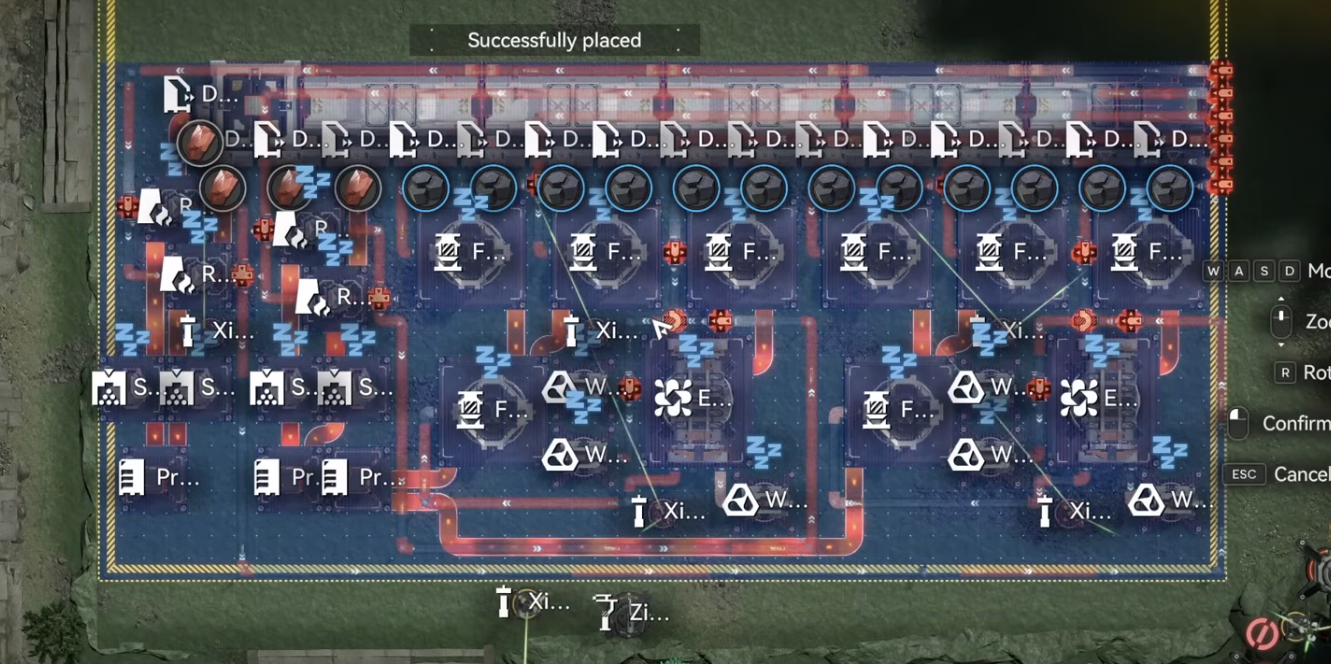
1.3 MS Bottom — deploy first, after the pipe removal
1.3 MS Top — deployed above the bottom half
If the deployment fails with a "reaching pipe logistics limit" error, the cause is almost always too many Pipe Splitters in your Energy Alluvium farm — remove them and switch to the newer, more pipe-efficient farm layout, then deploy again.
The fluid setup is where most first-time deployments stumble. The bottom side takes seven clean water pumps and four acid pumps — use the camera-rotation trick to see more of the shoreline, it makes placing Fluid Pumps much easier. Make sure there is one water pump going into each of the seven splitters, then connect the four acid pumps into the four splitters in the middle. Finally, confirm the pipe leaving the base runs out to a Fluid Supply Unit placed in the acid lake — getting that direction backwards makes the production graph look fine for half an hour before everything stalls.
7× Clean Water Pumps — one per splitter
4× Acid Pumps into the middle splitters
Core repositioned — takes items from the bottom side
To finish: move the Core into its final spot taking items from the bottom side, set the top-left output to SC Wuling Battery and the top-right output to Heavy Xiranite, and once the battery count starts climbing in the depot, delete the three temporary Thermal Banks. If everything is connected properly, the base starts working on its own from here.
Upgrading from 1.2.2
This section is only for players running the Part 8 (1.2.2) base. The prerequisites still apply — connect the new Mining Rigs and reach Regional Development Level 17 — and the Marker Stone prep is the same: face the acid lake on your right, delete everything there, and deploy three temporary Thermal Banks with power. Wuling 1–7 and the whole Jingyu Valley Sub AIC stay exactly where they are; the Core AIC gets three surgical patches plus the new Wuling 8 piece. If you are worried about making a mistake while replacing sections, you can always fall back to the full fresh procedure instead — it is slower but mistake-proof.
| Blueprint | Asia Server Code | NA/EU Server Code |
|---|---|---|
| 1.3 Upgrade 1 | EFO01a6584543eAUeoi5e | EFO010U96EOAA1i72E379 |
| 1.3 Upgrade 2 | EFO01a6584543eAU5ou5e | EFO01U4Aiu355eO9571a8 |
| 1.3 Upgrade 3 | EFO01u8U47U756038AoOU | EFO01A5i4639OaE191eO |
Upgrade 1 — Top-Left Block
Select from the first block in the top-left down to the end of the section and delete it, but leave the belt in place — the new blueprint reuses it. Then deploy 1.3 Upgrade 1 in the cleared space; it fits the gap exactly.
Select and delete the old top-left block
Leave this belt in place — the upgrade reuses it
1.3 Upgrade 1 deployed — it replaces the deleted section exactly
After the deployment, reconnect the double conduit inlet to its outlet on the top-left, then turn off the Protocol Stash in the new section and set it to storage mode — same rule as everywhere else in the base: these stashes split items between machines and must never be powered.
Reconnect the double conduit inlet to the outlet
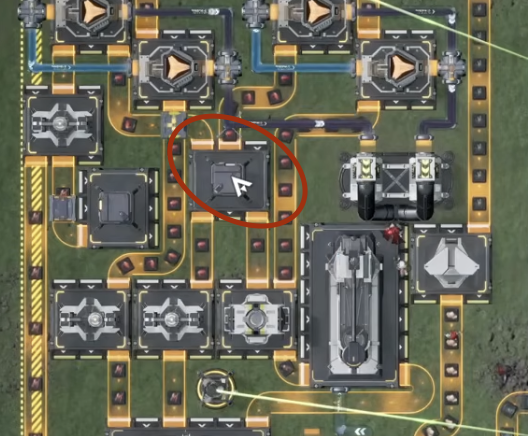
Turn the Protocol Stash off and set it to storage mode
Upgrade 2 — Depot Bus Section
On the bottom side, near the Depot Bus, delete the marked section and deploy 1.3 Upgrade 2 in its place.
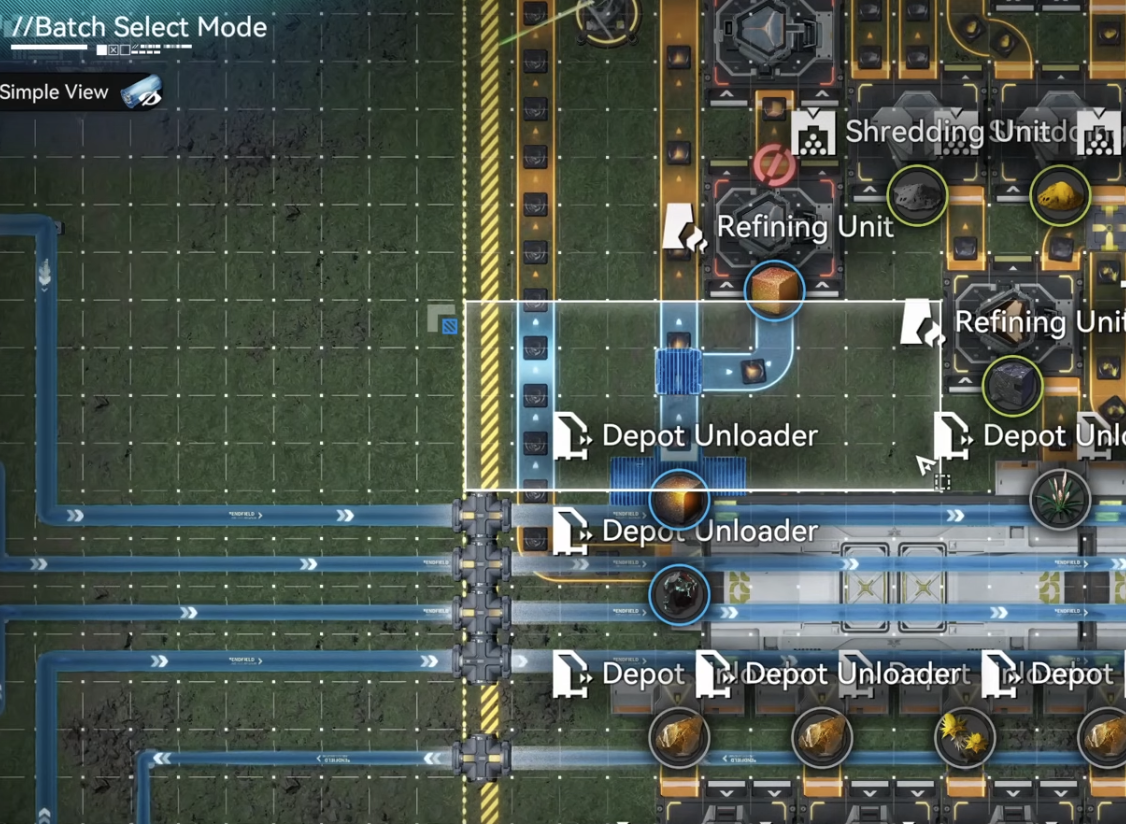
Delete this section next to the Depot Bus
1.3 Upgrade 2 replaces the deleted section
Upgrade 3 — Bottom-Right Belts
In the bottom-right corner, delete the two long belts, then deploy 1.3 Upgrade 3 so it matches up against the Expanded Crucible.
Delete these two long belts on the right
1.3 Upgrade 3 deployed to match the Expanded Crucible
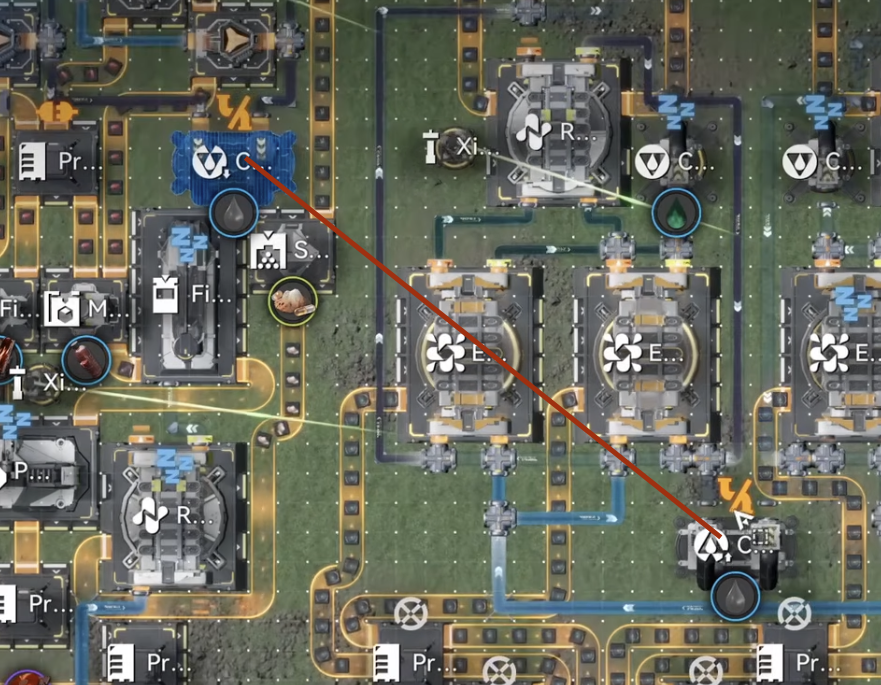
Wuling 8 & the Extra Pump
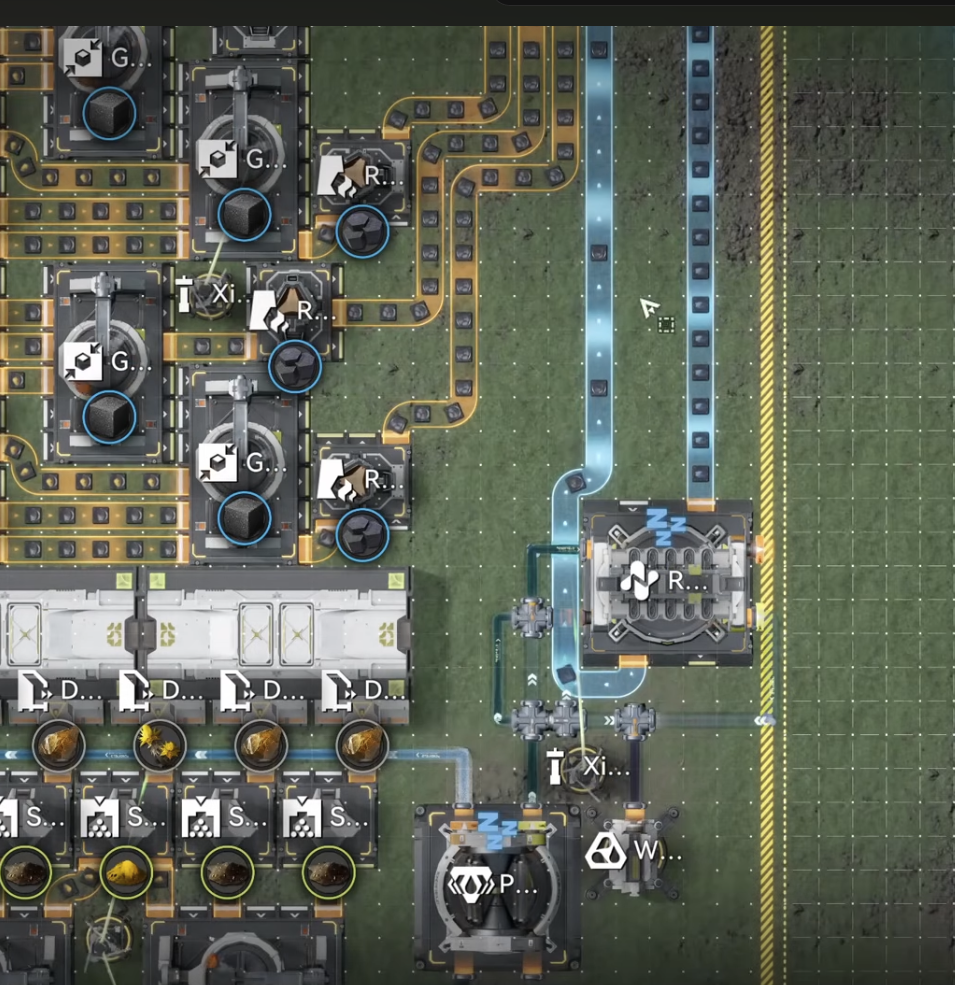
Change the Core's top-right and bottom-right outputs to Cuprium Ore, then deploy Wuling 8 (code table above) on the right side of the Core. Finally, drag one water pipe into the splitter on the right side — there is a small lake there where the extra Fluid Pump fits. That is all for the Core AIC.
Wuling 8 — deployed to match the Core
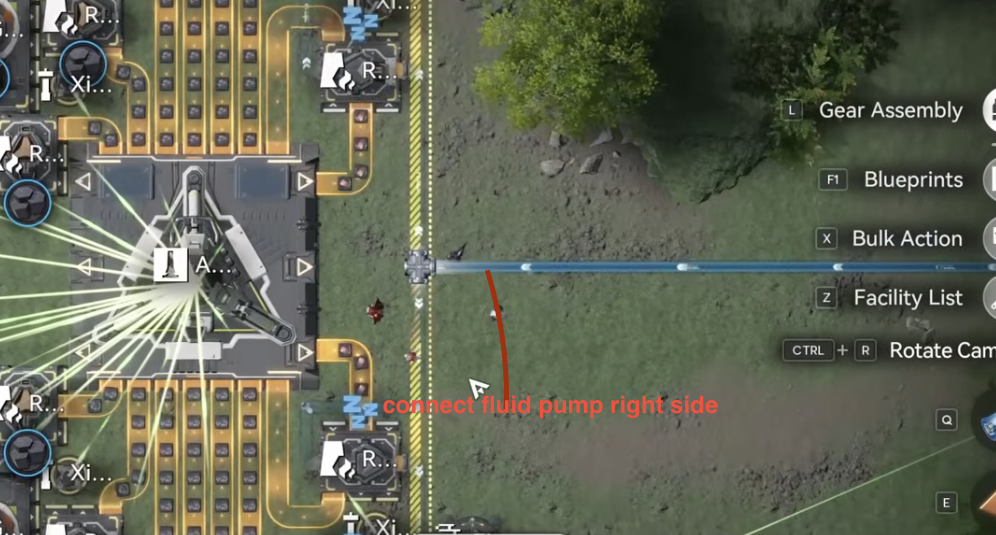
One water pipe into the splitter — Fluid Pump in the small lake on the right
To finish the migration, redeploy Marker Stone exactly as described in the Marker Stone section above — delete the old pipes, move the Core to the top-left, deploy the 1.3 MS Bottom and Top pair, wire the seven water and four acid pumps with the Fluid Supply Unit in the acid lake, set the outputs, and delete the temporary Thermal Banks. Jingyu Valley needs no changes at all.
Metastorage — Dense Originium Powder
The base is fed from Valley IV via Metastorage Transfer, and the 1.3 build switches the transferred good to Dense Originium Powder. A common worry first: Metastorage generates the material out of nothing — it does not consume anything from your Valley IV depot. Just make sure the transfer is set to Metastorage and not Stockpile Transfer.
To set it up, go to your existing Originium transfer (whichever one you have now), click Edit, then Stop Transfer and confirm. Click Edit again, swap the mode to Metastorage, open the goods list, select Dense Originium Powder, and start the transfer. Then give it time: if you have no Dense Originium Powder in the depot, the first Metastorage batch takes a while to arrive, and only after that will the production graph read correctly — expect one to two hours before the numbers stabilise. Alternatively, manually transport around 2,000 Dense Originium Powder to skip the waiting entirely.
Production & Profit Stats
At default settings the base makes all three Gear Components at 0.5 per minute each — 720 pieces in total per day — and still clears the outpost comfortably: demand is 63,900 bills per hour, and even with all three gear lines crafting, the base produces about 68,000 bills' worth of items per hour. There is no need to turn the gear lines off; the surplus means you can slowly bank Gear Components for the future at no cost to your income.
The gear math matters more in 1.3 because the shop now sells 120 Artificing Catalysts per week (20 more than before), and using all of them takes 6,000 Gear Components. At default you make about 5,000 of each component per week, so buying out the shop always works. But since Xiranite gears are the cheapest to artifice — only 8,000 Stock Bills each — most players artifice exclusively with those. If you want to lean into that, use a splitter at the Core AIC to redirect half of the Xiranite line into the bottom side: production shifts to 0.75 Xiranite Components and 0.25 Cuprium Components per minute, or roughly 7,560 Xiranite Components per week — enough to feed all 120 catalysts with Xiranite gears alone and save bills. The modification is optional and entirely up to you.
| Metric | Value |
|---|---|
| Outpost demand (all gear lines active) | 63,900 bills/hr |
| Base production (default settings) | ~68,000 bills/hr |
| Gear Components (default) | 3 × 0.5/min — 720/day, ~5,000 each/week |
| Power draw | 4.5 batteries/min (≈3 Thermal Banks' worth) |
On power: the base consumes the equivalent of 4.5 batteries per minute, and there is no point min-maxing it. The base produces far more than the outpost can buy, so optimising power just fills the depot with batteries you cannot sell — and the "insufficient power" popup is annoying enough that running lean is not worth it. One genuine saving: if your account powers all its turrets with Pylons (roughly 9,000 power usage in that configuration), switch the turrets to batteries instead — batteries last a very long time in turrets and free up a lot of grid power.
Base Functionalities & Maintenance
The base ships with built-in switches and caps so you can change what it makes without touching the layout:
- Core AIC, left side: the two switches for the Xiranite and Cuprium Component lines — to turn a line off, just activate the item port.
- Marker Stone, right below the Core: the Hetonite Component switch — turn it on to stop production.
- Core AIC, top-left: if you need parts to build facilities, set a number on this item port.
- Core AIC, middle: set a number for how much of the material here you need — with a cap set, the line clogs automatically when it is reached, so nothing breaks if you forget about it.
- Marker Stone, top-right: by default the base converts 1,000 Heavy Xiranite into Liquid Heavy Xiranite stored in two Fluid Tanks. When you need it to clear Blight during exploration, come here and drag the tanks. If you want more than 1,000, reset the switch and replace the Fluid Tanks.
One material is deliberately left unused: without gear crafting the base consumes 102.5 Ferrium Powder per minute, so about 17.5 per minute goes unused. You could craft low-tier syringes with it, but it is genuinely not necessary — the base already produces far more than it consumes, so just leave it.
The one hard rule of maintenance: never let Hetonite Parts or Yazhen Syringe A reach the depot limit. They are the main sources of sales income — always sell them first, or delete the excess if you cannot sell fast enough. SC Wuling Battery and Heavy Xiranite, on the other hand, can sit at the depot limit without affecting the base at all. Beyond that, the base is designed to handle every clogging situation on its own; everything in the layout has a purpose, so do not modify it unless you know exactly what you are doing.
If the base is not working or producing less than it should, check these in order:
- Ore income — make sure all Mining Rigs (including the new Sword Vault Dale connections) are powered and working, and your ore amounts match the requirements.
- Pipes — double-check every pipe is connected properly and actually transporting liquid, especially the out-going pipes to the Fluid Supply Units.
- Conduits — same check for the conduit links inside the Core AIC.
- Metastorage — confirm the transfer is set to Metastorage, not Stockpile Transfer, and that Dense Originium Powder is selected.
Frequently Asked Questions
That is the full Wuling 1.3 Sword Vault Dale Mega Base — three AICs, six new codes, and roughly 68,000 bills per hour against a 63,900 demand with every gear line running. If you are missing the reused pieces, Wuling 1–6 are in Part 5 and Wuling 7 plus the Jingyu Valley pair are in Part 8; the upstream Valley IV pipeline is covered in Part 1. For single-purpose factories outside the mega base series, the Blueprint Curation hub indexes everything by purpose.
Sponsored. We may earn a commission at no extra cost to you.