HEAVY XIRANITE CHUBBY LUNG BLUEPRINT: PHASE 2
Table of Contents
Phase 2 of AIC Support: Chubby Lung Attacks opens on day 8 of the event and adds a second limited-time formula: Heavy Xiranite Chubby Lung, made at the Packaging Unit from Proto Chubby Lung Heavy Shells and Proto Xiran-Cuprium Frames. It trades at the Wuling outposts for more Wuling Stock Bills and Fruits of Altruism Certs than the Phase 1 Xiranite Chubby Lung does. This guide is the Phase 2 build: two main blueprints for the Yinglung Pass sub AIC, two helpers depending on where your base is, and two optional rush blueprints, all with Asia and NA/EU codes.
It sits on top of either the Part 11 Wuling 1.4 mega base or the Part 13 1.5 upgrade, and it picks up where the Part 14 Phase 1 build left off. You do not need to have run Phase 1 first. Each step below splits by which guide your base currently follows.
Quick Answer
Upgrade the Yinglung Pass sub AIC to its maximum size, then work through four areas. On Marker Stone, cut the top side down to its three Cuprium lines. On the Core AIC, leave only the Separator Core section running. Empty Yinglung Pass and deploy Event P2Top along the top edge with Event P2Bot right below it. Then feed it 80 Inergen and 84 Xiragen per minute. That makes 12 Heavy Xiranite Chubby Lung per minute, about 345,600 Fruits of Altruism Certs a day, which clears the whole Phase 2 shop in about 5.12 days, or 2.2 days if you skip the final T-Creds entry. All codes are region locked for Asia and NA/EU.
Requirements
- The factory requirements of the 1.4 base or the 1.5 base, at minimum. Either works.
- The maximum size upgrade on the Yinglung Pass sub AIC. The two Phase 2 blueprints fill it.
- An Inergen conduit outlet carrying at least 80 per minute, which means four or more Gas Extractors feeding it.
- A Xiragen outlet carrying at least 84 per minute. The 100 per minute North Wuling Exclusion Zone line from Part 11 covers it.
- The Heavy Xiranite Chubby Lung formula unlocked in the event. It is a limited-time Phase 2 formula, so the factory cannot build it before the event hands it to you.
Heavy Xiranite Chubby Lung Blueprint Codes
Open Blueprints, go to Shared Blueprints, click Import Blueprints, and paste the code for your server region. Codes are region locked, so Asia and NA/EU are not interchangeable. If you are typing by hand, there is no letter L in any of these codes, the letter O and the digit 0 are different characters, and a stray space at either end will reject the import. The copy buttons avoid all three.
| Blueprint | Asia Server Code | NA/EU Server Code |
|---|---|---|
| Event P2TopYinglung Pass, top edge | EFO01a6584543eAOioe5e | EFO014o5O1688E3e5E81A |
| Event P2BotYinglung Pass, below P2Top | EFO01a6584543eAOAou5e | EFO01U4Aiu355eO3071a8 |
| Event TempCore AIC, only if you deleted it | EFO017i89o8o6E54eO2Ai | EFO0172UA3844i541O0Ai |
| 1.5 MS TopMarker Stone, only from the 1.4 base | EFO01I3A5UAUO19u65o08 | EFO01a709O5UU6A5aoe5e |
| Event ExXirRush only | EFO0101O35O5u7i90E179 | EFO014o5O1688E3e1Ea1A |
| Event P1 MdRush only | EFO01A7u13u3a4E769ieO | EFO0172UA3844i54uO2Ai |
Everyone needs Event P2Top and Event P2Bot. Event Temp is only for players who deleted the Core AIC Separator Core section during Phase 1, and 1.5 MS Top is the same code as in Part 13, needed only if your Marker Stone is still on the 1.4 layout. Event ExXir and Event P1 Md are the rush set. Skip them unless the shop math says you are behind.
Step 1: Marker Stone Top
Go to the Marker Stone sub AIC. The target for this step is a top side that runs only its three Cuprium processing lines, and nothing else.
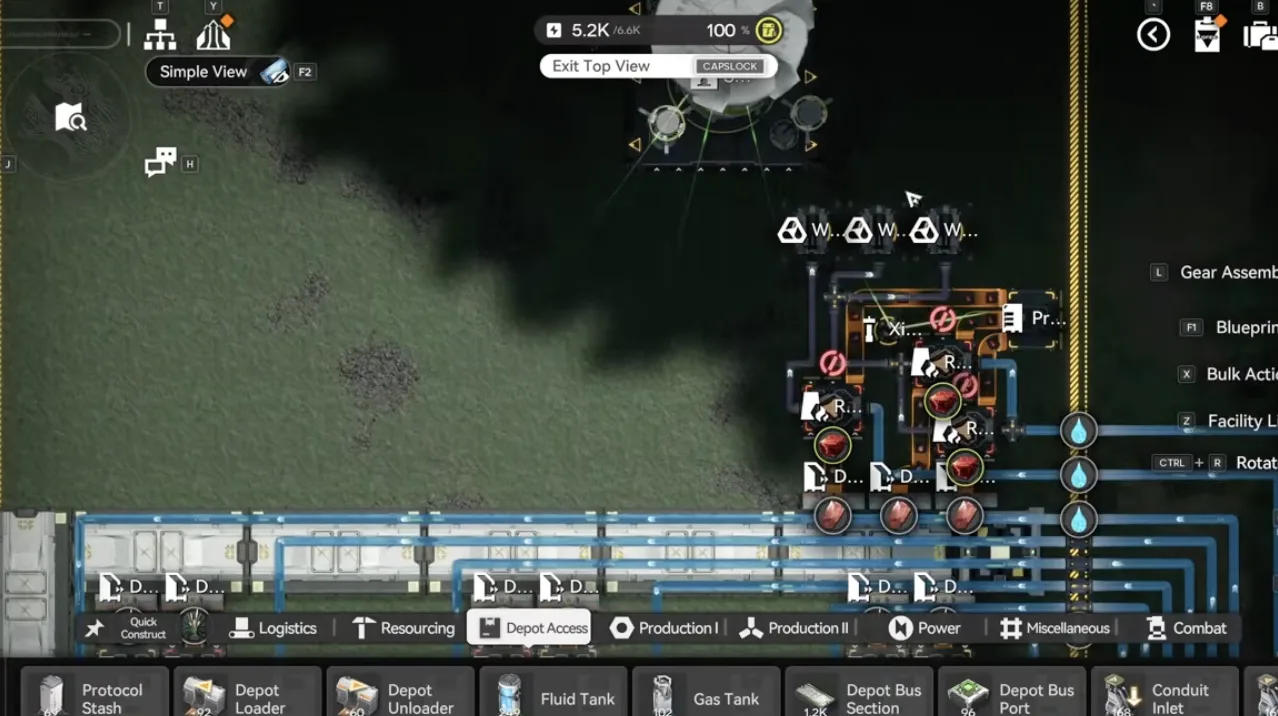
The target: three Cuprium lines and nothing else on the top side
How much work that takes depends on the guide you built from:
- You followed the Part 14 Phase 1 guide. You already removed the Separator Core section. Nothing to do here.
- You are on the Part 13 1.5 base. Delete the small section highlighted below. It is the Separator Core section, the same one Phase 1 removes.
- You are still on the Part 11 1.4 base. This one takes three moves, covered after the picture.
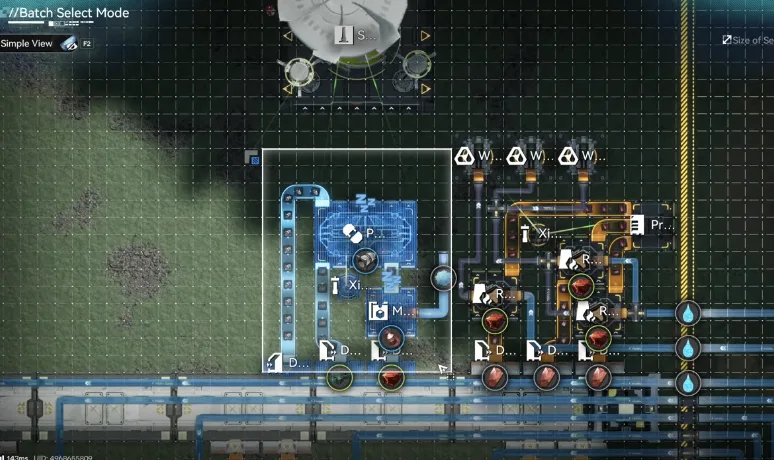
From the 1.5 base: delete this Separator Core section
From the 1.4 base, first disconnect the Inergen conduits and move them away so the clear does not take them with it. Then remove everything on the top side, deploy 1.5 MS Top, and finish by deleting the same small Separator Core section.
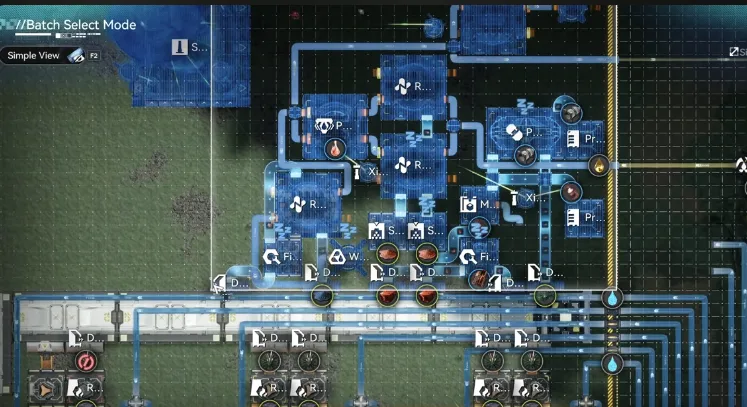
From the 1.4 base: clear the whole top side first
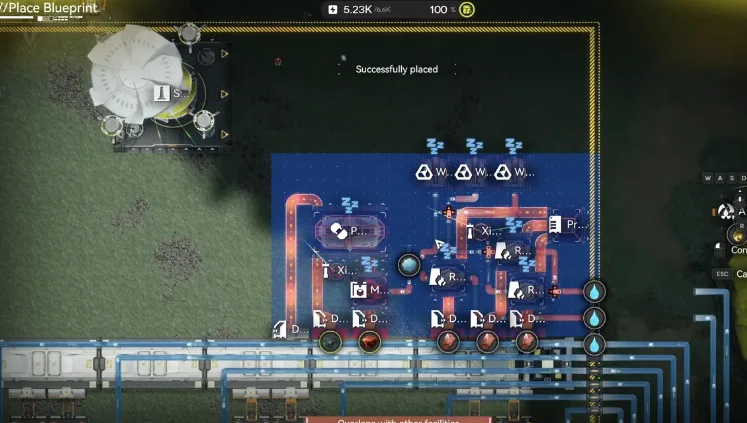
Deploy 1.5 MS Top in its place
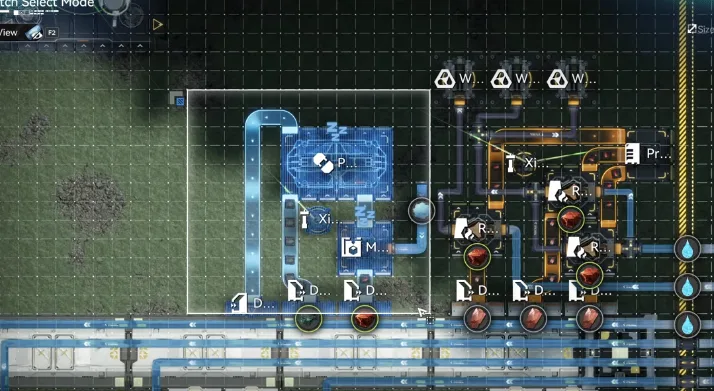
Then delete the Separator Core section, same as the 1.5 route
Step 2: Core AIC Separator Core
On the Core AIC bottom side, the goal is the same whichever route you took: the Separator Core line running and everything else stopped. There are two ways to arrive there.
If you followed the Phase 1 guide
During Phase 1 you either turned this whole area off or removed it.
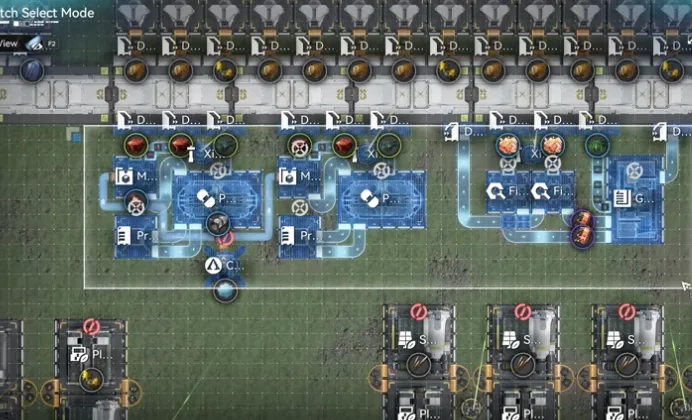
The area Phase 1 switched off or removed
Now turn back on just the small section making two lines of Separator Core. If you deleted the area instead of switching it off, deploy Event Temp there and plug an Inergen conduit outlet into it. That is the outlet Phase 1 told you to move aside rather than delete.
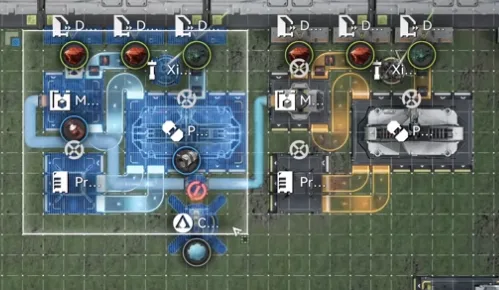
Turn this Separator Core section back on, or deploy Event Temp and plug the Inergen outlet in at the bottom
If you skipped the Phase 1 guide
Your bottom side is still the full build from the 1.4 or 1.5 guide. Turn off everything highlighted here and leave the Separator Core line alone. All you need from this side is its 60 per minute Separator Core.
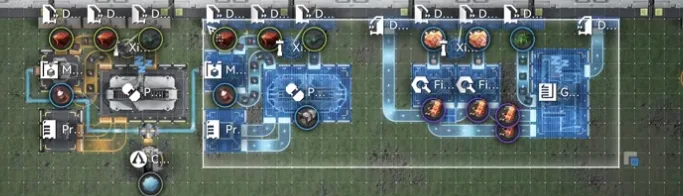
Turn off the highlighted sections, keep the Separator Core line on the left running
Step 3: Empty Yinglung Pass
Everything inside the Yinglung Pass sub AIC gets deleted. Before you do that, move your resource conduits out. These are the conduit outlets wired straight to the inlets that bring in raw resources: Inergen, Xiragen, clean water and acid. Park them outside the area first and you cannot delete them by accident and end up running the source again. The Phase 1 guide shows the same parking move with pictures.
Then empty the sub AIC and move the core to the bottom left for now, out of the way of the first placement.
Step 4: Deploy P2Top and P2Bot
Deploy Event P2Top along the topmost edge of the sub AIC.
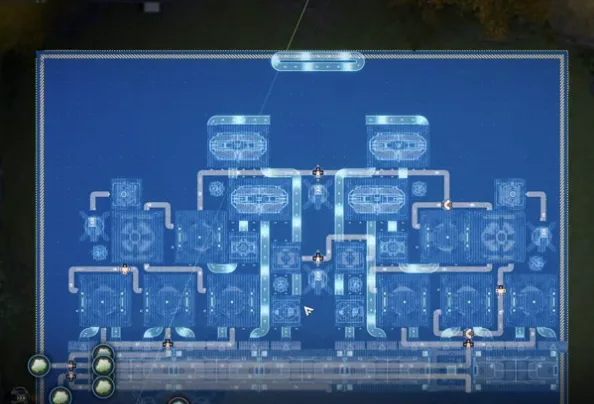
Event P2Top goes on the topmost side
Move the core up to the top side, turned so it takes items horizontally, sitting between the two Packaging Units. Then deploy Event P2Bot right below it, pushed toward the right side.
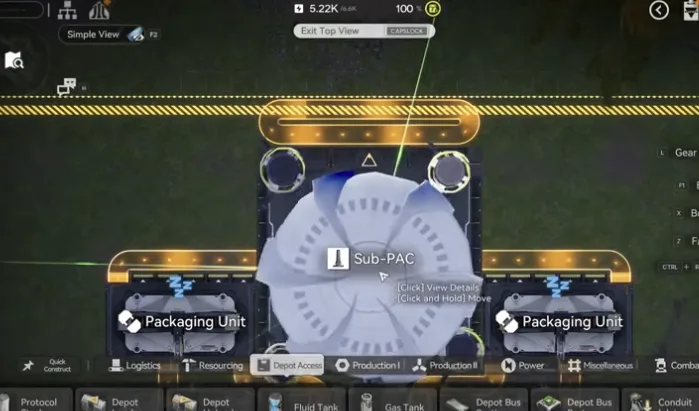
Core on the top side, taking items horizontally
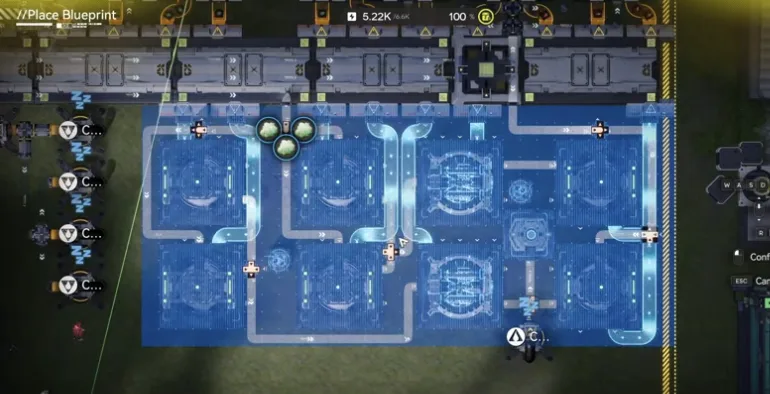
Event P2Bot right below it, toward the right
Step 5: Inergen and Xiragen
The build needs a conduit outlet carrying at least 80 Inergen per minute. That takes at least four Gas Extractors feeding one pipe. The Part 13 base only ran two, so add the extra extractors at the Inergen gas vent before you connect anything.
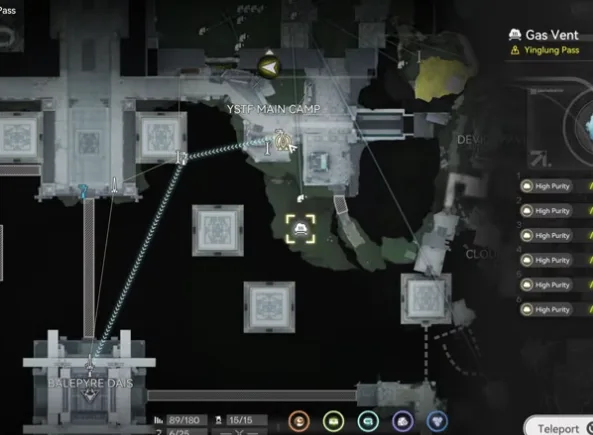
At least four extractors into one Inergen conduit
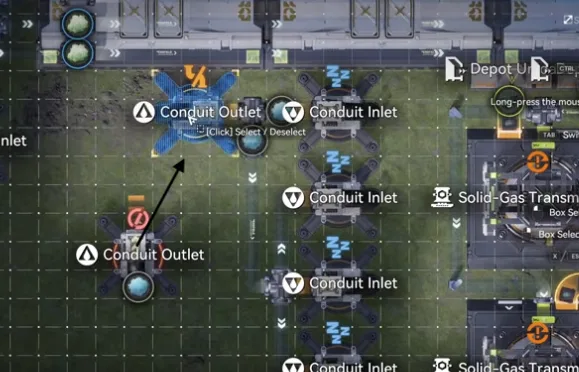
Move the 80 per minute outlet in to replace this one
Move that outlet into position so it replaces the one marked above. Then do the Xiragen. To be precise the build uses 84 per minute, but do not bother building to that number. Plug in the 100 per minute outlet that carries all the Xiragen collected from the North Wuling Exclusion Zone, which the Part 11 guide builds step by step. That completes the Phase 2 build.
Optional: Core AIC Cuprium Fix
One last change, and this one is worth keeping after the event ends. In the center of the Core AIC there are two Cuprium lines that end in Protocol Stashes. Remove those Protocol Stashes and route the items straight into the core with a small belt edit, like the pictures below. It does not have to be tile perfect.
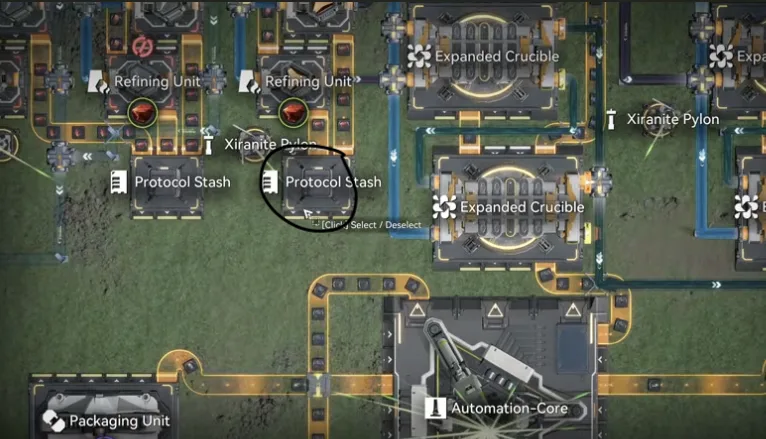
Remove the Protocol Stashes on the two Cuprium lines
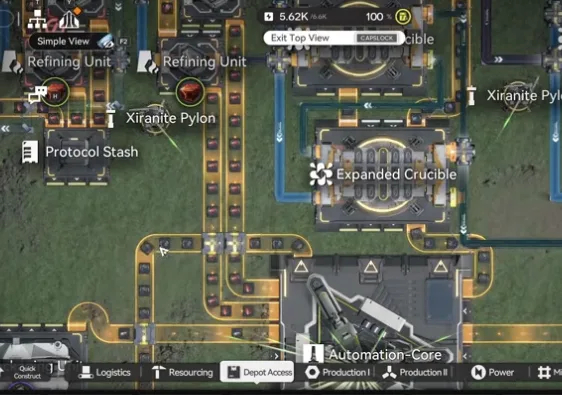
Belt the Cuprium straight into the core instead
With the Cuprium going into the core, this section can never clog, so the battery line's supply is always guaranteed. That is true during the event and after it, which is why it stays. If your Protocol Stashes here look different from the picture, that is the Overflow Protector 2.0 edit, which put them there in the first place.
Production and Shop Math
At full speed the Phase 2 build makes 12 Heavy Xiranite Chubby Lung per minute, which is 720 an hour.
- Stock Bills: all outposts together produce 141,360 Stock Bills an hour, and 12 per minute of Heavy Xiranite Chubby Lung is worth 144,000. The Phase 2 line covers the outposts on its own.
- Certs: roughly 345,600 Fruits of Altruism Certs a day.
- Trimmed event medal: it asks for 20,000 Heavy Xiranite Chubby Lungs submitted, which takes about 28 hours at this rate. The medal also wants 800,000 Certs earned across the event.
- Leftovers: the build leaves 210 Cuprium and 30 Xiranite per minute unused. That is fine unless you are rushing.
The first three rows below are the shop totals from the event. The last two add the Phase 1 shop on top, for players arriving late, at the same 345,600 Certs a day.
| Goal | Certs needed | Days at 12/min |
|---|---|---|
| Phase 2 shop, everything | 1,769,400 | 5.12 |
| Phase 2 shop, skip the final 100 T-Creds | 769,400 | 2.2 |
| Phase 1 shop, everything | ~411,000 | ~1.2 |
| Both shops, skip the final 100 T-Creds | ~1,180,400 | ~3.4 |
| Both shops, everything | ~2,180,400 | ~6.3 |
The final 100 T-Creds entry is the expensive one: it alone accounts for 1,000,000 of the Phase 2 total. Everything else in the Phase 2 shop fits in a little over two days. The event runs until September 30 at 16:00 server time and the Goods Exchange stays open until October 7 at 04:00, so check your own Cert balance against the table and decide which shop lines actually matter to you.
Chill or Rush
If you are chill. You already emptied the Phase 1 shop and deployed the Phase 2 build early. Leave the base exactly as it is and let it run. The two-day figure for the Phase 2 shop, or five days with the T-Creds, is comfortably inside the event window.
If you are in a rush. You are late, usually because you skipped Phase 1. Run the numbers from the table against the time you have left. If you cannot clear the items you want before the event ends, put the leftover 210 Cuprium and 30 Xiranite per minute to work making extra Chubby Lung with the two rush blueprints, Event ExXir and Event P1 Md. Event P1 Md is the same modular block from the Phase 1 guide (each copy eats 120 Cuprium and 60 Xiranite per minute), and the rush setup uses the two blueprints together. This part is only for players who need to catch up. If the table already says you are fine, skip it.
Producing more than your outposts can take will eventually back the line up. The Part 12 overflow protector and the Phase 1 overproduction notes cover both the automatic and the manual fix, and they apply the same way to Heavy Xiranite Chubby Lung.
When the event ends, the factory restore guide puts the base back on the 1.5 layout step by step.